
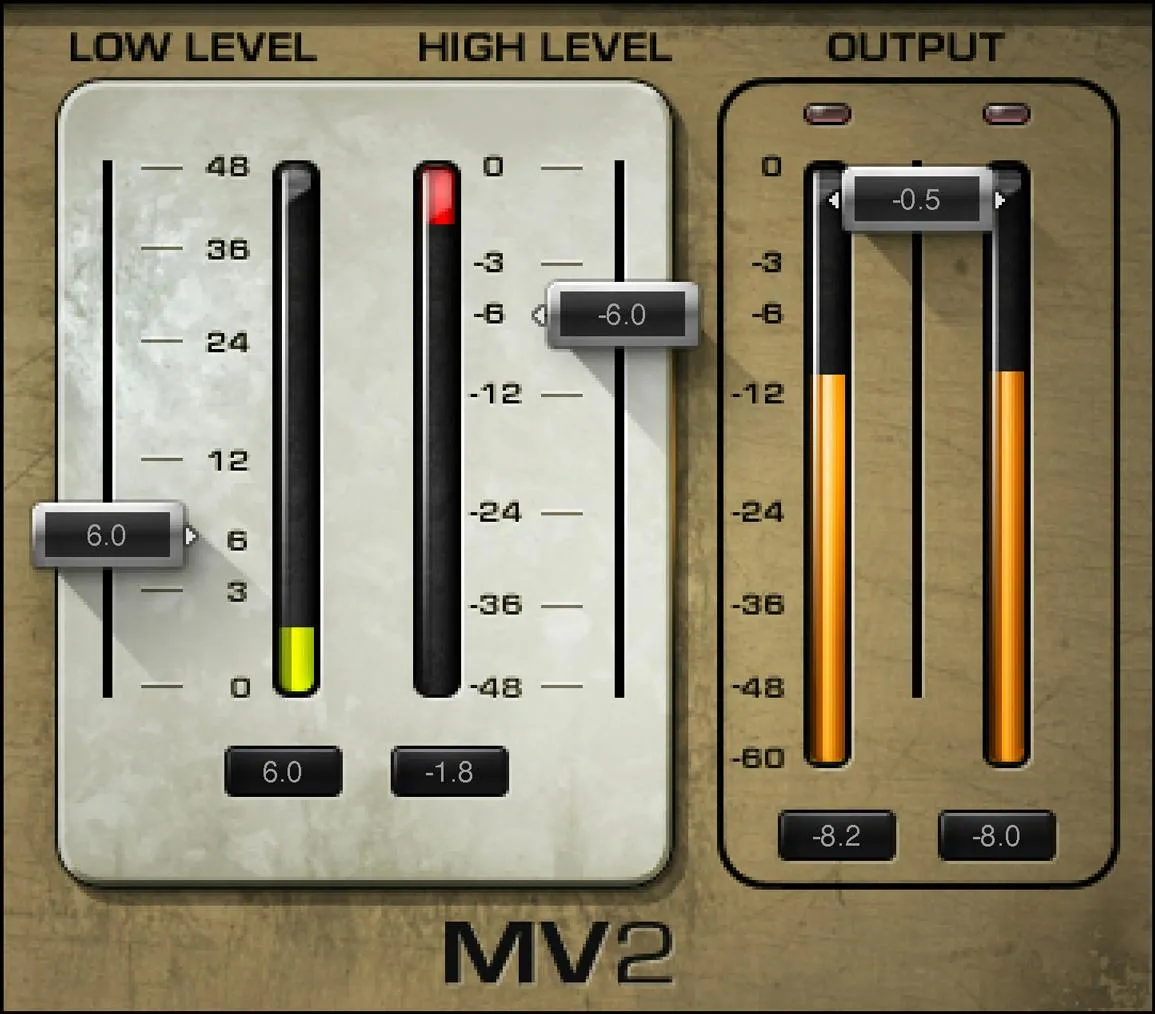
MV2 combines two directions of compression. Low Level raises quieter material from below its threshold. High Level compresses louder material above its threshold and applies automatic makeup gain. Output Gain trims the processed result. That makes MV2 useful when speech or music needs more consistent detail, but raising quiet audio can bring up breaths, hiss and room sound too.
MV2 is a dynamics processor, not an audio repair tool. If a word is buried because the recording is noisy, edit or clean the source first. If only one phrase is low, clip gain may solve it more precisely. If the whole track needs controlled density, MV2 can be a quick next step.
About this guide: this is a documentation-based explanation, not a new listening test or a product-performance ranking. The cover is an AI-generated editorial illustration; the interface image below is official Waves artwork.
What the two directions actually change
Ordinary downward compression reduces the difference between peaks and quieter material by acting above a threshold. MV2's High Level side does that job. Its Low Level side approaches the same gap from underneath: it pushes material below its setting upward while leaving stronger levels alone. You can use either side or combine them.
The two faders are thresholds, not separate volume sliders for “quiet” and “loud” stems. The center meters show what the processing is doing. A larger reading is not automatically better; the right result is the smallest amount that makes the intended material more intelligible or consistent without making noise and breaths distracting.
A sensible first pass
- Insert the mono or stereo MV2 component that matches the track. Start from a neutral/default state rather than an unknown inherited preset.
- Play a representative section that includes soft words or notes, a loud passage and the gaps between them. Adjust Low Level slowly until the quiet detail becomes useful. Listen to the gaps: upward compression can lift room tone and mouth sounds along with the wanted signal.
- Adjust High Level if louder passages still jump out. Its automatic makeup gain can alter the perceived level, so do not judge solely by which version is louder.
- Use Output Gain to bring the processed playback into a fair comparison range. Compare using the host's bypass at matched apparent level and watch the output meter. Clear the documented cut/boost maximum values before checking another passage.
- Recheck the whole program in context. MV2's output meter is not a LUFS or true-peak compliance meter; measure those separately if delivery has a loudness specification.
There is no universal voiceover threshold to paste into every recording. A quiet, close-miked voice and a noisy location recording need different decisions.
Every MV2 control and readout
Low Level: upward-compression threshold
The left fader sets where low-level compression begins. Audio below the set threshold is pushed upward. The MV2 manual prints its control range as 0 to +48 dBFS. That notation is reproduced from the manual; it should not be read as an instruction to drive a digital track above full scale.
Use it when low words, note tails or other wanted details are hard to hear. Listen especially during pauses. MV2 does not know whether a quiet sound is a syllable, a breath, a reverb tail or an air conditioner; all can become more prominent. If noise rises before the wanted detail sounds right, back off and address the source or automate specific phrases.
High Level: downward-compression threshold
The right fader sets the threshold above which MV2 compresses the stronger signal. The manual prints 0 to -48 dBFS. Its high-level section includes automatic makeup gain. That means moving this fader changes dynamics and can also affect loudness; compare at matched perceived level to hear the actual improvement.
It can restrain louder syllables, drum hits or other peaks while Low Level brings quieter content forward. MV2 does not expose a ratio, attack, release or knee control in its documented interface. If you need those choices, use a more adjustable compressor rather than looking for hidden MV2 knobs.
Output Gain: level after processing
The Output Gain fader trims the result. The manual gives a range of 0 to -48 dBFS. Use it to make a fair before/after comparison and avoid sending an unnecessarily hot signal into the next insert. This is an output trim, not a true-peak limiter ceiling. The original manual misspells its label as “Ouput Gain”; the control is described here with the corrected spelling.
Output meters: the outgoing level
The output meter or meters show processed output level; the manual documents 0 to -60 dBFS. The official product image also shows numbers beneath the two output meter columns. They present output values, but the manual does not define their hold or reset behavior; do not assume the cut/boost reset gesture works on them. Watch the meters while setting Output Gain, especially after adding both types of compression. The mono and stereo components provide configurations for their respective tracks. Do not treat these meters or numbers as integrated loudness or true-peak measurements.
Cut / Boost meters: what each compressor is doing
The central meters display gain reduction from the top down and low-level gain boost from the bottom up. Their displayed limits are -48 dB cut and +48 dB boost. They are feedback, not another pair of faders. Watch them alongside the audio: strong boost in a pause may tell you that room noise is being emphasized.
Maximum readouts and reset
Numbers below those meters hold the maximum cut and boost observed. A fast peak can disappear before your eyes get back to the plugin, so these readouts help you catch it. Click anywhere on the cut/boost meter to reset the held values, then play the passage you want to inspect. This click clears the readout; it does not reset the compressor settings.
Dither and mono/stereo: behaviors, not extra faders
The manual says MV2 automatically applies dither and offers separate Mono and Stereo components. Neither is described as an on/off switch inside the processor. Pick the appropriate component from your host's plugin list; do not count them as two different Waves products. If you have a delivery-specific dither or bit-depth workflow, verify it at final export rather than assuming MV2 supplies a configurable final-stage dither processor.
The toolbar at the top
MV2 also has Waves' shared WaveSystem toolbar. It manages the plugin window and settings rather than adding more compression parameters. The WaveSystem guide describes the controls below. Its screenshots are V15; Waves documents a revised V17 preset menu, so installed appearance may differ.
About
Opens identification information about the plugin. It does not alter the sound.
Undo and Redo
Undo steps back through recent changes; Redo restores changes you undid. The shared guide specifies a history of up to 32 actions.
Preset name and menu
The preset name opens Waves' own preset controls. Load a factory or user preset, search for a setting, or save a useful starting point. In the V15 guide, an asterisk beside the name means the loaded preset has changed. Use this Waves menu rather than assuming your host application's preset browser contains the same list.
In V17, clicking the preset name—or double-tapping Shift—opens a newer window. It supports mouse or arrow-key browsing, Enter to load, search by name, and Factory, User and Favorite filters. A star marks a Favorite. Its top bar offers Save, Copy, Paste, Reset to Default, Detach Window and a hamburger menu. Detach keeps the preset window available while browsing; Reset to Default loads the default preset. These are V17 menu functions, not extra MV2 compression controls.
Previous and Next arrows
Step to the neighboring preset without reopening the main menu. Listen at a fair comparison level when auditioning different settings.
Setup A/B
Switch between two versions of the current plugin settings. A/B compares settings within MV2; it is not the host's bypass switch.
Copy A→B or B→A
Duplicate one setup into the other, then alter just one copy. This gives the comparison a common starting point.
Save
Save the current settings as a user preset. Factory presets can be used as starting points but cannot be overwritten.
Toolbar menu
Use it to resize the plugin window and open guides. Available menu items can vary by plugin and version; MV2's manual does not document an Input/Mix lock, Analog Noise toggle or other special MV2 toolbar parameter.
When MV2 is the right choice—and when it is not
For voiceover, MV2 can help keep softer words present after editing and broad level correction. The tradeoff is particularly obvious in home recordings: a little lift can help a final consonant, while too much lift exposes ventilation, breaths and room reflections. Listen in the pauses, not just during speech. That is a workflow suggestion, not a claim that a new MV2 listening comparison was performed for this article.
On music, the same relationship applies to quiet note tails and louder hits. If your main need is a transparent volume ride phrase by phrase, try automation or a rider. If you need detailed timing and ratio decisions, choose a full compressor. If you need a specified final loudness/true-peak ceiling, use and measure with the appropriate downstream tools; MV2 alone does not establish that delivery target.
Related plugins
- Renaissance Vox is a simpler vocal dynamics alternative; the MV2 manual compares its high-level compressor concept to RVox.
- MaxxVolume offers a broader dynamics workflow if MV2's compact controls are not enough. Compare each manual before assuming matching control behavior.
- Vocal Rider addresses vocal level riding rather than substituting for MV2's two-way compression.
Bottom line
MV2's three processing faders are easy to remember: Low Level raises quiet content, High Level controls loud content, and Output Gain trims the result. The meters and resettable maximum readouts show how hard those two directions are working. Bring quiet detail forward only as far as the recording will tolerate; if noise comes up with it, fix the source or target individual phrases instead.
Sources: Waves MV2 User Manual, Waves MV2 product, WaveSystem V15 guide, V17 preset update, image-use condition.
Frequently Asked Questions
What is the difference between Low Level and High Level in Waves MV2?
Low Level applies upward compression below its threshold, bringing quieter material forward. High Level applies downward compression above its threshold and includes automatic makeup gain.
Why can MV2 make room noise and breaths more obvious?
MV2's Low Level section raises signals below its threshold, so quiet noise can rise along with wanted syllables or note tails. Listen during pauses and reduce the upward compression if unwanted detail becomes distracting.
Is MV2 Output Gain a limiter ceiling?
No. Output Gain trims the processed output, while the manual documents no true-peak limiter control or delivery ceiling in MV2.
How do you reset MV2's maximum cut and boost readings?
Click anywhere on the Cut/Boost meter to clear the held maximum cut and boost values. This resets those readouts, not the compressor settings.
Does MV2 have attack, release, ratio, or knee controls?
The documented MV2 interface does not expose those controls. If the job requires detailed timing, ratio, or knee choices, use a more adjustable compressor.
Should you load MV2 Mono or Stereo?
Choose the component that matches the track's channel configuration. Mono and Stereo are two components of the same processor, not different processing modes inside one loaded instance.

About the Author
Joseph Nilo has been working professionally in all aspects of audio and video production for over twenty years. His day-to-day work finds him working as a video editor, 2D and 3D motion graphics designer, voiceover artist and audio engineer, and colorist for corporate projects and feature films.