A dialogue track can peak at -6 dBFS and still sound too quiet.
Another track can peak lower and sound much louder.
That is because a peak meter answers one question:
How close did the signal get to digital clipping?
It does not answer:
How loud does the whole programme feel over time?
LUFS and LKFS were created for that second question.
They help you deliver dialogue that is consistent, intelligible, and appropriate for the destination—without crushing every mix into the same shape.
Quick answer
Use the delivery specification first.
There is no universal LUFS target for every video.
When a client, broadcaster, streaming service, podcast platform, or distributor gives you a loudness specification, use that exact measurement method and target.
When no specification exists, my practical starting point for a dialogue-led stereo web, corporate, course, tutorial, or YouTube video is:
- -16 LUFS integrated for the finished programme; and
- -1 dBTP maximum true peak.
Dense short-form creator content may move toward -14 LUFS.
A cinematic or more dynamic piece may sit lower.
That is a practical production target, not an official YouTube requirement. YouTube's current public upload guide specifies audio format, channels, and 48 kHz sample rate, but it does not publish a LUFS number.
Loudness targets at a glance
| Destination | Loudness target | True-peak limit | What is measured | Important note |
|---|---|---|---|---|
| Web / corporate / course / YouTube with no supplied spec | About -16 LUFS integrated as Joseph's starting point; -14 to -18 may suit the content | ≤ -1 dBTP practical ceiling | Finished programme | Not an official YouTube target |
| Apple Podcasts | Around -16 LKFS ±1 dB | ≤ -1 dB FS true peak | Finished programme | Condition before encoding |
| US TV / ATSC without metadata or prior agreement | -24 LKFS | ≤ -2 dBTP | Dialogue-gated for long form; full programme for short form | Current A/85:2026-07 |
| ATSC streaming exchange with no prior agreement | Choose one target from -23 to -27 LKFS | ≤ -2 dBTP quick-reference ceiling | Depends on content type | Use one consistent service target |
| EBU R 128 | -23 LUFS | ≤ -1 dBTP in linear production | Whole programme | Distribution limits may be lower |
| Netflix branded near-field | -27 LKFS ±2 LU | ≤ -2 dBTP | Dialogue-gated | Netflix-specific delivery spec |
These numbers are not competing opinions about one master.
They belong to different delivery systems.
What LUFS measures
LUFS estimates perceived programme loudness over time.
The measurement applies frequency weighting, channel weighting, and gating defined by the selected standard.
It is not simply an average of the waveform.
It is also not a direct measurement of:
- dialogue clarity;
- intelligibility;
- noise;
- distortion;
- dynamic range quality;
- music balance;
- emotional impact; or
- whether the mix sounds good.
A mix can hit the correct LUFS target and still have buried dialogue, harsh sibilance, pumping compression, distorted peaks, or music that masks every word.
LUFS is a delivery measurement—not a replacement for mixing.
Why peak level is not enough
A short transient can reach a high peak without making the programme feel loud.
A heavily compressed voice can stay below that same peak and feel much louder because more of the programme remains near its maximum level.
That is why two clips with the same peak reading can have very different integrated loudness.
LUFS, LKFS, dBFS, and dBTP
These units answer different questions.
LUFS
Loudness Units relative to Full Scale is the term used in EBU workflows.
It describes absolute loudness on the digital scale.
LKFS
Loudness, K-weighted, relative to Full Scale is the term used in ITU and ATSC contexts.
For ordinary production targets, LUFS and LKFS are numerically equivalent.
A target of -24 LKFS and a reading of -24 LUFS represent the same numerical loudness value when the same measurement method is used.
The larger issue is not the label.
It is whether the meter uses the correct:
- BS.1770 version;
- programme or dialogue gate;
- channel layout;
- measurement duration; and
- target standard.
LU
Loudness Unit describes a relative change.
One LU is a one-decibel change in loudness level.
If a programme measures 2 LU below target, it needs approximately 2 dB of gain to reach the target—assuming no peak or creative problem prevents that move.
dBFS
Decibels relative to Full Scale normally describes sample amplitude.
0 dBFS is the digital ceiling.
A sample-peak meter tells you the highest stored sample value.
dBTP
Decibels True Peak estimates the highest point of the reconstructed continuous waveform.
That point can occur between stored samples.
A file that never reaches 0 dBFS on a sample meter can still exceed 0 dBTP after reconstruction, sample-rate conversion, or lossy encoding.
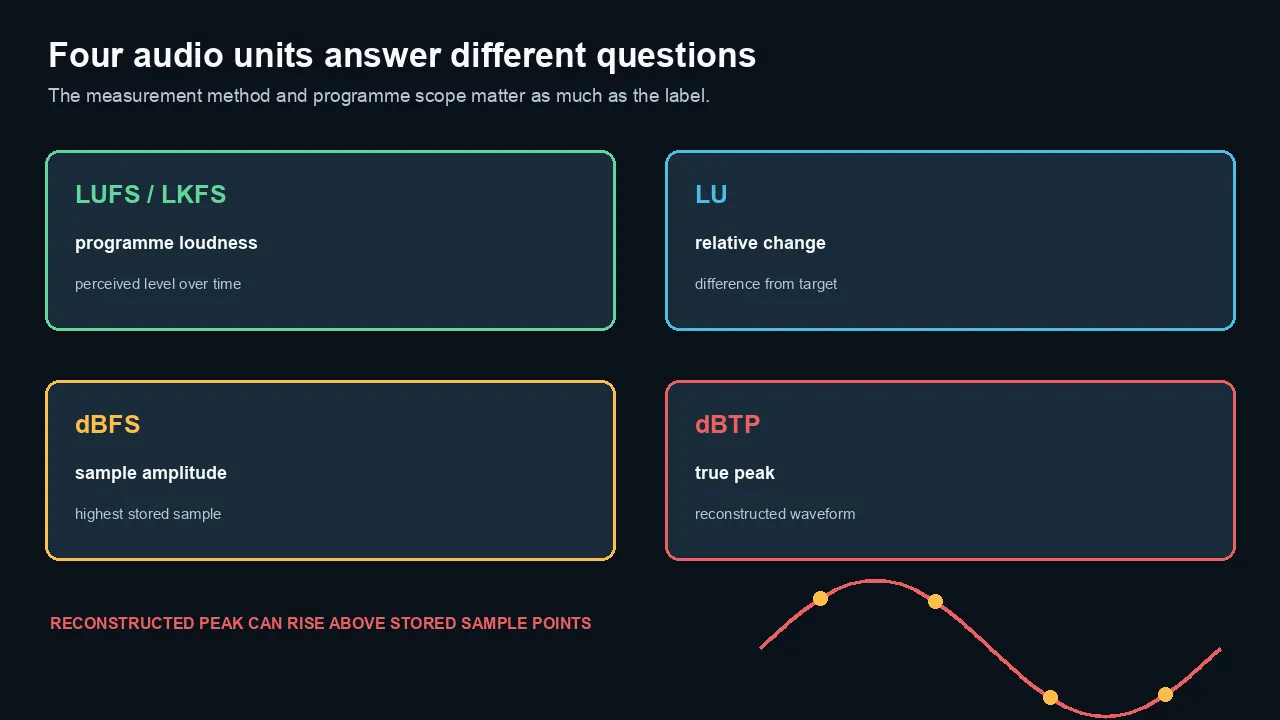
LUFS and LKFS describe programme loudness, LU describes relative change, dBFS describes stored sample amplitude, and dBTP estimates reconstructed true peak.
Integrated, short-term, momentary, and LRA
A loudness meter shows more than one number because each timescale answers a different question.
Integrated loudness
Integrated loudness is the gated average over the complete measurement.
Use it to answer:
Did the finished programme meet its overall delivery target?
Reset the meter before the final pass.
If you start measuring halfway through the timeline or forget to reset after another sequence, the number is not your final programme loudness.
Short-term loudness
Short-term loudness uses a moving three-second window.
It is useful for:
- comparing one sentence with the next;
- spotting a loud guest or quiet pickup line;
- checking the change between scenes;
- judging music under speech; and
- finding sections that make the integrated number misleading.
Do not force every three-second window to the same value.
Natural speech needs movement.
Momentary loudness
Momentary loudness uses a moving 400 ms window.
It reacts quickly to words, syllables, music hits, and short bursts.
It is useful for seeing brief loudness changes, but it moves too quickly to be the main delivery target.
Loudness Range
Loudness Range, or LRA, describes the statistical loudness variation across a programme.
A low LRA often indicates a controlled, dense mix.
A higher LRA may suit documentary, drama, concert, or cinematic work.
LRA is not a quality score.
A talking-head tutorial can be too dynamic for phone listening even if the LRA looks artistically impressive.
A film can be flattened and lifeless even if its integrated number is correct.
The EBU does not recommend LRA for programmes shorter than one minute because there are too few short-term data points.
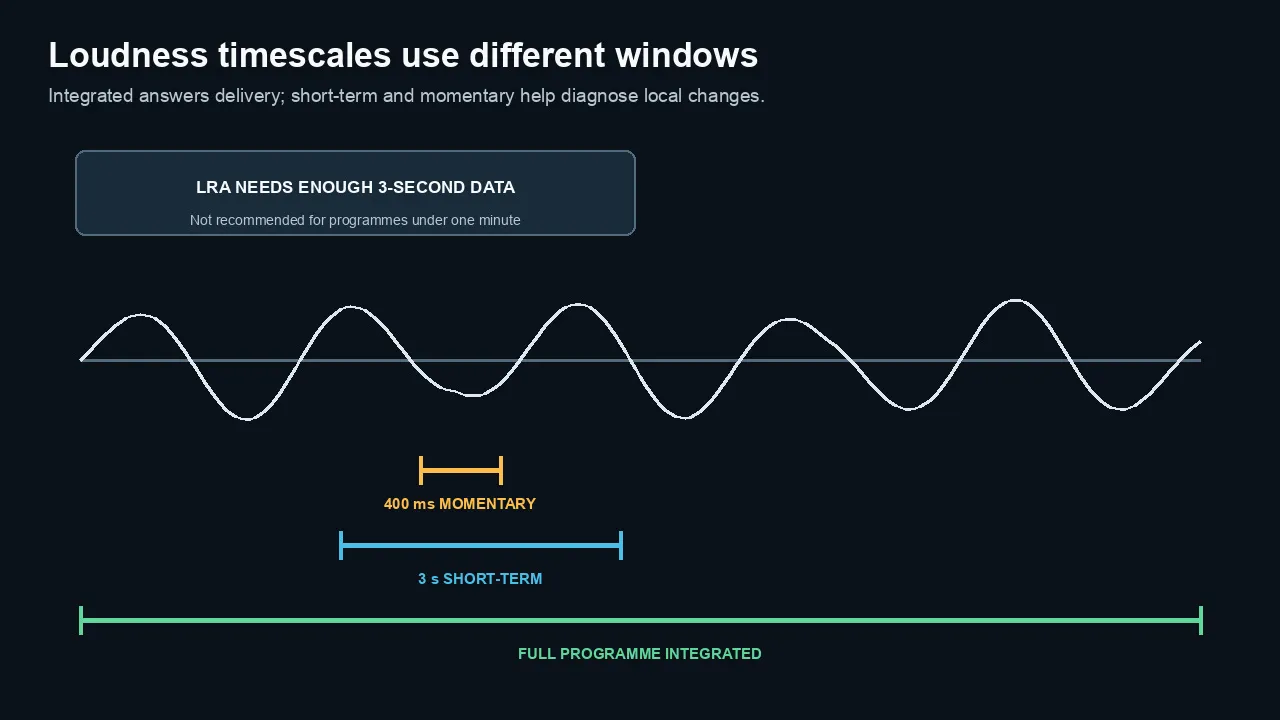
Momentary loudness uses 400 milliseconds, short-term uses three seconds, and integrated loudness covers the complete measured programme.
Why true peak matters
A digital file stores samples.
The playback system reconstructs a continuous waveform between those samples.
The reconstructed waveform can rise above the highest stored sample.
Those are inter-sample peaks.
A true-peak meter estimates them by oversampling or otherwise reconstructing the waveform more precisely.
Why encoding can create a problem
AAC, MP3, Opus, sample-rate conversion, and other processing can change peak structure.
A master that sits close to 0 dBFS may clip after encoding even when the source file looked safe on a sample-peak meter.
That is why Apple asks podcast creators to condition loudness and true peak before encoding.
Practical ceiling for ordinary web video
For dialogue-led web video without another specification, -1 dBTP is a sensible final ceiling.
Use -2 dBTP when:
- the delivery specification requires it;
- the file will pass through aggressive encoding or multiple generations;
- the mix contains sharp transients;
- you want additional safety; or
- a distributor recommends more headroom.
Do not set a limiter to 0 dBFS and assume the encoded file is safe.
Choose the target by destination
The destination decides the target.
Web, corporate, course, tutorial, and YouTube video
YouTube's public upload guide does not publish a LUFS target. Use the YouTube upload bitrate and audio settings guide for the separate encoding decisions.
For dialogue-led work with no client specification, I start around:
- -16 LUFS integrated; and
- -1 dBTP maximum true peak.
This target is loud enough for ordinary laptop, phone, and television playback without forcing every mix into a heavily limited -14 LUFS shape.
Move toward -14 LUFS when the content is deliberately dense and short, such as:
- social ads;
- short creator videos;
- app promos;
- energetic product launches; or
- content designed for noisy mobile environments.
Move lower when the programme needs more dynamics, such as:
- documentary;
- narrative work;
- cinematic branded content;
- music-led films; or
- pieces with intentional quiet sections.
The important rule is consistency across the programme and your own channel or client series.
Apple Podcasts
Apple's current recommendation is approximately:
- -16 LKFS ±1 dB; and
- true peak no higher than -1 dB FS.
Apple asks for this conditioning before encoding.
If a video podcast also ships as audio-only, create and verify the podcast master separately rather than assuming the video mix automatically meets the audio-feed target. The Adobe Podcast versus Premiere Pro guide covers the wider production split.
US television and ATSC
The current A/85:2026-07 default for content delivered without metadata and no prior agreement is:
- -24 LKFS; and
- true peak below -2 dBTP.
Long-form content uses average dialogue as the anchor, measured with dialogue gating over the complete composite programme.
Short-form content uses integrated full-program measurement.
Do not send an unspec'd -16 LUFS web master to a broadcaster and expect it to pass.
EBU R 128
The EBU target is:
- -23 LUFS programme loudness; and
- maximum -1 dBTP during linear production.
The programme is measured in its entirety rather than emphasizing dialogue alone.
The final distribution chain may require a lower peak limit.
Netflix branded near-field delivery
Netflix's current branded-content near-field specification uses:
- -27 LKFS ±2 LU;
- dialogue gating; and
- -2 dB true peak maximum.
This specification belongs to Netflix production and delivery workflows.
It is not a reason to mix an ordinary YouTube tutorial at -27 LKFS.
Streaming-service exchange
The 2026 ATSC update recognizes that streaming services use different operational targets.
When no prior arrangement exists, it recommends selecting one service target between -23 and -27 LKFS and using it consistently.
That is an exchange recommendation for service operators and suppliers—not proof that every consumer platform normalizes user uploads to one value.
Dialogue loudness vs full-program loudness
This is where many loudness guides become misleading.
A dialogue track is not the finished programme
Suppose the voice track measures -16 LUFS by itself.
Then you add:
- music;
- sound effects;
- ambience;
- an intro sting;
- a loud logo animation; and
- thirty seconds with no speech.
The finished programme will not necessarily measure -16 LUFS.
Measure the correct object:
- whole programme for ordinary web video, podcast, Apple, and EBU-style programme targets;
- dialogue-gated composite programme when a delivery spec such as ATSC long-form or Netflix calls for it;
- individual stems or tracks only for diagnosis, consistency, or a stem-specific delivery requirement.
Dialogue-gated does not mean dialogue solo
A dialogue-gated measurement analyzes the composite programme and uses a speech gate to identify appropriate regions.
It is not the same as muting music and effects and measuring the dialogue stem alone.
Follow the meter and method required by the specification.
Why silence matters
Integrated loudness uses gating, so long digital silence does not simply drag the average down in a naïve way.
But programme structure still matters.
A short dense ad and a long documentary with quiet scenes should not be compared by one number without context.
A practical web-video target
For most of my dialogue-led web work, the goal is not maximum loudness.
It is:
- clear speech;
- stable sentence-to-sentence level;
- music that supports rather than masks;
- enough dynamics to sound natural;
- a safe true peak; and
- consistency across a series.
My starting point
For the finished stereo programme:
- target about -16 LUFS integrated;
- keep true peak at or below -1 dBTP;
- allow short-term loudness to move naturally;
- keep the voice intelligible on laptop speakers and a phone; and
- check the mix at a repeatable monitoring level.
This is not a rule that every line must hit one meter value.
It is a starting point for the final programme.
When -14 LUFS makes sense
A denser -14 LUFS mix can suit:
- short ads;
- social clips;
- high-energy explainers;
- music-forward creator content; and
- noisy listening environments.
The tradeoff is reduced headroom and potentially more compression or limiting.
Do not move to -14 simply because a blog calls it the YouTube standard.
When lower is better
A lower integrated level can preserve:
- musical impact;
- cinematic dynamics;
- environmental perspective;
- emotional contrast; and
- natural speech movement.
If the content is intentionally dynamic, the mix can sit below -16 LUFS and still be correct.
How to measure a finished video
Use the same workflow every time.
1. Confirm the target
Write down:
- loudness value;
- LUFS or LKFS label;
- whole-programme or dialogue-gated method;
- true-peak limit;
- channel layout;
- sample rate;
- deliverable duration;
- required meter/standard version; and
- any tolerance.
Do not start with a generic preset when the client supplied a spec.
2. Finish the editorial audio
Before the final loudness pass:
- complete dialogue edits;
- add room tone;
- set clip gain;
- repair obvious noise and damage;
- place music and effects;
- create automation; and
- remove temporary tracks.
A loudness reading from an unfinished timeline is temporary.
3. Place the meter on the final output path
The meter should see everything that reaches the export.
In a stereo mix, that usually means the final mix bus or master output.
Check for:
- tracks bypassing the bus;
- nested sequences with separate routing;
- hardware outputs not included in export;
- post-fader versus pre-fader placement; and
- effects placed after the meter.
If a limiter sits after the meter, the true-peak reading is not final.
4. Reset the meter
Clear the integrated measurement before the pass.
Confirm the correct preset, unit, gate, and channel layout.
5. Measure the complete programme
Play the entire sequence or use a trustworthy offline loudness scan.
Do not loop the loudest sentence and call that integrated loudness.
6. Record the result
At minimum, record:
- integrated loudness;
- maximum true peak;
- short-term high and low regions;
- LRA for programmes long enough to make it meaningful;
- meter/version;
- measurement mode; and
- date.
7. Correct the mix
If the programme is uniformly 2 LU low and has enough headroom, a 2 dB gain increase may be appropriate.
If only some scenes are low, fix those scenes.
If the mix is too loud because music or effects dominate, reduce or automate those elements rather than turning down the entire programme blindly.
8. Measure again
Reset and run the complete pass again.
9. Export and verify
Measure or inspect the final encoded file.
Check:
- loudness;
- true peak;
- channel layout;
- sample rate;
- sync;
- start/end;
- fades;
- metadata; and
- audible codec distortion.
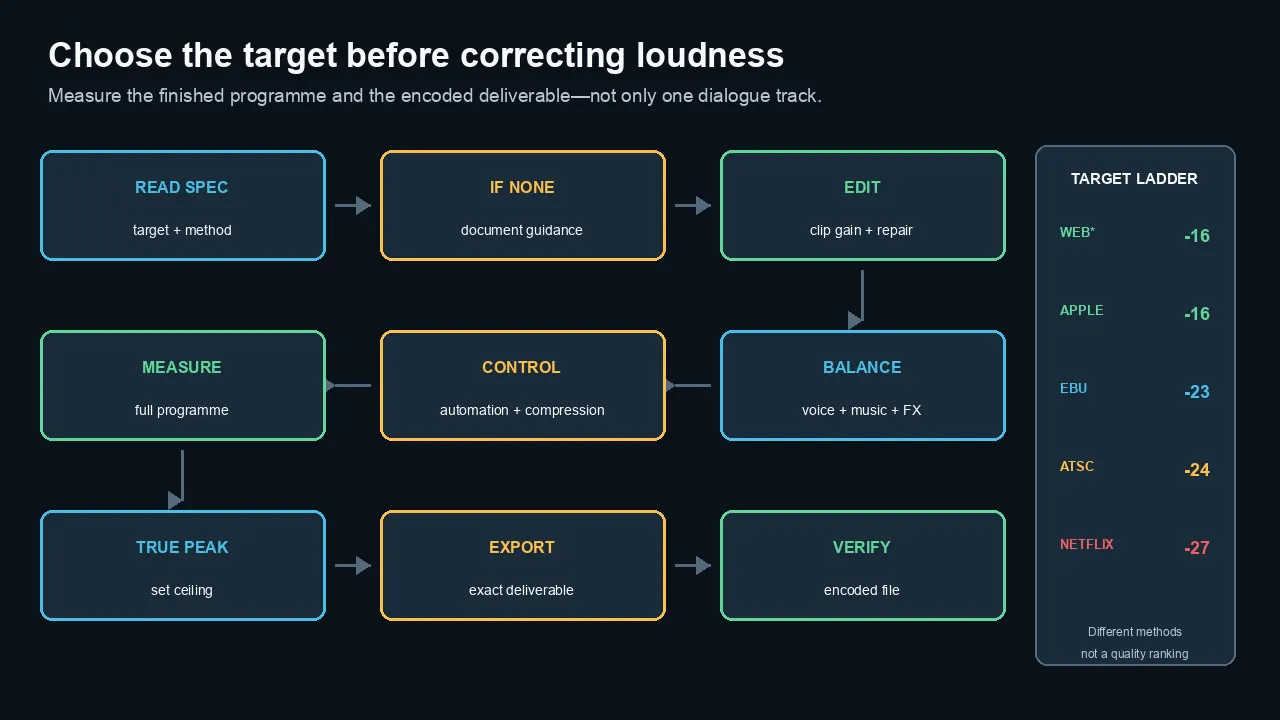
Choose the delivery method first, mix and measure the finished programme, set the required true-peak ceiling, then verify the encoded deliverable.
How to reach the target without crushing the mix
A limiter is not the first loudness tool.
Start with clip gain
Clip gain fixes recording-level differences before compression.
Use it to bring quiet and loud dialogue clips into the same working range.
This lets the compressor respond more consistently.
Edit and automate
Use volume automation for:
- quiet words;
- loud laughs;
- sentence endings;
- off-axis phrases;
- scene changes;
- music transitions; and
- sound-effect hits.
Automation is often more transparent than asking one compressor to solve every level problem.
Compress for consistency
Compression can reduce the gap between quiet and loud speech.
For dialogue, start gently.
Listen for:
- pumping room noise;
- louder breaths;
- dulled consonants;
- exaggerated mouth noise;
- flattened emphasis; and
- music ducking caused by bus compression.
Use the compressor to shape dynamics—not to chase a LUFS number by itself.
Use a limiter for final peak control
A true-peak limiter can catch remaining peaks and establish the ceiling.
If the limiter is reducing several decibels throughout the programme, return to the mix.
Heavy limiting can create:
- distortion;
- pumping;
- harshness;
- lost transients;
- reduced depth; and
- listener fatigue.
Normalize after the mix, not instead of the mix
Loudness normalization can move a finished balanced programme to the required level.
It cannot repair:
- buried dialogue;
- inconsistent clips;
- poor music balance;
- clipping;
- harsh EQ;
- excessive compression; or
- a wrong measurement method.
Dialogue, music, and effects balance
The integrated target includes more than the voice in a normal web mix.
Establish the voice first
Make the dialogue consistent before mixing music around it.
Check the voice on:
- studio monitors;
- headphones;
- laptop speakers;
- a phone; and
- a television when the project matters.
The words should remain understandable without turning the master into a brick.
Place music under the message
Do not use one fixed music level for an entire project.
Automate around:
- dense phrases;
- pauses;
- transitions;
- emotional moments;
- title cards; and
- outros.
If the programme is too loud because music is high, do not lower the dialogue to save the integrated number.
Preserve ambience
Dialogue cleanup can collapse the room between phrases.
Use consistent room tone and ambience to hide edits and keep the voice connected to picture.
A technically compliant silent background can sound less natural than a controlled noise floor.
Watch short-term loudness
Integrated loudness can hide one scene that is much louder than the rest.
Use short-term readings to find:
- a guest microphone that jumps forward;
- an intro twice as loud as the programme;
- music that swallows one section;
- a quiet pickup line; or
- a loud sponsor segment.
Premiere Loudness Meter workflow
Premiere includes a Loudness Meter effect. The Premiere Pro Essential Sound workflow is a separate track-level editing and mixing guide.
Adobe's current meter shows:
- input/true-peak information;
- momentary loudness;
- short-term loudness;
- integrated loudness; and
- loudness range.
The meter does not change the audio.
Basic setup
- Open the Audio Track Mixer for the sequence.
- Place Loudness Meter on the final mix/master path.
- Open the effect editor.
- Set the unit, target loudness, maximum true peak, and scale.
- Reset integrated loudness.
- Play the complete programme.
- Record integrated and true peak.
- Adjust the mix.
- Reset and repeat.
- Verify the encoded export.
Choose the preset carefully
A broadcast preset is not automatically right for YouTube.
A podcast target is not automatically right for television.
Create named presets that include the destination and measurement method, such as:
Web Dialogue -16 LUFS / -1 dBTP;Apple Podcast -16 LKFS / -1 TP;ATSC -24 LKFS Dialogue Gated / -2 dBTP;EBU R128 -23 LUFS / -1 dBTP; andNetflix Near Field -27 LKFS Dialog / -2 dBTP.
Only create a preset when the meter supports the required gate and standard.
Meter placement matters
If you insert the meter before the final limiter, EQ, gain, or master fader, it may not show the exported result.
Inspect the exact signal path. For more specialized analysis and handoff work, see what Adobe Audition adds.
When a paid meter such as WLM Plus helps
A built-in compliant meter is enough for many projects.
Do not buy another meter merely to display the same integrated number.
A dedicated cross-host tool can help when you need:
- the same meter in Premiere, Logic, and other supported hosts;
- ITU, EBU, and ATSC presets;
- clear target warnings;
- simultaneous loudness timescales;
- loudness range;
- true-peak metering;
- gain and trim correction;
- a true-peak limiter in the same workflow; or
- repeatable settings across client deliverables.
Waves describes WLM Plus as a loudness meter and correction tool for broadcast, video, trailers, games, and packaged media.
Use WLM Plus as a meter, not an excuse
Even when a tool can trim loudness and limit peaks, listen to the result.
Automatic correction can move the programme to the number.
It cannot decide whether:
- the dialogue is masked;
- the music is too loud;
- the compression is audible;
- the ambience is broken;
- the target is appropriate; or
- the client supplied a different spec.
Check the export, not only the timeline
The timeline is not the final file. The Digital Video Explained guide maps this audio check into the wider capture-to-display chain.
Export can change:
- sample rate;
- codec;
- channel layout;
- gain;
- peak structure;
- metadata;
- head/tail duration; and
- sync.
Verify the final encoded file
For important deliveries:
- export the exact deliverable;
- reopen it in a meter or analysis tool;
- confirm duration and sync;
- measure integrated loudness;
- check maximum true peak;
- verify channels and sample rate;
- listen to the beginning, loudest section, quietest dialogue, and end; and
- compare against the written specification.
Lossy encoding headroom
A file that reaches the ceiling before AAC or MP3 encoding may exceed it afterward.
That is one reason to retain true-peak headroom.
If the client accepts only a lossy deliverable, measure the encoded file—not only the uncompressed intermediate.
Keep the master
Deliver the required file, but keep a clean high-quality master and the project.
Do not use a downloaded streaming copy as the new production master.
Common loudness mistakes
Mistake 1: Treating -14 LUFS as an official YouTube rule
YouTube's public upload guide does not currently list a LUFS target.
Use -14 only when it suits your content and workflow, not because it is presented as a mandatory upload specification.
Mistake 2: Measuring dialogue solo for a full-program target
Music and effects change the final programme loudness.
Measure the object required by the spec.
Mistake 3: Measuring the wrong duration
Integrated loudness requires the complete intended programme or the exact measurement window defined by the delivery standard.
Mistake 4: Forgetting to reset the meter
Old playback contaminates the new integrated value.
Mistake 5: Looking only at integrated loudness
Check true peak, short-term variation, loud scenes, quiet dialogue, channels, and the encoded file.
Mistake 6: Using a sample-peak limiter as true-peak protection
A sample ceiling does not guarantee that inter-sample peaks remain below the delivery limit.
Mistake 7: Limiting the entire mix into compliance
If the limiter is always working, fix the mix.
Mistake 8: Using the same target for every destination
Web, podcast, ATSC, EBU, and Netflix specifications are different.
Mistake 9: Ignoring stereo and downmix behavior
A stereo mix can become louder, quieter, or phasey when folded down.
Measure and listen to every required channel version.
Mistake 10: Trusting one number more than the ears
A compliant meter cannot hear a buried word, unnatural noise reduction, or a distracting music cue.
The practical bottom line
Use the specification when one exists.
When no specification exists, choose a repeatable target that fits the audience and content.
For a typical dialogue-led web video, I start around:
- -16 LUFS integrated; and
- -1 dBTP true peak.
Then I listen.
I check the voice against music and effects.
I watch short-term consistency.
I preserve enough dynamics to sound natural.
I measure the full programme, export it, and verify the final file.
The goal is not the loudest waveform.
The goal is dialogue that arrives at the intended level, remains clear on real playback systems, and survives the delivery chain without clipping or forcing the listener to reach for the volume control.
Frequently asked questions
What LUFS should a video be?
Use the delivery specification first. When no specification exists, a practical starting point for dialogue-led web video is about -16 LUFS integrated with true peak at or below -1 dBTP. Dense short-form content may move toward -14 LUFS, while cinematic content may sit lower.
What LUFS should dialogue be for YouTube?
YouTube's current public upload-encoding guide does not publish a creator-facing LUFS target. Measure the finished programme rather than forcing the dialogue track alone to a number. For an unspec'd dialogue-led YouTube mix, -16 LUFS integrated and -1 dBTP is a practical starting point, not an official YouTube requirement.
Is -14 LUFS the YouTube standard?
Do not present it as an official YouTube upload standard. -14 LUFS is a common practical target for dense online content, but YouTube's public upload guide currently specifies audio format, channels, and 48 kHz rather than a LUFS value.
Are LUFS and LKFS the same?
For ordinary production targets, LUFS and LKFS are numerically equivalent. LUFS is common in EBU terminology, while LKFS is common in ITU and ATSC contexts. The measurement version, gate, programme duration, and channel configuration still matter.
What is integrated LUFS?
Integrated loudness is the gated average loudness over the complete measurement. Use it to judge whether the finished programme meets its overall target.
What is short-term LUFS?
Short-term loudness is a moving three-second measurement. It is useful for comparing scenes, sentences, guests, music sections, and local loudness changes.
What is momentary LUFS?
Momentary loudness uses a moving 400 ms window. It reacts quickly to individual words and brief events, so it is useful for diagnosis but not normally the final programme target.
What is true peak?
True peak estimates the highest point of the reconstructed continuous waveform, including peaks that can occur between stored samples. It is shown in dBTP and can reveal clipping risk that a sample-peak meter misses.
Should I use -1 or -2 dBTP?
Use the delivery specification. -1 dBTP is a practical ceiling for ordinary web and podcast work. ATSC and Netflix specifications commonly use -2 dBTP. Additional headroom can help with lossy encoding and multigeneration delivery.
Why does my audio peak high but still sound quiet?
Peak level shows the highest brief amplitude, not the average perceived loudness. A dynamic recording can have high peaks and low integrated loudness. Use clip gain, automation, controlled compression, and programme loudness metering rather than peak level alone.
Should I normalize dialogue before or after compression?
Set clip gain and edit first, then use compression and automation to control dynamics. Measure the finished mix and apply final loudness correction and true-peak limiting near the end. Do not replace the mix with one normalization step.
Does loudness normalization improve audio quality?
It changes level. It does not repair noise, clipping, distortion, harsh EQ, buried dialogue, poor music balance, or unnatural compression.
Is Waves WLM Plus necessary for video loudness?
No. A compliant built-in meter may be sufficient. WLM Plus becomes useful when its cross-host workflow, standards presets, warnings, correction controls, loudness views, and true-peak limiter solve a real production need.
Official sources reviewed
- ITU-R BS.1770-5
- ATSC A/85:2026-07 and Annex M quick reference
- EBU R 128 version 5.0 (November 2023)
- Netflix Sound Mix Specifications and Best Practices v1.6
- Apple Podcasts audio requirements
- YouTube recommended upload encoding settings
- Adobe Premiere Loudness Meter documentation
- Waves WLM Plus product documentation and user guide

About the Author
Joseph Nilo has been working professionally in all aspects of audio and video production for over twenty years. His day-to-day work finds him working as a video editor, 2D and 3D motion graphics designer, voiceover artist and audio engineer, and colorist for corporate projects and feature films.