
You upload a clean video to YouTube.
It looks sharp on your computer. The color is right. The motion is smooth.
Then YouTube finishes processing it.
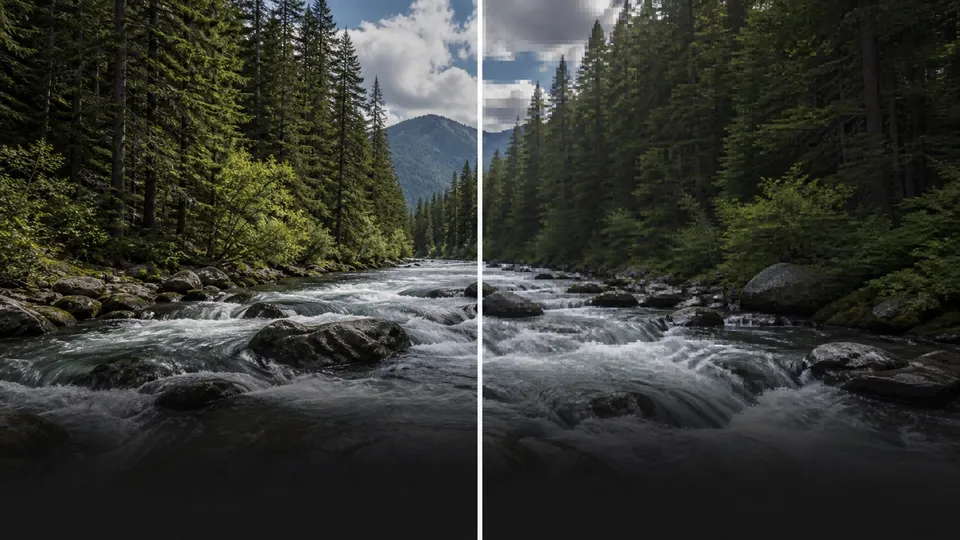
Leaves turn into mush. Film grain crawls. Dark areas become blocky. Fine text loses its edges. Smooth skies show bands that were not obvious in the master.
YouTube did not misplace your original pixels.
It made new versions of your video for streaming. That process removes data, and some images are much harder to compress than others.
Quick answer
YouTube re-encodes every upload. It creates multiple versions for different resolutions, devices, codecs, and connection speeds.
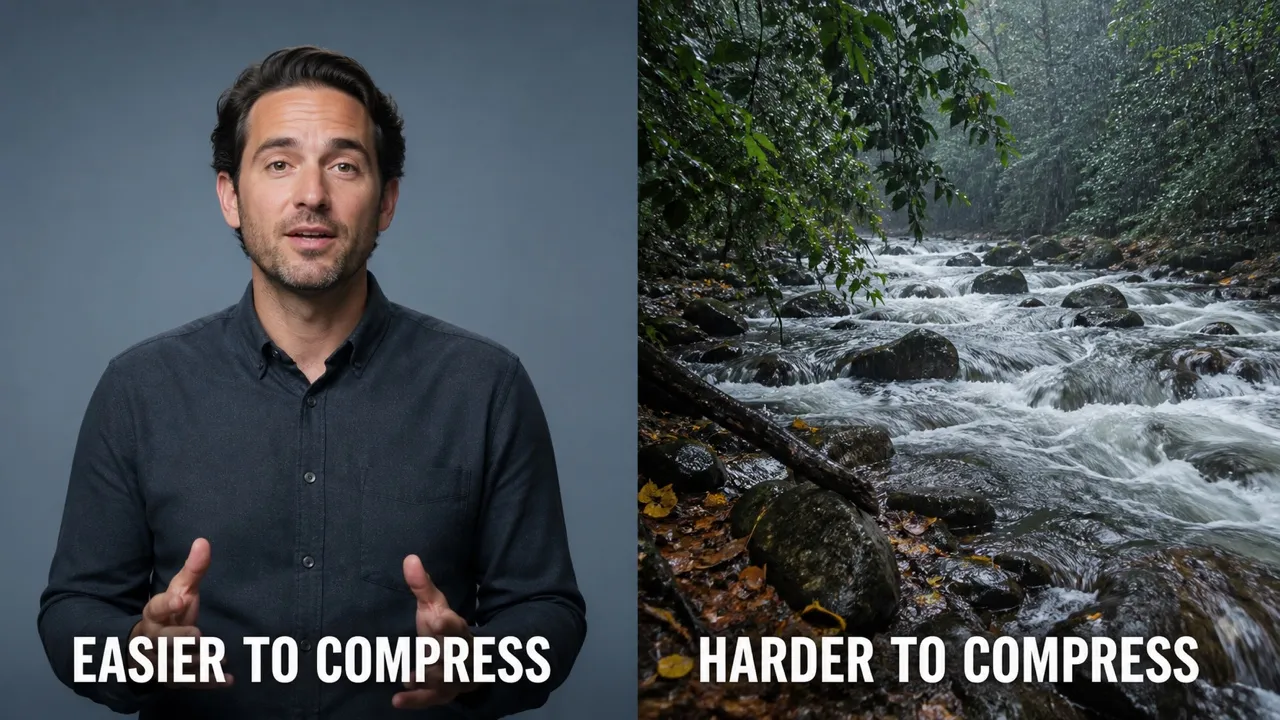
Simple images often survive this well. A steady talking head against a clean background is relatively easy to compress.
Fast motion, water, foliage, confetti, grain, camera noise, dark detail, gradients, and small screen text are harder. When a scene asks for more data than the stream can carry, the encoder has to simplify it.
The best defense is not one magic export preset.
Start with a clean source. Avoid unnecessary re-encoding. Match the source frame rate. Use progressive video and a sensible variable bitrate. Control noise and sharpening. Wait for high-resolution processing to finish. Then inspect the actual YouTube stream at the resolution your viewers will use.
First, make sure compression is the real problem
Not every soft YouTube video is a compression failure.
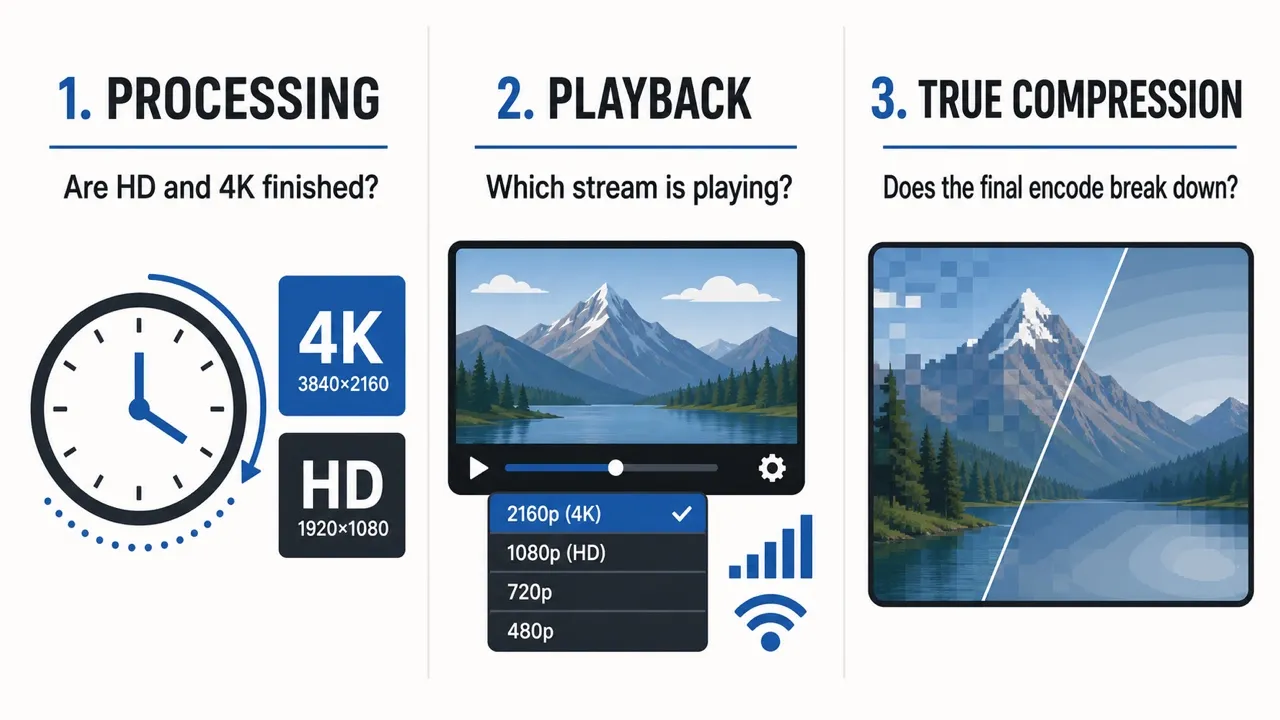
Before you rebuild the export, identify which stage is causing the problem.
| What you see | Most likely cause | What to check first |
|---|---|---|
| Only 360p or 720p is available soon after upload | Higher-resolution processing is not finished | Wait until 1080p, 1440p, or 4K appears in the Quality menu |
| The video looks sharp at 4K but soft on Auto | The player selected a lower stream | Manually choose the intended playback resolution |
| The exported file already looks bad locally | Source, timeline, scaling, or export problem | Fix the local master before uploading again |
| Motion breaks apart but static shots look fine | The scene is exceeding the stream’s practical bit budget | Check motion, noise, detail, frame rate, and playback resolution |
| Color looks washed out, too dark, or too bright | Color-space or HDR/SDR mismatch | Check tags, sequence color space, tone mapping, and display path |
| Small text looks soft while camera footage looks acceptable | Resolution, scaling, chroma subsampling, or UI design | Capture and export at the native screen resolution; enlarge important text |
| Dark areas pulse or form blocks | Noise and low-light detail are difficult to compress | Reduce noise, avoid lifting underexposed footage too far, and check the master |
| Skies and gradients show bands | Limited bit depth, aggressive compression, or a stressed gradient | Check the source bit depth and avoid overprocessing smooth gradients |
YouTube says new uploads become available in lower quality first. Higher-quality versions can take longer to process, especially at 4K or high frame rates.
Do not judge the final image while only a low-resolution stream is available.
Also check the player itself.
YouTube’s Auto setting can choose a lower playback resolution based on the device, connection, viewport, and current conditions. A finished 4K upload can still begin playback at 720p or lower.
Use Stats for nerds
On the desktop player, right-click the video and choose Stats for nerds.
Look at:
- Current / Optimal Res
- Codecs
- Viewport / Frames
- Dropped Frames
- Connection Speed
The most important first check is Current / Optimal Res.
If you are judging a 4K upload while YouTube is serving a 720p stream, you are not evaluating the best processed version.
What YouTube does after you upload a video
YouTube does not simply store your upload and send that exact file to every viewer.
It builds a delivery system around it.
The basic path looks like this:
- You upload one source file.
- YouTube analyzes and re-encodes it.
- It creates multiple streaming versions.
- The player chooses a version for the current device and connection.
- The device decodes and displays that stream.
Those versions can differ in resolution, bitrate, and codec.
A viewer on a television with fast internet may receive a very different stream from someone watching on a phone over a weak mobile connection.
This is necessary.
A pristine production master may be hundreds of megabits per second. It is far too large for normal streaming at YouTube’s scale.
The tradeoff is that the final YouTube stream is a new compressed generation, not your original master.
Compression is a budget
A video encoder has a limited amount of data to describe each moment.
It looks for repeated information within a frame and across nearby frames. It spends fewer bits on predictable areas and more bits where the image changes.
When the scene is simple, that system works remarkably well.
When the scene is chaotic, the encoder has to make harder choices.
It may soften texture, merge nearby tones, simplify motion, remove grain, or break an image into visible blocks.
That is why two videos exported with the same settings can look different after YouTube processes them.
Why some videos compress better than others
Consider two shots.
The first is a locked-off interview. The background is soft. The lighting is clean. Most of the frame barely changes.
The second is a drone moving over a forest after rain. Every leaf has texture. Water is moving. The camera is moving. The shadows contain noise.
The interview gives the encoder many predictable pixels.
The forest gives it millions of small changes.
Resolution alone does not describe that difference. Image complexity does.
Easy images
These tend to compress well:
- clean talking-head footage;
- large flat backgrounds;
- slow or locked camera moves;
- well-lit images with low noise;
- bold graphics with generous edges;
- limited movement inside the frame; and
- shallow depth of field with a soft background.
Difficult images
These tend to reveal compression quickly:
- grass, leaves, gravel, hair, fabric, and water;
- confetti, snow, rain, smoke, and particles;
- fast pans and rapid gameplay;
- film grain and camera noise;
- underexposed footage lifted in post;
- smooth gradients and skies;
- tiny interface text and thin lines;
- oversharpened edges; and
- footage that has already been compressed several times.
This does not mean you should avoid detailed or textured images.
It means they need a cleaner path into the final encode.
The eight biggest YouTube compression problems
1. Film grain and camera noise
Grain changes from frame to frame.
To a compression system, that looks like constant motion across much of the picture.
The encoder spends data trying to preserve a random pattern. When it runs out of room, the pattern can smear, crawl, clump, or disappear.
Noise is usually worse than intentional grain. Chroma noise in dark footage can create ugly blocks and shifting color.
Practical fixes:
- expose cleanly in camera;
- use noise reduction before adding creative grain;
- resize before applying final grain;
- keep grain subtle for a streaming version; and
- check the processed result during motion, not only on a paused frame.
2. Fine random detail
Foliage, grass, water, gravel, brick, hair, and textured fabric contain a large amount of high-frequency detail.
That detail becomes especially difficult when the camera or subject moves.
A forest can look sharp on a paused frame and turn soft the moment the camera pans.
Practical fixes:
- avoid excessive sharpening;
- use a higher-resolution source when it is genuinely available;
- give the upload enough bitrate;
- use slower, controlled camera moves when the shot allows; and
- review the processed stream during the most detailed movement.
3. Fast or chaotic motion
Compression works partly by predicting how parts of the image move between frames.
A slow pan across a simple wall is predictable.
A first-person game, handheld concert shot, water splash, or confetti cannon is not.
When motion becomes complex, blocking and smearing become easier to see.
Practical fixes:
- use the source frame rate rather than converting it unnecessarily;
- give high-frame-rate footage the bitrate it needs;
- avoid adding artificial sharpening to fast footage;
- inspect rapid turns, transitions, and particle effects; and
- consider whether 60 fps is helping the content or simply doubling the frames that must be described.
4. Dark footage and lifted shadows
Dark footage often contains sensor noise.
When you raise underexposed shadows in post, you reveal that noise along with the subject.
The result may look acceptable in a high-bitrate master but fall apart in a streaming encode.
Practical fixes:
- protect exposure during capture;
- reduce chroma noise before compression;
- avoid crushing and then re-lifting shadows through multiple transforms;
- check the grade on a calibrated or dependable display; and
- make a dedicated streaming version if the master uses aggressive texture in the shadows.
5. Smooth gradients and banding
A clean sky, studio wall, spotlight falloff, or motion-graphics gradient can use many subtle tonal steps.
Compression may merge those steps.
The result is banding: visible rings or stripes where the transition should be smooth.
An 8-bit source can show banding before YouTube touches it. A second lossy encode can make it more obvious.
Practical fixes:
- work in a higher-bit-depth pipeline where the source and software support it;
- avoid extreme gradient stretching;
- add only a very small amount of controlled dither when appropriate;
- do not remove all texture and then expect an 8-bit gradient to remain perfectly smooth; and
- check skies, fades, glows, and large soft backgrounds after processing.
6. Screen recordings and small text
Software tutorials are a special case.
Small type, thin icons, one-pixel lines, and sharp color boundaries are much less forgiving than normal camera footage.
A browser window that is readable in the editing application may become uncomfortable after scaling and 4:2:0 delivery.
Practical fixes:
- capture at the native display resolution;
- avoid fractional scaling when possible;
- enlarge the application UI or browser zoom;
- design callouts with thicker lines and larger text;
- keep important text away from a noisy background;
- use 30 fps when the content does not need 60 fps; and
- upload at a resolution that preserves the interface cleanly.
7. Repeated lossy exports
Every lossy encode makes decisions about what information to discard.
If you export H.264, re-import it, add a change, export H.264 again, send it through another service, and then upload that file to YouTube, the damage accumulates.
This is generation loss.
Practical fixes:
- return to the original timeline for revisions;
- keep camera originals and high-quality graphics;
- use ProRes, DNxHR, or another suitable mezzanine codec for intermediate renders;
- avoid downloading a social-media copy and using it as the new master; and
- upload from the cleanest practical generation.
8. Oversharpening and artificial edge detail
Sharpening can make a local master look crisp.
Too much sharpening creates halos, ringing, and tiny edge variations. Those details consume data and can become unstable after compression.
Practical fixes:
- judge sharpness at the final display size;
- apply output sharpening after scaling;
- use less sharpening on noisy footage;
- avoid sharpening an already compressed source; and
- compare motion, not only still frames.
Does a higher upload bitrate help?
Usually, yes—up to a point.
A cleaner, less compressed upload gives YouTube a better source.
It reduces the chance that the platform will amplify artifacts that were already present in your file.
But a huge upload does not force YouTube to preserve the original bitrate.
YouTube still creates its own streaming versions.
A higher bitrate cannot:
- restore clipped highlights;
- remove camera noise;
- create detail that was lost during scaling;
- fix a wrong color transform;
- make 8-bit banding disappear;
- repair a low-quality screen capture; or
- guarantee a particular playback codec.
Use YouTube’s recommended upload bitrate as a practical starting point.
Then raise it when the footage is genuinely difficult: fast motion, grain, screen recordings, fine texture, HDR, or heavy color work.
For the current resolution and frame-rate tables, link readers to:
Best YouTube Bitrate Settings for 1080p, 4K, Shorts, and HDR
For the rate-control decision, link to:
Bigger is not always better
There is a point of diminishing returns.
A 300 Mbps H.264 upload of a normal 1080p talking head may take much longer to export, upload, and process without producing a visible improvement.
Spend data where the image needs it.
Do not use file size as the only quality test.
Should you upload at 1440p or 4K?
If the source and timeline are native 4K, upload 4K.
That preserves the available spatial detail and gives viewers access to a higher-resolution stream.
The harder question is whether you should upscale a 1080p project to 1440p or 4K.
What upscaling can do
Upscaling may cause YouTube to create a different set of streaming versions.
At higher playback resolutions, those versions may receive more data and can sometimes look cleaner than a standard 1080p stream.
That can help detailed screen recordings, gameplay, motion graphics, or footage that is especially difficult to compress.
What upscaling cannot do
Upscaling does not create real source detail.
It cannot turn a soft 1080p capture into true 4K.
It also does not guarantee:
- VP9;
- AV1;
- a fixed playback bitrate;
- better quality on every device;
- that viewers will select the higher resolution; or
- that the scaling itself will be artifact-free.
Treat 1440p or 4K upscaling as a test, not a secret switch.
Compare the processed versions on the same display, at the same viewport size, after all resolutions have finished processing.
For screen tutorials, a higher-resolution timeline can be worthwhile when it lets you capture and present the interface at a cleaner scale.
For soft camera footage, upscaling may only create a larger file.
AVC1, VP9, and AV1: how much should you care?
Stats for nerds may show a video codec beginning with:
avc1;vp09; orav01.
These identify H.264/AVC, VP9, and AV1 families.
Newer codecs can represent similar quality more efficiently than older codecs. That matters at streaming scale.
But the codec name is only one part of the result.
Quality also depends on:
- resolution;
- bitrate;
- encoder settings;
- source quality;
- frame rate;
- image complexity;
- device support; and
- the stream YouTube selected at that moment.
A poorly served low-resolution stream does not become excellent just because it uses a newer codec.
Likewise, a well-encoded high-resolution AVC stream can look good.
Can you force YouTube to use VP9 or AV1?
No supported upload setting guarantees a specific playback codec.
You can upload a clean file at an appropriate resolution and let YouTube build the available versions.
You can inspect the result with Stats for nerds.
You should not build the entire workflow around a promise that 1440p, 4K, channel size, view count, or one export codec will always trigger a particular YouTube codec.
Those rules can change, and the viewer’s device still matters.
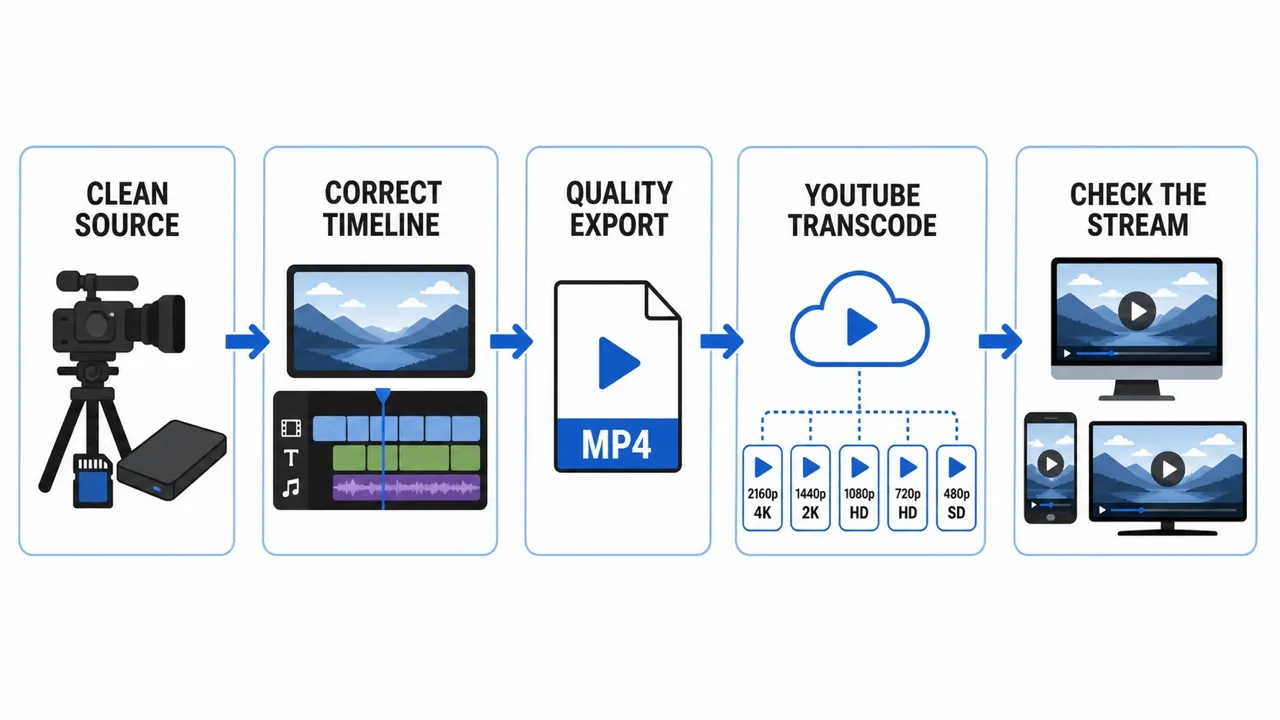
A clean YouTube upload workflow
The goal is simple:
Give YouTube the cleanest practical source without creating an absurd file or adding another damaged generation.
1. Start from the original timeline
Do not make a new upload from a downloaded YouTube copy, social-media export, or old review file.
Return to the timeline and source media.
2. Check the timeline before export
Confirm:
- sequence resolution;
- frame rate;
- progressive scan;
- scaling quality;
- color space;
- HDR or SDR intent;
- graphics sharpness;
- noise reduction;
- grain; and
- final output levels.
A wrong timeline cannot be fixed by a better upload bitrate.
3. Match the source frame rate
YouTube recommends uploading at the same frame rate used during recording.
Do not convert 24 fps to 60 fps because a larger number sounds better.
Do not drop 60 fps gameplay to 30 fps without checking motion.
Frame-rate conversion should be an editorial decision.
4. Use a clean progressive export
YouTube’s current standard recommendation is MP4 with H.264, progressive scan, High Profile, variable bitrate, and 4:2:0 chroma subsampling.
That is a safe delivery path.
A high-quality ProRes or other supported mezzanine upload can also be useful when upload time and file size are acceptable. The practical gain depends on the source and the rest of the pipeline.
5. Give difficult footage enough bitrate
Use the official recommendation as the floor for a normal clean upload.
Use the upper end or a modest buffer when the image contains:
- rapid motion;
- heavy texture;
- grain;
- noise;
- screen recordings;
- fine graphics;
- HDR; or
- extensive color work.
Do not cap a complex 4K60 export at a bitrate designed for a simple 1080p30 video.
6. Preserve the color pipeline
For normal SDR delivery, use a properly tagged Rec. 709 workflow.
For HDR, use the correct color space, transfer function, metadata, and monitoring path.
If a video looks washed out or too dark, compression may not be the main problem.
Use these related guides where relevant:
- How to Fix iPhone HDR Footage in Premiere Pro
- How to Work With iPhone HDR Footage in Final Cut Pro
- Log Video Format Reference Guide
7. Review the exported file outside the NLE
Play the actual file in a dependable player.
Check:
- detailed motion;
- gradients;
- titles;
- dark areas;
- skin tones;
- audio sync; and
- the beginning and end.
If the file is already damaged, stop there.
8. Upload as unlisted first
Let all required resolutions finish processing.
Then check the Quality menu and Stats for nerds.
Do not make a time-sensitive video public while only the low-resolution versions are ready.
9. Review the processed stream where viewers will watch
Check a desktop browser, phone, and television when the project matters.
The same stream can look different because of display size, scaling, codec support, and playback selection.
10. Keep the master
YouTube is a delivery platform, not your archive.
Keep the clean master, project, graphics, audio, and source footage.
Fixes for different kinds of video
Gaming videos
Gaming combines fast motion, sharp UI, particles, detailed environments, and frequent camera turns.
That is a difficult compression mix.
Use a high-quality capture. Avoid recording at an unnecessarily low bitrate. Keep the interface readable. Test 1440p or 4K delivery when the source supports it.
Most important, inspect rapid movement after processing.
A paused inventory screen tells you little about what happens during a fast turn.
Software tutorials and screen recordings
Capture at native resolution.
Make the interface larger than you think you need. A viewer may watch on a phone, through a lower-resolution stream, or inside a small browser window.
Use thicker callout lines, larger labels, and clear contrast.
When smooth cursor motion does not require 60 fps, 30 fps can give each frame more room within a similar data budget.
Nature, travel, and drone footage
Leaves, water, rocks, grass, and aerial movement can overload a compressed stream.
Avoid heavy sharpening and noisy shadow lifts.
Use the native high-resolution source. Keep camera movement controlled when the shot allows. Review detailed sections during motion.
Film, documentary, and music video work
Grain can be part of the look.
But the ideal theatrical grain may not survive a streaming encode.
Consider a separate YouTube version with slightly restrained grain. Keep the creative intent, but judge it after platform processing.
Motion graphics and animation
Avoid one-pixel lines, tiny type, and gradients that sit near the edge of banding.
Check saturated color boundaries.
Design for the final streaming size, not only the full-resolution composition viewer.
Low-light events and concerts
Noise is often the main problem.
A strong denoise pass followed by restrained texture can survive better than untreated sensor noise.
Do not confuse a brighter lifted shadow with a cleaner shadow.
Run your own YouTube compression test
You do not need to guess.
Build a short test that includes the material your channel actually uses.
Create a 20- to 30-second test sequence
Include:
- a clean face against a simple background;
- foliage, grass, water, hair, or fabric;
- a smooth gradient or sky;
- small screen text and thin interface lines;
- a dark shot with visible shadow detail;
- fast motion or a rapid camera turn; and
- film grain or camera noise.
Keep the source and timeline identical across exports.
Export controlled versions
A useful comparison might include:
- Version A: Native resolution at YouTube’s normal recommended bitrate.
- Version B: Native resolution at a moderately higher bitrate.
- Version C: A carefully scaled 1440p or 4K version.
- Version D: A denoised version with restrained grain added after scaling.
Do not change five settings at once.
If Version C also changes sharpening, noise reduction, codec, and frame rate, you will not know what caused the difference.
Upload unlisted
Wait until every intended resolution is available.
Record the processing date and time.
Use Stats for nerds to note:
- current resolution;
- optimal resolution;
- codec;
- dropped frames; and
- viewport.
Compare fairly
Use the same:
- browser;
- device;
- display;
- viewport;
- playback resolution; and
- test section.
Watch in motion.
A still screenshot can reveal blocking or banding, but it cannot show temporal smearing, crawling grain, or pulsing detail.
Keep the result
This test can become a channel-specific export standard.
Repeat it after major changes to:
- capture hardware;
- editing software;
- export codec;
- color workflow;
- grain treatment; or
- YouTube delivery behavior.
Troubleshooting by symptom
“My upload only looks bad right after I publish it.”
Wait for high-resolution processing.
YouTube makes lower-quality versions available first. Publish as unlisted and confirm that the intended quality options exist.
“The local export is sharp, but YouTube is soft.”
Manually select the intended playback resolution.
Then inspect Stats for nerds. If the correct high-resolution stream is playing, focus on image complexity, source compression, bitrate, scaling, and codec.
“The image is fine until the camera moves.”
That points to a motion and complexity problem.
Check grain, noise, foliage, particles, frame rate, bitrate, and sharpening.
“My screen recording text is hard to read.”
Increase UI scale and text size.
Capture at native resolution. Avoid fractional scaling. Use thicker callouts and a higher-resolution delivery when it produces a real improvement.
“My sky has bands after upload.”
Check the local export first.
If banding already exists, fix the gradient, bit depth, or grade. If it appears mainly after upload, use a cleaner source and a small amount of controlled dither where appropriate.
“My blacks pulse and turn into blocks.”
Look for noise and underexposure.
Compression struggles when dark regions contain random chroma noise. Denoise before sharpening or adding grain.
“My colors changed.”
Treat this as a color-management problem until proven otherwise.
Check Rec. 709, HDR, transfer characteristics, full versus limited range, media interpretation, and display behavior.
More bitrate will not repair a wrong transform.
“I uploaded a much larger file and nothing improved.”
You may have reached diminishing returns.
The source, scene complexity, scaling, playback stream, or platform transcode may be the limiting factor.
Test one controlled change at a time.
The practical bottom line
You cannot turn off YouTube compression.
You can control what reaches it.
Start with a clean image. Protect detail before export. Avoid repeated lossy encodes. Match the source frame rate. Use enough bitrate. Keep the color pipeline correct. Wait for processing. Check the stream YouTube is actually serving.
Most important, test the footage that gives your channel trouble.
A preset that works for a studio interview may fail on gameplay, rain, foliage, film grain, or a detailed software interface.
The right workflow is not the one with the biggest file.
It is the one that gives your real footage the cleanest final YouTube image.
Frequently asked questions
Does YouTube compress every uploaded video?
Yes. YouTube re-encodes uploads into multiple streaming versions for different resolutions, devices, codecs, and connection conditions. Viewers do not normally receive the exact production master that was uploaded.
Why does my YouTube video look blurry after upload?
First check whether higher-resolution processing is complete and whether the player selected a low resolution. If the correct stream is playing, blur can come from source compression, scaling, motion, noise, insufficient bitrate, or YouTube’s final transcode.
Can I stop YouTube from compressing my video?
No. YouTube compression is part of the platform’s delivery system. You can reduce visible damage by uploading a clean source, avoiding repeated lossy exports, using enough bitrate, and controlling noise, grain, motion, and scaling.
Does uploading a higher bitrate improve YouTube quality?
A higher upload bitrate can help when it gives YouTube a cleaner source, especially for motion, grain, screen detail, and textured footage. Past a certain point, larger files produce diminishing returns because YouTube still makes its own streaming versions.
Should I upload a 1080p video as 4K?
Test it. A 4K upscale may receive a different streaming treatment and can sometimes look cleaner at higher playback resolutions. It does not create real detail or guarantee VP9, AV1, a specific bitrate, or better quality on every device.
Is VP9 or AV1 better than AVC1 on YouTube?
VP9 and AV1 are more efficient codec families, but the codec name alone does not determine quality. Resolution, bitrate, source quality, frame rate, image complexity, encoder choices, and device support also matter.
Why is my 4K upload only available in 360p or 720p?
YouTube processes lower-resolution versions first. Higher-resolution and high-frame-rate versions can take much longer. Wait until 4K appears in the Quality menu before judging the final result.
Why does film grain look bad on YouTube?
Grain changes across the frame from one moment to the next, which consumes data. When the stream cannot preserve it cleanly, grain may smear, pulse, clump, or disappear. Use clean source footage and consider a restrained streaming-grain treatment.
Why do screen recordings look blurry on YouTube?
Small text, thin lines, sharp UI edges, scaling, and 4:2:0 delivery make screen recordings demanding. Capture at native resolution, enlarge important interface elements, avoid fractional scaling, and test a higher-resolution delivery.
Does 60 fps make YouTube compression worse?
It can make the encode more demanding because the stream must describe twice as many frames as 30 fps. YouTube recommends higher upload bitrates for high-frame-rate video. Use 60 fps when the motion benefits from it, not as an automatic quality upgrade.
Official sources checked
- YouTube Help — Recommended upload encoding settings:
Open official source - YouTube Help — Low video quality after upload:
Open official source - YouTube Help — Change the quality of your video:
Open official source - Google for Developers — VP9 bitrate modes in detail:
Open official source - Google for Developers — VP9 overview and media resources:
Open official source - YouTube Help — Supported YouTube file formats:
Open official source - YouTube Help — Upload high dynamic range (HDR) videos:
Open official source

About the Author
Joseph Nilo has been working professionally in all aspects of audio and video production for over twenty years. His day-to-day work finds him working as a video editor, 2D and 3D motion graphics designer, voiceover artist and audio engineer, and colorist for corporate projects and feature films.