Understanding the Importance of Export Settings
When you're editing a video in Adobe Premiere Pro, knowing the best export settings is crucial.
The best H264 settings, for instance, can ensure you achieve the highest quality export Premiere Pro can offer for your YouTube videos.
Your audience demands crisp, clear video, and understanding how to save video Premiere Pro does can significantly uplift the quality of your content.
Premiere Pro's export functionalities are robust.
But have you ever experienced issues like "Premiere Pro taking hours to export" or the "Premiere Pro export larger than original" size?
Another common complaint many video editors have is that the 'Premiere Pro export takes too long.'
Waiting hours for a video to export can be a significant drawback, especially on tight deadlines. This guide will provide solutions to optimize your export times and overcome such challenges.
Such challenges can be daunting, especially when on a tight deadline.
This guide will help you navigate through these settings to optimize your exports effectively.
While the focus of this guide is on the latest Adobe Premiere Pro settings, those using Premiere Pro 2020 export settings will find many of these tips applicable as well.
This page may include affiliate links.
Though I only recommend software that I use and fully believe in.
⭐⭐⭐⭐⭐
I pay for Adobe Creative Cloud and have used it every day in my 20-year career as a video editor, producer, and colorist.
Purchasing Adobe CC through these links will get you the best deal available and support this site.
Get Adobe Creative Cloud Now!Table of Contents
- Understanding The Importance Of Export Settings
- The Role Of Bitrate In Video Quality
- Bitrate Settings
- Bitrate Settings With Media Encoder
- Match Source Adaptive High Bitrate
- Basic Video Settings
- Resolution And Aspect Ratio
- Advanced Bitrate Encoding
- Bitrate
- Youtube 1080P Full HD Preset
- Youtube Bitrate Table
- Maximum Render Quality
- Video And Audio Codecs
- Frame Rate
- File Size And Length
- Testing
- Audio Export Settings
- Finalizing Your Premiere Pro Export Settings
- What Are The Best Export Settings In Adobe Premiere?
- Adobe Premiere Pro Export Settings FAQ

The Role of Bitrate in Video Quality
The quality of a video is largely determined by its bitrate.
The bitrate is the amount of data processed per unit of time.
High bitrate results in high quality and large file size.
Low bitrate leads to lower quality but smaller file size.

Delving into Bitrate Settings
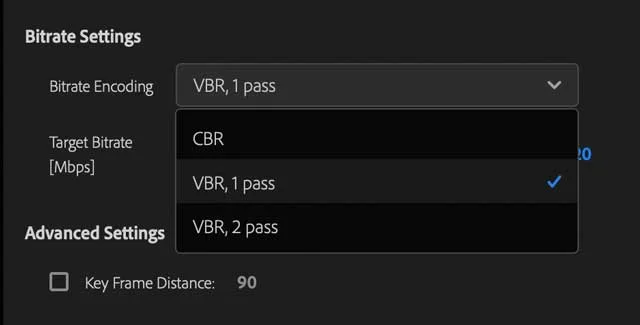
Bitrate settings come in two types: Constant Bitrate (CBR) and Variable Bitrate (VBR).
CBR keeps the bitrate the same throughout the video.
VBR adjusts the bitrate as needed, improving the quality while keeping the file size in check.
If you're wondering what's better, VBR 1 Pass vs 2 Pass, 2 pass is generally your better quality choice. It just takes longer to process.
Delving into Bitrate Settings with Media Encoder
When exporting from Premiere Pro, you might also use Adobe Media Encoder.
Understanding media encoder bitrate settings is crucial.
Bitrate settings come in two types: Constant Bitrate (CBR) and Variable Bitrate (VBR).
If you're using Media Encoder, knowing the media encoder best settings can make a significant difference in the quality and size of your exports
Embracing Match Source Adaptive High Bitrate
Match Source Adaptive High Bitrate is an option in Premiere Pro that adjusts the bitrate to match maximum bitrate of the source video.
It helps preserve the video quality while optimizing the file size.
This setting is ideal for uploading to YouTube, where maintaining high quality is key, but large file sizes can be an issue.

Tackling Basic Video Settings
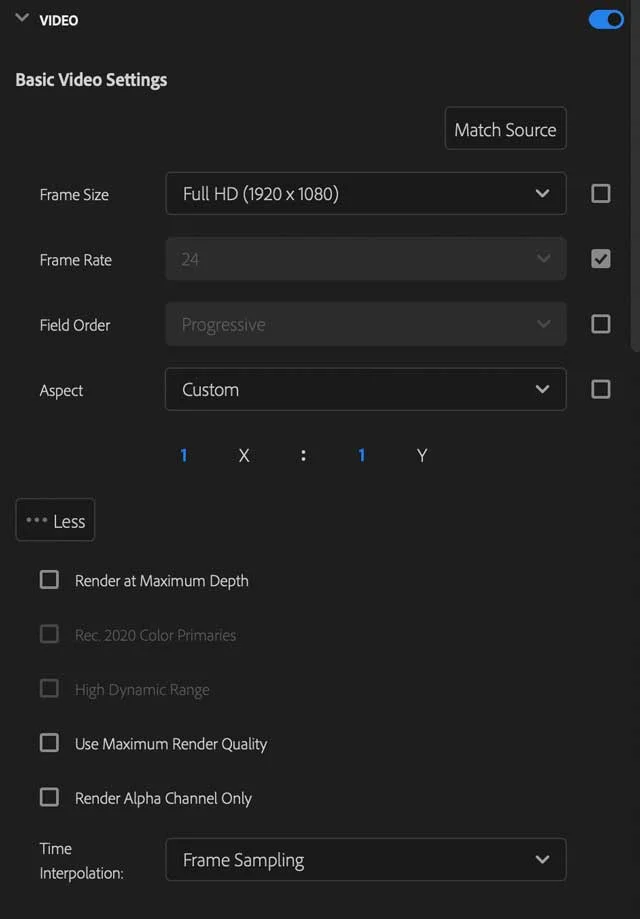
When setting up your export settings, especially if you're trying to export .mov Adobe Premiere Pro files, begin with the Basic Video Settings. Set the width and height to match your source video.
Resolution and Aspect Ratio: Export 1920x1080 Premiere Pro and More
The aspect ratio of your video can affect how it is displayed on different devices. YouTube supports various aspect ratios like 16:9 (widescreen), which is perfect when you want to export 1920x1080 Premiere Pro projects, 4:3 (standard), and 1:1 (square).
If you're looking for a slightly lower resolution, you can also export 720p Premiere Pro sequences.
This might be especially relevant for those focusing on mobile viewership or platforms that don't demand full HD.
Employing Advanced Bitrate Encoding
In the realm of Adobe Premiere Pro lossless export settings, you might want to dive into Bitrate Encoding settings.
Here, especially if you're aiming to export to .mov in Premiere Pro, you'll find the Match Source Adaptive High Bitrate setting.
Bitrate
Bitrate refers to the amount of data processed in a given amount of time. Higher bitrate typically means better quality but also results in larger file sizes. For YouTube, the platform recommends a bitrate of 8 Mbps for HD content and up to 45 Mbps for 4K content.
Premiere Pro Video Settings and the YouTube 1080p Full HD Preset
When setting up your export settings in Premiere Pro 2022, especially if you're aiming to export .mov files, begin with the Basic Video Settings.
Also, for those who want a quick fix, the "YouTube 1080p Full HD preset download" might be a solution to consider, ensuring optimal settings for YouTube uploads.
YouTube Bitrate Table
Here are YouTube's recommended bitrates for different sizes of video, including the YouTube Max Bitrate.
Recommended video bitrates for SDR uploads
| Type | Video Bitrate, Standard Frame Rate (24, 25, 30) | Video Bitrate, High Frame Rate (48, 50, 60) |
| 8K | 80 - 160 Mbps | 120 to 240 Mbps |
| 2160p (4K) | 35–45 Mbps | 53–68 Mbps |
| 1440p (2K) | 16 Mbps | 24 Mbps |
| 1080p | 8 Mbps | 12 Mbps |
| 720p | 5 Mbps | 7.5 Mbps |
| 480p | 2.5 Mbps | 4 Mbps |
| 360p | 1 Mbps | 1.5 Mbps |
Recommended video bitrates for HDR uploads
| Type | Video Bitrate, Standard Frame Rate (24, 25, 30) | Video Bitrate, High Frame Rate (48, 50, 60) |
| 8K | 100 - 200 Mbps | 150 to 300 Mbps |
| 2160p (4K) | 44–56 Mbps | 66–85 Mbps |
| 1440p (2K) | 20 Mbps | 30 Mbps |
| 1080p | 10 Mbps | 15 Mbps |
| 720p | 6.5 Mbps | 9.5 Mbps |
| 480p | Not supported | Not supported |
| 360p | Not supported | Not supported |

Opting for Maximum Render Quality
In the Video tab, there's a checkbox for Maximum Render Quality. Check this box to ensure the best possible quality during the exporting video process. This can increase export time, but the result is worth it.

Video and Audio Codecs
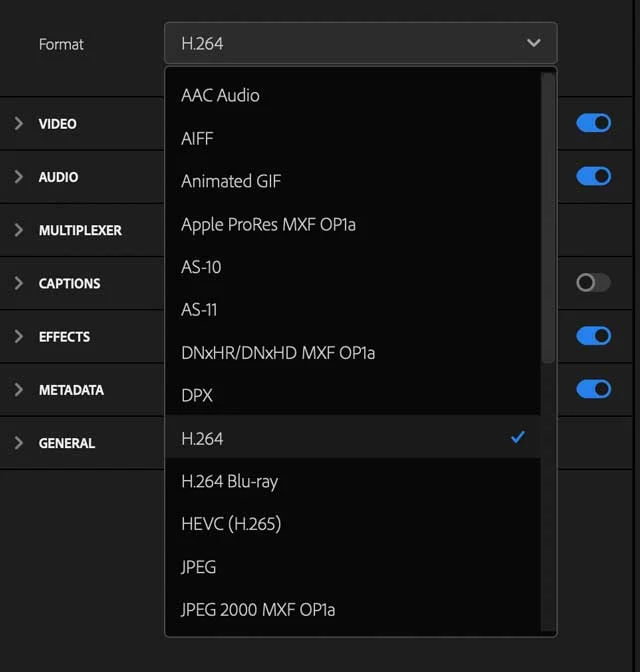
A codec is used to compress and decompress a video or audio file. YouTube recommends using the H.264 video codec and AAC audio codec for the best compatibility and quality.
Frame Rate
Matching the export frame rate with your source video's frame rate is usually a good idea to avoid frame drops or stuttering. YouTube supports a range of frame rates from 24 to 60 frames per second.
File Size and Length
If you're opting to export .mov Adobe Premiere Pro files, remember that .mov often results in larger file sizes due to its lossless compression. This might bring you closer to YouTube’s maximum file size limit.
Testing
Before uploading your export video to YouTube, it can be beneficial to watch your exported video in its entirety. This allows you to check for any issues, such as video stuttering, audio synchronisation problems, or unexpected quality loss.
Remember, the goal is to ensure that your audience has the best viewing experience possible, so take the time to fine-tune your settings and check the quality before uploading.
Perfecting Audio Export Settings
When determining how to save audio in the best quality, consider the Audio Format and Audio Codec settings.
Finalizing Your Premiere Pro Export Settings
Before you click the export button, especially if you're hoping for an Adobe Premiere Pro lossless export, double-check all your settings.
Then, navigate to the Export Menu, select your settings, and click Export.
Voila!
You've now created a high-quality video, be it export 1920x1080 Premiere Pro or export 720p Premiere Pro, ready for uploading to your YouTube channel.
What are the best export settings in Adobe Premiere?
The best export settings in Adobe Premiere depend on your video's purpose. There are two ways to export your video for YouTube: using an export preset or manually selecting your settings.
Using an export preset
- Choose Export from the header bar at the top of Premiere Pro or select File > Export > Media File from the Export menu.
- Select YouTube from the list of destinations on the left and enable the switch to access all settings.
- In the Preset drop-down menu, choose YouTube 1080p Full HD. If you don't see this in the Preset drop-down list, click More Presets to open the Preset Manager dialog box and search for the preset.
- Click export. This will automatically choose the best export settings for YouTube, making the entire process simple1.
Manually selecting your settings If you prefer more control over your export, you can manually select your settings. The best Premiere Pro export settings for YouTube are generally:
Video settings
- Format: H.264 (.mp4)
- Frame sizes: Depending on your video's resolution, choose among UHD (3840 x 2160), Quad HD (2560 x 1440), Full HD (1920 x 1080), HD (1280 x 720), or SD NTSC Wide (854 x 480).
- Frame rate: Match the frame rate of the source video.
- Target bitrate: 8 Mbps (45 for 4K)
- Bitrate encoding: VBR, 1-pass
- Field order: Progressive
- Aspect: Match the aspect of the source video
Audio settings
- Audio format & codec: AAC
- Sample rate: 48 kHz
- Audio channels: Stereo
After exporting your project with these settings, you'll be ready to create and upload directly to YouTube
Adobe Premiere Pro Export Settings FAQ
What does match source high bitrate mean?
Match Source High Bitrate is a setting in Premiere Pro that automatically adjusts the bitrate of the the exported video file, to match the quality of the source video.
What does adaptive high bitrate mean?
Adaptive High Bitrate means the bitrate changes during the video depending on the complexity of the video frames. It helps to optimize the quality and the file size.
Should I use adaptive high bitrate?
Yes, using Adaptive High Bitrate is beneficial when uploading videos to YouTube. It helps maintain high video quality while managing file size.
What should my target bitrate be?
The target bitrate depends on the quality and resolution of your video. For 1080p video, a target bitrate of 10-12 Mbps is often used.
Is Adaptive High bitrate good?
Yes, Adaptive High Bitrate is good for preserving video quality while managing file size.
What is the best format to export in Premiere for YouTube?
H.264 is widely considered the best format to export videos in Premiere Pro for YouTube. However, if you're aiming to export .mov in Premiere Pro, that's also a solid choice, known for its high-quality output, albeit with larger file sizes.
The H.264 codec, commonly associated with its software version 'x264', is one of Adobe Premiere Pro's recommended settings for achieving high-quality video exports. This codec is especially recommended for YouTube uploads due to its balance between quality and file size
How do I use Premiere Pro VBR 2 pass settings for optimal export quality?
Using the best H264 settings, such as Premiere Pro VBR 2 pass, is crucial for high-quality exports, especially for platforms like YouTube. VBR stands for Variable Bit Rate, and the 2 pass option allows Premiere Pro to analyze your video twice before finalizing the export. The first pass analyzes the video, and the second pass allocates bits effectively. To use VBR 2 pass, go to File > Export > Media. In the Export Settings dialog box, select H.264 format, and under the Bitrate Encoding option, choose VBR, 2 pass. Then set the Target Bitrate and Maximum Bitrate according to your preferences and the requirements of the platform you are exporting for.
Why is my Adobe Premiere Pro video quality poor after exporting and how can I fix it?
If your Adobe Premiere Pro video quality is poor after exporting, it might be due to a variety of factors such as low bitrate, incorrect resolution settings, or using a highly compressed format. To improve the video quality, first, ensure that your sequence settings match the resolution of your source footage. Next, when exporting, select a high-quality format such as H.264. You should also change the bitrate to a higher value, as this greatly influences the quality of your video. If your video contains a lot of motion, consider using Premiere Pro VBR 2 pass settings as well for better bit allocation.
How can I change bitrate in Premiere Pro to ensure the best quality for YouTube videos?
To change bitrate in Premiere Pro, you need to access the export settings. Go to File > Export > Media to open the Export Settings dialog box. Select H.264 as your format, which is a widely accepted format for YouTube. In the Bitrate Settings section, you’ll have options like CBR, VBR 1 pass, and VBR 2 pass. For the best quality, choose VBR 2 pass. Now, set the Target Bitrate and Maximum Bitrate. For YouTube, a good starting point for Target Bitrate is 16 Mbps for 1080p footage. However, you may need to adjust these values depending on the specifics of your video. Finally, click Export to render your video with the new bitrate settings.
Video Encoding Related Posts:
What is the Best Target Bitrate for YouTube?
Best Premiere Pro Export Settings for YouTube
High Bitrate vs. Adaptive High Bitrate
How to use SurferSEO to Write Scripts for YouTube Videos
Best Microphones For YouTube Videos 2022
Best Mac for Video Editing in 2023
Best Monitors for Video Editing
Find the Best Export Settings for YouTube Videos Now!
Mastering Adobe Media Encoder: Your Gateway to Efficient Media Processing
Video Editing Related Posts
Adobe Creative Cloud for Video Editing
Top 10 Video Editing Software for Mac
The Benefits of Dual-Monitor Setups for Video Editing
How to Choose the Right Video Editing Monitor for Your Needs
Best Monitors for Video Editing
Best Video Editing Software in 2023
Best Mac for Video Editing in 2023
(Almost) 50 Mistakes Every New Video Producer Makes
Breakthrough AI Tools: Elevate Your Video Production Game!
- Understanding The Importance Of Export Settings
- The Role Of Bitrate In Video Quality
- Bitrate Settings
- Bitrate Settings With Media Encoder
- Match Source Adaptive High Bitrate
- Basic Video Settings
- Resolution And Aspect Ratio
- Advanced Bitrate Encoding
- Bitrate
- Youtube 1080P Full HD Preset
- Youtube Bitrate Table
- Maximum Render Quality
- Video And Audio Codecs
- Frame Rate
- File Size And Length
- Testing
- Audio Export Settings
- Finalizing Your Premiere Pro Export Settings
- What Are The Best Export Settings In Adobe Premiere?
- Adobe Premiere Pro Export Settings FAQ
Video Encoding Related Posts:
What is the Best Target Bitrate for YouTube?
Best Premiere Pro Export Settings for YouTube
High Bitrate vs. Adaptive High Bitrate
How to use SurferSEO to Write Scripts for YouTube Videos
Best Microphones For YouTube Videos 2022
Best Mac for Video Editing in 2023
Best Monitors for Video Editing
Find the Best Export Settings for YouTube Videos Now!
Mastering Adobe Media Encoder: Your Gateway to Efficient Media Processing
Video Editing Related Posts
Adobe Creative Cloud for Video Editing
Top 10 Video Editing Software for Mac
The Benefits of Dual-Monitor Setups for Video Editing
How to Choose the Right Video Editing Monitor for Your Needs
Best Monitors for Video Editing
Best Video Editing Software in 2023
Best Mac for Video Editing in 2023
(Almost) 50 Mistakes Every New Video Producer Makes
Breakthrough AI Tools: Elevate Your Video Production Game!
