I created this video for the FxFactory YouTube Channel.
Be sure to like & subscribe!
Transcript below.
In this video, I’d like to show you how to properly edit and deliver iPhone HDR footage in Premiere Pro.
We did a video on this topic in 2020 but recent Premiere Pro updates since then added new HDR features and changed the workflow . . . for the better.
Let’s take a look.
Setting Up an HDR Project in Premiere Pro
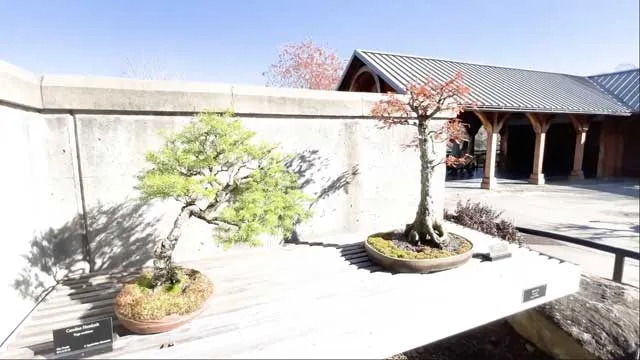
If you’ve ever experienced extreme over-exposure levels when previewing clips in the Browser & Viewer, you’re likely dealing with clips captured with the HDR mode enabled.
Since iPhone 12, the cameras have the ability to capture HDR as an HEVC video file.
I’ve got some HDR footage captured with my iPhone 14 Pro Max.
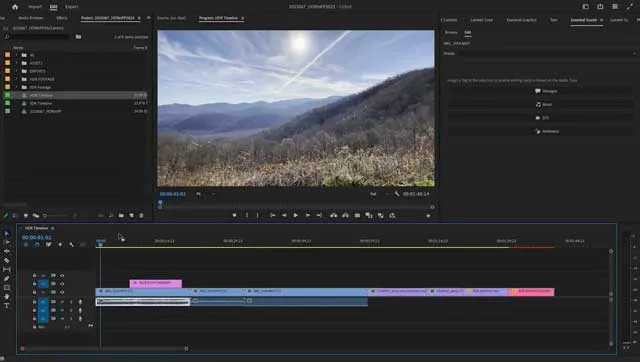
In Premiere Pro, import your footage. Drag your footage to the New Sequence icon to create a new sequence with it.
This creates a new sequence with the correct frame size, rate and color space.
Go to sequence settings, or command-0.
In previous versions of Premiere Pro, it would not automatically recognize the color space, and now it does.
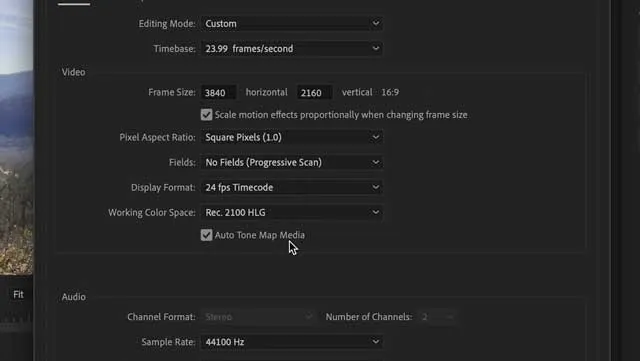
Auto Tone-Mapping in Premiere Pro
You can see the “Auto Tone Map Media” box is checked. This feature recalculates HDR color values so they display consistently in the Rec. 709 color space.
It also adjusts wide color gamuts to display accurately in your sequence without blown-out highlights
I’ve got an SDR timeline and I’ll add my HDR clips. This displays correctly with no additional work or plugins required.
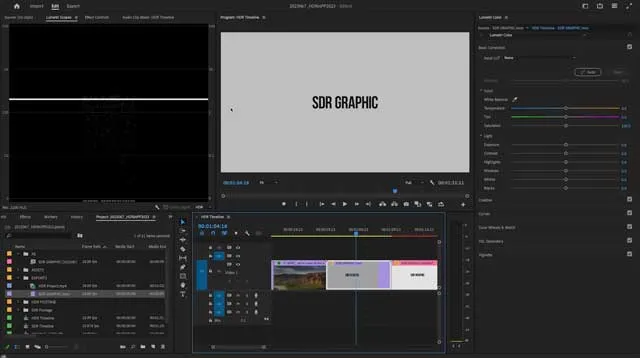
SDR Graphics on an HDR Timeline
I’ve got a white SDR Graphic video file. On the HDR timeline the white appears dimmer than the 100% white of the original. This is reflected in the scopes.
In this case, I’ll choose the clip in the project, right-click, choose Modify / Interpret Footage.
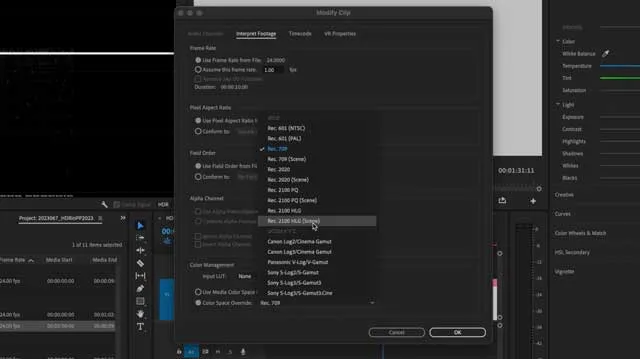
At the bottom, under Color Management, I’ll choose Color Space Override and set it to the color space of my timeline - Rec 2100 HLG.
Now the white point appears correctly on the timeline and the white has been bumped up to 1K in the scopes.
Next is the same graphic, imported directly from After Effects via Dynamic Link. It appears dim, as well. We just need to make the color space match in After Effects.
In After Effects, go to File / Project Settings / and the Color Tab.
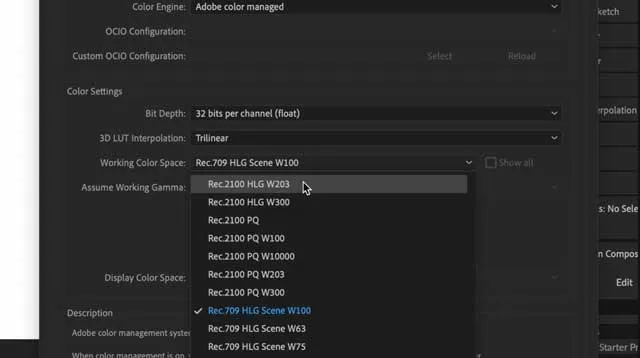
Make sure your bit depth is set to 32 bits per channel. And then set your Working Color Space to match Premiere Pro.
Now the graphic has the correct white level in Premiere.
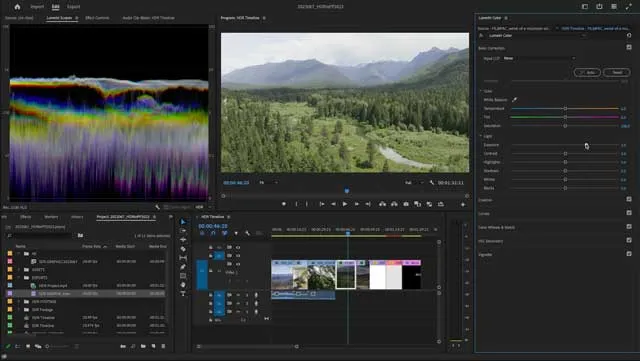
Color-Correcting SDR Footage on an HDR Timeline
While I have the scopes open, you can see that I can color-correct my SDR clips in the HDR color space and brighten them up considerably.
A side note: to monitor HDR footage properly, you need a monitor that supports HDR.
I’m looking at two monitors: my 2021 MacBook Pro, which has an XDR display, and an LG monitor, which is SDR.
Once it's edited, we can share on YouTube, which supports HDR or SDR playback depending on the viewing hardware.
Current consumer hardware includes AppleTV 4K connected to supported TVs, and of course, the iPhone you shot your footage on.
How to Export HDR from Premiere Pro
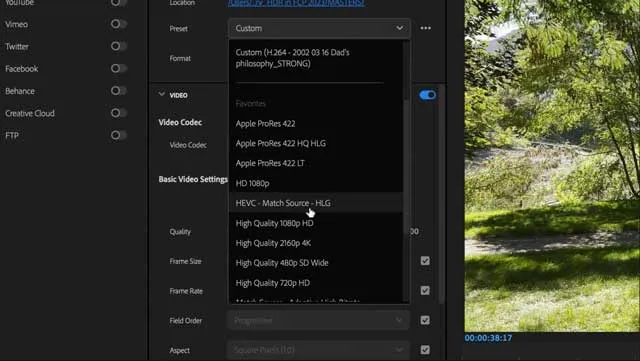
Export a master file as ProRes 422. There are presets that support HLG, I’ll choose ProRes 422 HQ HLG.
For a smaller file, for easier uploading to YouTube, search the presets for HEVC - Match Source - HLG.
You can further tweak the encoding settings to taste, but the main thing is that we are outputting the correct color space.
The iPhone Pro Max with Dolby Vision HDR puts a lot of power into the hands of consumers and professionals alike.
Create with a Wide Range of Video Effects at FxFactory.com.
HDR in Premiere Pro FAQ
How to Export HDR Video in Premiere Pro?
To export HDR (High Dynamic Range) video in Premiere Pro, you will need to set up your project settings correctly from the beginning to maintain the wider color and dynamic range. Once your editing is complete, go to File > Export > Media. In the Export Settings dialog box, select the format and a preset that supports HDR, such as HEVC (H.265) with the preset set to HDR10. Ensure that the ‘Rec.2020 Color Primaries’ and ‘High10’ or ‘High’ profile are selected under the Video tab. Also, check the box for 'Render at Maximum Depth' for better quality.
How to Export HDR Video for YouTube?
Exporting HDR video for YouTube is similar to exporting for other purposes but with some additional considerations. Go to File > Export > Media, and choose HEVC (H.265) as the format with a preset set to HDR10. Under the Video tab, select 'Rec.2020 Color Primaries' and the 'High' profile. Additionally, make sure to check the boxes for 'Render at Maximum Depth' and 'Use Maximum Render Quality'. YouTube recommends a bit rate of 44-56 Mbps for 4K HDR videos, so set your target and maximum bit rate accordingly in the export settings.
How do I Fix HDR Color in Premiere Pro?
If the colors in your HDR footage appear incorrect or off in Premiere Pro, ensure you have the correct color workspace selected. Go to File > Project Settings > General and set the color workspace to High Dynamic Range. Additionally, you may need to adjust color grading using Lumetri Color panel to achieve desired look. Using scopes like the Lumetri Scopes will help you monitor the color and brightness levels of your HDR footage accurately.
How do You Add HDR in Premiere Pro?
Adding HDR to your project in Premiere Pro begins by setting up your project for HDR workflow. Go to File > Project Settings > General and select High Dynamic Range under the color workspace. When importing HDR footage, Premiere Pro should retain the HDR metadata. If you are working with SDR (Standard Dynamic Range) footage, you can use the Lumetri Color panel to grade it to HDR by adjusting the color settings, though the result may not have the same quality as native HDR footage.
How do I Convert HDR to SDR in Premiere Pro?
Converting HDR (High Dynamic Range) to SDR (Standard Dynamic Range) in Premiere Pro can be done using the Lumetri Color panel. Under the Basic Correction section, reduce the contrast and bring down the highlights and whites, while lifting the shadows and blacks to compress the dynamic range. You may also need to adjust the saturation and other color settings to achieve a natural look. It's advisable to monitor the waveform and vectorscope to ensure you are maintaining a proper color and brightness balance.
Why are my SDR Graphics Dim in Premiere Pro?
When working with SDR (Standard Dynamic Range) graphics in an HDR (High Dynamic Range) project in Premiere Pro, the graphics may appear dim due to the mismatch in dynamic range. To correct this, you can use the Lumetri Color panel to adjust the brightness and contrast of the graphics to match the HDR footage. Alternatively, convert your entire project to SDR to ensure consistency in appearance.
How Can I Ensure Accurate Color Grading for HDR in Premiere Pro?
Accurate color grading in HDR can be achieved by using professional color grading tools within Premiere Pro like the Lumetri Color panel and scopes such as Lumetri Scopes. It’s also advisable to work on a calibrated HDR monitor to see accurate color representation. Additionally, familiarize yourself with HDR color grading techniques and consider using LUTs (Look Up Tables) to achieve a desired look more efficiently.
What are the System Requirements for Editing HDR Footage in Premiere Pro?
Editing HDR footage in Premiere Pro requires a powerful computer with a capable graphics card that supports 10-bit color and HDR workflows. Additionally, a monitor that supports HDR with a wide color gamut and higher brightness is beneficial for accurate color grading. Ensure your system meets the minimum requirements specified by Adobe for handling HDR workflows in Premiere Pro.
Can I Work with Both HDR and SDR Footage in the Same Premiere Pro Project?
Yes, you can work with both HDR and SDR footage in the same Premiere Pro project. However, be aware that there may be challenges in matching the color and brightness levels between HDR and SDR clips. It’s advisable to color grade the SDR footage to match the HDR footage as closely as possible using tools like the Lumetri Color panel.

About the Author
Joseph Nilo has been working professionally in all aspects of audio and video production for over twenty years. His day-to-day work finds him working as a video editor, 2D and 3D motion graphics designer, voiceover artist and audio engineer, and colorist for corporate projects and feature films.
Video Encoding Related Posts:
What is the Best Target Bitrate for YouTube?
Best Premiere Pro Export Settings for YouTube
High Bitrate vs. Adaptive High Bitrate
How to use SurferSEO to Write Scripts for YouTube Videos
Best Microphones For YouTube Videos 2022
Best Mac for Video Editing in 2023
Best Monitors for Video Editing
Find the Best Export Settings for YouTube Videos Now!
Mastering Adobe Media Encoder: Your Gateway to Efficient Media Processing
Video Editing Related Posts
Adobe Creative Cloud for Video Editing
Top 10 Video Editing Software for Mac
The Benefits of Dual-Monitor Setups for Video Editing
How to Choose the Right Video Editing Monitor for Your Needs
Best Monitors for Video Editing
Best Video Editing Software in 2023
Best Mac for Video Editing in 2023
(Almost) 50 Mistakes Every New Video Producer Makes
Breakthrough AI Tools: Elevate Your Video Production Game!
- Setting Up An HDR Project In Premiere Pro
- Auto Tone-Mapping In Premiere Pro
- SDR Graphics On An HDR Timeline
- Color-Correcting SDR Footage On An HDR Timeline
- How To Export HDR From Premiere Pro
- HDR In Premiere Pro FAQ
Video Encoding Related Posts:
What is the Best Target Bitrate for YouTube?
Best Premiere Pro Export Settings for YouTube
High Bitrate vs. Adaptive High Bitrate
How to use SurferSEO to Write Scripts for YouTube Videos
Best Microphones For YouTube Videos 2022
Best Mac for Video Editing in 2023
Best Monitors for Video Editing
Find the Best Export Settings for YouTube Videos Now!
Mastering Adobe Media Encoder: Your Gateway to Efficient Media Processing
Video Editing Related Posts
Adobe Creative Cloud for Video Editing
Top 10 Video Editing Software for Mac
The Benefits of Dual-Monitor Setups for Video Editing
How to Choose the Right Video Editing Monitor for Your Needs
Best Monitors for Video Editing
Best Video Editing Software in 2023
Best Mac for Video Editing in 2023
(Almost) 50 Mistakes Every New Video Producer Makes
Breakthrough AI Tools: Elevate Your Video Production Game!
