

Quick answer: To make a video in WeVideo, start a Video project, add your clips to the project bin, drag them onto the timeline, trim the rough edges, add only the titles and audio you need, then use Export in the upper-right corner.
Checked August 10, 2026. WeVideo's current project, editor, media, export, and account documentation informed these steps.
Affiliate disclosure: This page contains affiliate links. I may earn a commission if you buy through them, at no extra cost to you.
Review the current option: WeVideo
Your first edit does not need transitions on every cut or a pile of effects.
Start with a short story you can finish: an introduction, three or four useful shots, clear audio, and an ending. Once that works, the extra polish is much easier.
Quick take: WeVideo is best for creators, classrooms, nonprofits, and small teams that want a browser-based editor with screen/webcam recording, stock assets, green screen, collaboration, and simple publishing workflows.
Plans and promotions change often, so check WeVideo's current offer before choosing a subscription.
1. Start the right kind of WeVideo project
Sign in to WeVideo and click Create. Choose Video for the full timeline editor, or choose Storyboard if you want a simpler place to arrange a first draft.
WeVideo's current editor guide says Video opens the full-featured editor by default. Its project guide also documents the Create menu and current project types. Storyboard can later move into the full editor, but a full-editor project cannot move backward into Storyboard.
Before importing anything, decide the video's purpose, audience, and rough length. A sixty-second practice video is plenty for learning the workflow.
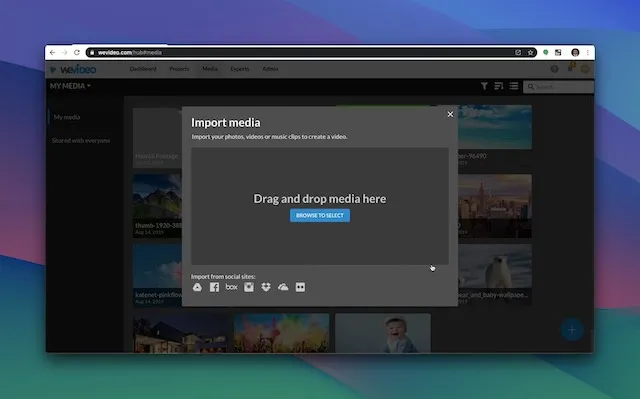
2. Add your media
Open the project and choose Add media to upload clips, images, or audio. WeVideo's current media guide calls the project-specific collection the Project bin; your account-wide files remain under Uploads.
Name files before uploading when you can. Even a simple pattern such as 01-intro, 02-demo, and 03-ending makes the edit easier to follow.
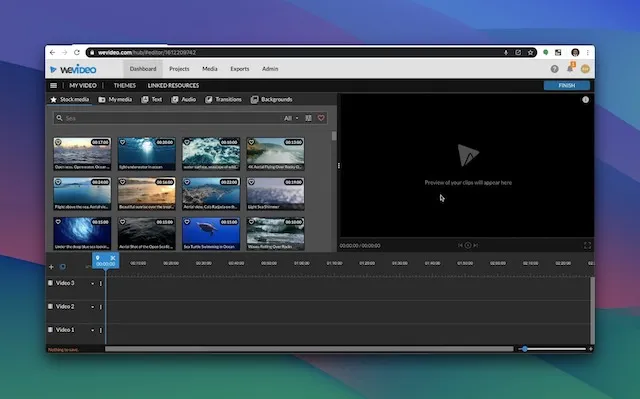
3. Build the rough cut on the timeline
Drag the clips from the project bin to the timeline in story order. Do not worry about effects yet.
Trim the beginning and end of each clip, split clips where the subject changes, and remove pauses that do not help. Watch the whole rough cut once before polishing individual moments.
If the story is hard to follow without music or transitions, fix the clip order first. A clean sequence is doing the real work.
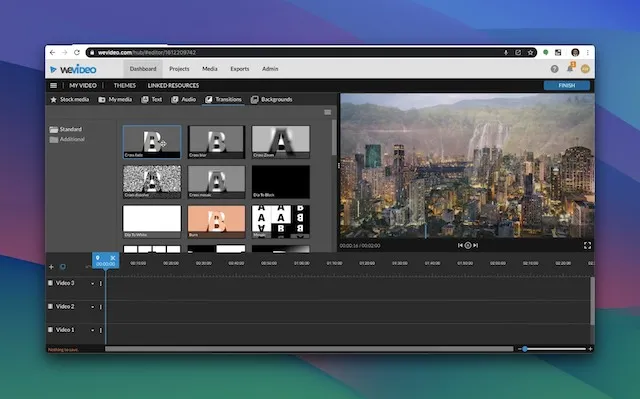
4. Add titles and transitions carefully
Use a title to identify the video and simple text where the viewer needs a name, step, or key point. Keep the type large enough to read on a phone.
Most cuts do not need a transition. Use one when it helps show a change in time, place, or topic—not simply because the menu is there.
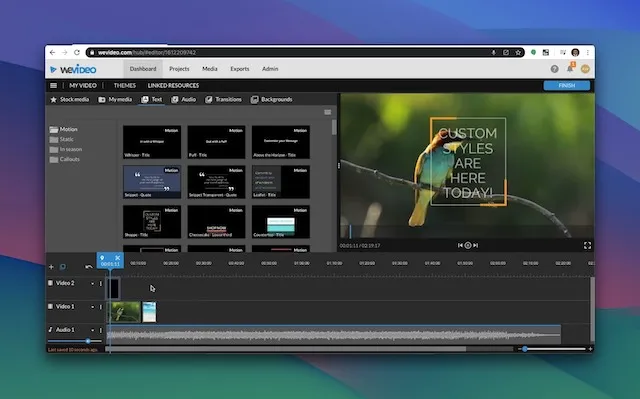
Pick one title style and reuse it. Matching type, color, and spacing will make a first video feel more intentional than mixing several animated presets.
5. Make the voice easy to hear
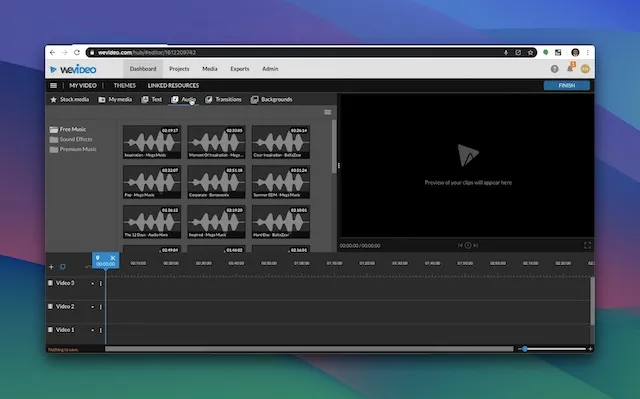
Dialogue or narration should lead. Lower background music until it supports the voice instead of competing with it, then listen once on headphones and once through ordinary speakers.
If you import music, confirm you have permission to use it. A track being easy to download does not automatically make it cleared for every project.
6. Preview, export, and download
Watch the project from beginning to end. Check spelling, abrupt cuts, black frames, clipped speech, music level, and whether the ending hangs around too long.
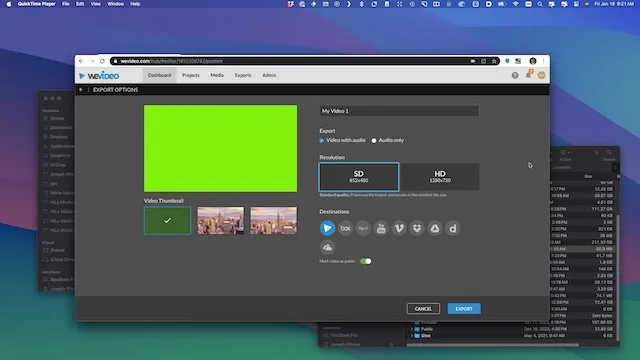
Click Export in the upper-right corner. WeVideo's current export instructions list options such as title, file type, resolution, subtitles, frame rate, quality, and destination. What you can select depends on your plan or school permissions.
After processing finishes, download the file or use the available sharing options. Open the downloaded video and check it once more before sending or publishing it.

Decide whether WeVideo fits the next project
If the beginner workflow above fits the way you want to edit, review the current WeVideo option after finishing one short test project.
WeVideo beginner FAQ
Should a beginner use Storyboard or the full editor?
Storyboard is the simpler starting point. Choose Video and the full editor when you need multiple tracks, transitions, backgrounds, and more control.
Does WeVideo still have a free plan?
Do not assume a permanent free account is available for a new signup. WeVideo's current terms say the legacy Free Account began phasing out in April 2026, while its pricing page promotes trials for current plans.
How do I import files into WeVideo?
Open a project, choose Add media, and upload or record your material. Add the files you need to the project bin, then drag them onto the timeline.
Where is the WeVideo export button?
In the current full editor, Export is in the upper-right corner. Choose the available settings, start the export, then wait for processing before downloading.
Why is an export option missing?
Resolution, download, and other export options can depend on the account plan and, for school accounts, administrator permissions.

About the Author
Joseph Nilo has been working professionally in all aspects of audio and video production for over twenty years. His day-to-day work finds him working as a video editor, 2D and 3D motion graphics designer, voiceover artist and audio engineer, and colorist for corporate projects and feature films.
WeVideo Related Posts
Surprising WeVideo Reviews: What the Experts Really Think!
Affordable Video Editing: WeVideo Pricing and Plans Explained
WeVideo Editing Tips: A Beginner's Guide to Mastering the Platform
Step-by-Step Tutorial: Creating Your First Video on WeVideo
Advanced WeVideo Features: Unlocking Creative Potential for Professionals
WeVideo vs. Other Editing Software: A Comprehensive Comparison
Maximizing School Projects with WeVideo: A Teacher's Perspective
WeVideo for Business: Enhancing Your Company's Digital Marketing
WeVideo Mobile App Review: Editing on the Go
Integrating WeVideo in E-Learning: Tips and Tricks
WeVideo for YouTube Creators: Elevating Your Channel
WeVideo Updates and Feature Improvements
WeVideo for Nonprofits: Storytelling and Advocacy Through Video
WeVideo and Social Media Marketing: Strategies for Success
WeVideo’s Cloud-Based Editing: Advantages for Remote Work
- Getting Started With WeVideo
- Importing Your Media
- Crafting Your Story
- Adding Creative Flair
- Fine-Tuning With Audio
- Finalizing Your Video
WeVideo Related Posts
Surprising WeVideo Reviews: What the Experts Really Think!
Affordable Video Editing: WeVideo Pricing and Plans Explained
WeVideo Editing Tips: A Beginner's Guide to Mastering the Platform
Step-by-Step Tutorial: Creating Your First Video on WeVideo
Advanced WeVideo Features: Unlocking Creative Potential for Professionals
WeVideo vs. Other Editing Software: A Comprehensive Comparison
Maximizing School Projects with WeVideo: A Teacher's Perspective
WeVideo for Business: Enhancing Your Company's Digital Marketing
WeVideo Mobile App Review: Editing on the Go
Integrating WeVideo in E-Learning: Tips and Tricks
WeVideo for YouTube Creators: Elevating Your Channel
WeVideo Updates and Feature Improvements
WeVideo for Nonprofits: Storytelling and Advocacy Through Video
WeVideo and Social Media Marketing: Strategies for Success
WeVideo’s Cloud-Based Editing: Advantages for Remote Work