
Updated May 12, 2026.
Quick answer: a seamless Final Cut Pro transition is less about picking a flashy effect and more about matching motion, timing, composition, and audio across the cut.
Open the Transitions browser with Control-Command-5, drag a transition to an edit point, or select the edit point and press Command-T to apply the default Cross Dissolve.
Transitions are useful when they help the viewer understand time, motion, or mood. They become distracting when they announce the editor instead of serving the scene.
This guide focuses on transitions that feel motivated: dissolves, push moves, whip pans, Flow for jump cuts, and plugin transitions used with restraint.
What Makes a Transition Seamless?
A seamless transition works because the outgoing shot and incoming shot already have something in common. The effect simply helps the cut feel intentional.
The camera or subject moves in a similar direction across both shots.
The transition lands on a beat, gesture, blink, camera move, or spoken phrase.
The clips are close enough in exposure and color that the effect does not reveal a mismatch.
Before adding a transition, trim the edit until it works as a cut. If the cut is weak, a transition usually makes the weakness more visible.
How to Add a Transition in Final Cut Pro
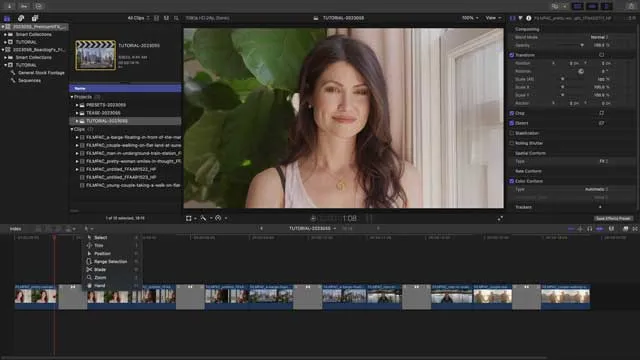
Apple's current Final Cut Pro guide describes the standard workflow clearly: open the Transitions browser, choose a transition, then drag it to an edit point. You can also select an edit point and double-click a transition.
For the fastest dissolve, select the edit point and press Command-T. Final Cut Pro applies the current default transition, which is Cross Dissolve unless you have changed it.
| Action | Final Cut Pro Method | Best Use |
|---|---|---|
| Open Transitions browser | Click the Transitions button or press Control-Command-5 | Browsing built-in categories and previewing options. |
| Add default transition | Select an edit point and press Command-T | Fast cross dissolves and repeated timeline work. |
| Replace a transition | Drag a new transition on top of the old one | Trying cleaner alternatives without rebuilding the edit. |
| Copy a transition | Copy/paste or Option-drag the transition | Keeping a repeated transition style consistent. |
Final Cut Pro creates transitions using media handles. If there are not enough extra frames before or after the cut, trim the clip or let Final Cut Pro create the overlap.
Best Transition Types to Use
Cross dissolve, fade to black, fade from black, subtle wipes, and audio crossfades are still the most useful transitions for narrative and client work.
The transition calls attention to itself, hides a bad cut, breaks the rhythm, or adds plugin-heavy motion to footage that does not support it.
Cross dissolve
Use a cross dissolve for time passing, gentle scene changes, openings, endings, and emotionally slower moments.
Flow transition
Apple's Flow transition is designed to merge jump cuts and remove pauses or mistakes in on-camera interviews. Keep it short; Apple notes that Flow uses a fixed six-frame duration and unexpected results can happen when it is forced beyond its intended use.
Push, wipe, and slide transitions
Use these when the shot already has direction. A push transition feels better when the subject or camera movement leads the viewer into the next shot.
Whip pan and zoom transitions
These can work for YouTube, travel, sports, and social edits. They need motion blur, matching direction, and rhythm; otherwise they feel like presets.
Common Transition Mistakes
- No handle frames: the transition needs extra media before and after the cut.
- Too many transition styles: a project with ten different transition looks feels inconsistent.
- No audio planning: a visual transition often needs a clean audio crossfade or sound bridge.
- Using a transition to hide poor pacing: fix the cut first, then add the effect.
- Overusing plugin packs: strong plugin transitions should be a style choice, not the default edit language.

Third-Party Transition Plugins
Third-party transitions can be useful when a project has a defined visual style and deadlines are tight. FxFactory, MotionVFX, and Pixel Film Studios all offer Final Cut Pro transition products, but they are not a substitute for good edit timing.
Before buying a pack, check the demo footage, compatibility notes, render cost, and whether the transition style fits your actual projects.
Final Cut Pro Transition FAQ
How do I add a transition in Final Cut Pro?
Open the Transitions browser with Control-Command-5, drag a transition to an edit point, or select the edit point and press Command-T to add the default transition.
Why will Final Cut Pro not add my transition?
The most common reason is missing handle frames. Trim the clips to create extra frames on both sides of the edit point, then apply the transition again.
What is the Flow transition for?
Flow is designed to smooth jump cuts in on-camera interviews, especially when removing pauses or mistakes. It is not a general-purpose flashy transition.
What is the best transition for professional edits?
Most professional edits use simple cuts, cross dissolves, fades, and motivated movement transitions. The best transition is the one the viewer barely notices.
Should I use third-party transition plugins?
Use them when they match the project style and save time. Avoid relying on plugin transitions to cover weak shot planning or poor pacing.
Related Final Cut Pro Guides
For better transition timing, start with the Final Cut Pro performance guide, the iPhone HDR workflow, and the LOG post-production workflow.

About the Author
Joseph Nilo has been working professionally in all aspects of audio and video production for over twenty years. His day-to-day work finds him working as a video editor, 2D and 3D motion graphics designer, voiceover artist and audio engineer, and colorist for corporate projects and feature films.
Table of Contents
- Quick Answer
- What Makes a Transition Seamless?
- How to Add a Transition in Final Cut Pro
- Best Transition Types to Use
- Common Transition Mistakes
- Third-Party Transition Plugins
- Final Cut Pro Transition FAQ
Final Cut Pro Related Posts
How to Create a Seamless Transition in Final Cut Pro
Mastering the Essentials: A Beginner's Guide to Final Cut Pro Keyboard Shortcuts
Optimizing Performance in Final Cut Pro
How to Work With iPhone HDR Footage in Final Cut Pro
All About the Final Cut Pro Student Discount
Video Editing Related Posts
Adobe Creative Cloud for Video Editing
Top 10 Video Editing Software for Mac
The Benefits of Dual-Monitor Setups for Video Editing
How to Choose the Right Video Editing Monitor for Your Needs
Best Monitors for Video Editing
(Almost) 50 Mistakes Every New Video Producer Makes
Breakthrough AI Tools: Elevate Your Video Production Game!
Find the Best Export Settings for YouTube Videos Now!
Your Guide on Where To Find Video Editor Remote Jobs
Adobe video workflow guides