The process of adding video transitions is simple but the "why" and "when" to add video transitions require a bit more explanation and experience editing video.
This article will cover how to add transitions in Premiere Pro and address common issues, like when Premiere Pro can't apply a transition.
This page may include affiliate links.
Though I only recommend software that I use and fully believe in.
⭐⭐⭐⭐⭐
I pay for Adobe Creative Cloud and have used it every day in my 20-year career as a video editor, producer, and colorist.
Purchasing Adobe CC through these links will get you the best deal available and support this site.
Get Adobe Creative Cloud Now!Table of Contents
- What are Transitions?
- When should I use transitions?
- How to Apply Transitions in Premiere Pro
- What are Some Commonly-Used Video Transitions?
- Types of Audio Transitions in Premiere Pro
- Using clip handles
- How To Edit a Transition
- Working with the default video transition in Adobe Premiere Pro
- How to Import Premiere Pro Transitions
- Working with Issues Like “Premiere Pro Can’t Apply Transition”
- How do I add transitions to all clips in Premiere?
- Third Party Transition Effects for Adobe Premiere Pro
- What About Adobe Premiere Rush Transitions?
- Premiere Pro Transitions FAQ
What are Transitions?
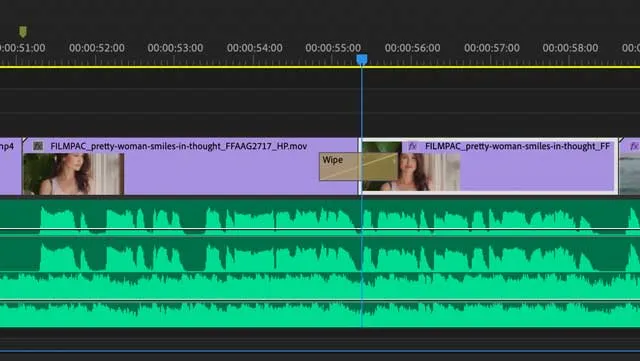
Transitions are an effect created between different media on the same track that creates an animated link between them.
Transitions move scenes along between different shots.
In real-world terms, you've seen this effect countless times: a dissolve between two shots of a person walking across a room and the next shot of them walking out a door.
Different transitions might be used to pass time as opposed to physically moving two or more clips for a sense of energy on the Premiere Pro timeline.
In video editing, many different types of transitions can be used to add style or energy to your project. Included are everything from simple, smooth transitions to super cool video transitions in Premiere Pro.
The most common type of transition is a cut, which is when one video clip instantly replaces another.
But for this article, that might be considered the lack of a video transition, since we haven't added a transition to the cut between clips.
There are also fades, wipes, and other more creative transitions that can be used to add variety to your project. More on those in a minute.
Additionally, for those who seek more specialized effects, learning how to import Premiere Pro transitions can greatly expand your editing capabilities.
Included are everything from simple, smooth transitions to super cool video transitions in Premiere Pro.
When should I use transitions?
There is no hard and fast rule for when to use transitions in your video edit.
However, as a general guideline, you should only use transitions when it helps the storytelling of your project.
If a cut from one scene to the next makes sense without a transition, then don't add one just for the sake of it.
However, if a particular transition helps to add energy or style to your edit, then, by all means, use it!
Using too many transitions might be distracting so watching from the first clip to the end of your timeline panel a few times will help you review.
How to Apply Transitions in Premiere Pro
Applying transitions in Adobe Premiere Pro is simple. Just follow these five easy steps:
- Select the clip you want to apply a transition to.
- Click on the "Effects" tab in the Premiere Pro toolbar (it looks like a wrench).
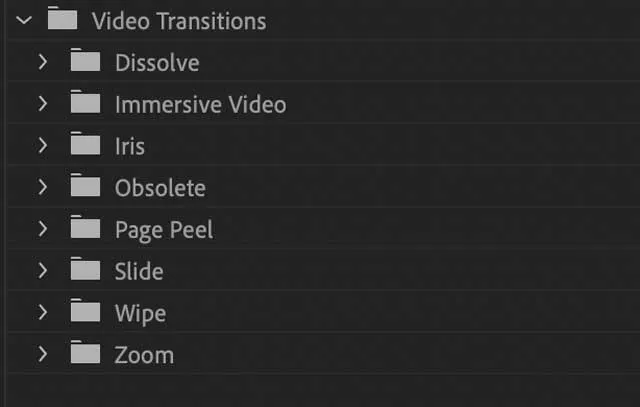
- Expand the "Video Transitions" folder to see all the Premiere Pro transitions.
- Drag and drop the desired transition onto the clip. You'll know you're in the right place when the mouse pointer shows the transitions icon.
What are Some Commonly-Used Video Transitions?
Some of the most commonly-used video transitions include:
Cross Dissolve: This is a basic transition type that fades one clip into a second clip. It's often used as an intro or outro to a scene. It's one of the more commone default transitions in use by video editors.
Fade to Black: A fade-to-black transition is exactly what it sounds like. It fades the video from its current state to complete blackness. This is commonly used at the end of a timeline or used as a dip to black when used between a clip and second clip.
Dip to White: A dip to white transition is similar to a fade to black, except it fades to complete whiteness between two clips.
Wipe: A wipe is a transition type that moves one clip out of the frame while another clip moves in. There are many different types of wipes, such as a clock wipe (aka Premiere Pro Radial Wipe). George Lucas is famous for using Edge Wipes and Diagonal Wipes in his Star Wars movies.
Shape: A shape transition is when a geometric shape, such as a circle or square, is used as a reveal between two clips in the sequence.
Spin: A spin transition rotates the video frame around a fixed point, giving the illusion that the scene is spinning around.
Zoom: A zoom transition slowly or quickly zooms in or out of the video frame between two clips.
3D Spin: A 3D spin is similar to a regular spin, except it uses a 3D perspective to make it appear as if the scene is spinning around you.
The best Premiere Pro transitions add to the "story" of your edit and do not distract.
Types of Audio Transitions in Premiere Pro
In addition to video transitions, various types of audio transitions can be used in Premiere Pro.
- Crossfade: Crossfades are smooth transitions that fade one audio clip into another. This is commonly used to smoothly transition between two pieces of dialogue or two songs.
- Fade In/Out: A fade in or fade out transition slowly increases or decreases the volume of an audio clip until it can no longer be heard
The Default Audio Transition in Premiere Pro is a Crossfade, which you can apply by dragging it onto an audio clip in your timeline.
To access the various types of audio transitions, expand the "Audio Transitions" folder in the Adobe Premiere Pro effects panel.

Using clip handles
You can use clip handles to add extra frames to a clip on your timeline, giving you more room to apply transitions.
To do this, simply select the clip you want to add handles to, then press "Cmd + Shift + D" (Mac) or "Ctrl + Shift + D" (PC). This will add extra frames to the beginning and end of your clip, giving you more room to work with.
Clip handles are especially useful when you're working with audio clips, as they give you more control over the timing of your audio transitions.
How To Edit a Transition
Adding transitions in Premiere Pro is simple. But what if you want to edit a transition to make it longer or shorter?
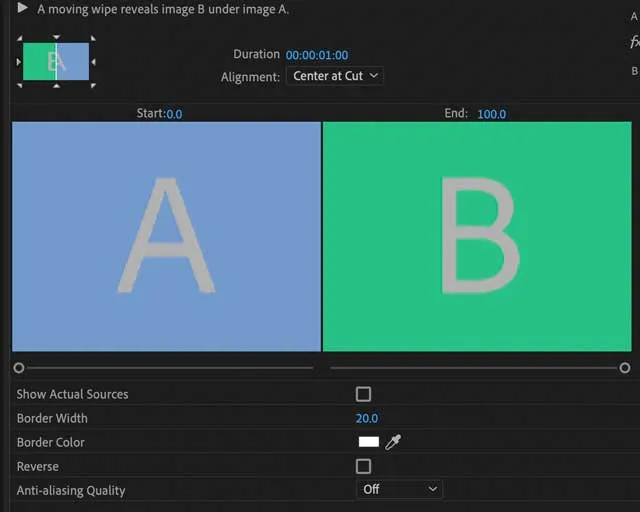
To do this, simply select the transition on your timeline, then press "Cmd + D" (Mac) or "Ctrl + D" (PC). This will open up the effect controls panel for that particular transition, where you can adjust its length. Depending on the type of transition, effects panel might have additional parameters you can adjust, for example the feathering of the edge of a wipe.
You can also use the "Ripple Edit Tool" to quickly trim the beginning or end of a transition. To do this, simply select the transition on your timeline, then press "B" on your keyboard. This will enable the Ripple Edit Tool, which you can use to trim the beginning or end of your transition.
Retiming transitions in the timeline panel is as easy as dragging the edge of the transition to make it longer or shorter.
Working with the default video transition in Adobe Premiere Pro
The default video transition in Adobe Premiere Pro is the "Cross Dissolve" transition. To apply default video transitions, simply select the two clips you want to transition between on your timeline, then press "Cmd + D" (Mac) or "Ctrl + D" (PC).
Or go to Edit / Sequence / and choose Apply Default Transition.
You can set the default transition in Premiere Pro by going to Preferences > Timeline > Default Transition. From here, you can select a different default transition, such as the "Fade to Black" transition. Here in Premiere Pro you can also set the default transition duration, as well.
How to Import Premiere Pro Transitions
For those who want a wider range of transitions beyond what's available in Premiere Pro by default, importing transitions is a must-know skill. Follow these steps:
- After acquiring a third-party transition pack, download and unzip the files.
- Open Premiere Pro and navigate to Window > Essential Graphics.
- Click on the “Install Motion Graphics Template” button, represented by an icon with a plus sign.
- Browse and select the transition templates you'd like to import.
- Once imported, these transitions will be available in your Essential Graphics panel for use.
If you find that Premiere Pro can't apply transition after importing, ensure that your software is updated, and recheck the installation steps for any mistakes.
Working with Issues Like "Premiere Pro Can't Apply Transition"
Sometimes, even after successfully importing transitions, you might encounter issues like "Premiere Pro can't apply transition". Here are a few troubleshooting steps:
- Ensure your software version supports the transition type.
- Recheck the sequence settings.
- Reset the Premiere Pro preferences.
- Reach out to the transition pack vendor for support or any required updates.
How do I add transitions to all clips in Premiere?
To add transitions to all clips in Premiere Pro, simply select all the clips on your timeline that you want to transition, then press "Cmd + D" (Mac) or "Ctrl + D" (PC). This will apply the default transition (Cross Dissolve) to all selected clips.
You can also bulk add transitions in Premiere Pro by selecting multiple clips on your timeline, then choosing "Add Selected Transitions" from the "Edit" menu.
Finally, you can add transitions in Premiere Pro by dragging and dropping them from the "Effects" panel onto your timeline.
Third Party Transition Effects for Adobe Premiere Pro
In addition to the default Premier Pro transitions included in Adobe Premiere Pro, there are also many third-party transition effects and video editing tools available. These can be found online or through a plugin. Go to each website to install transitions in Premiere Pro.
Some popular third-party transition plugins for Adobe Premiere Pro include:
- DVE Ultimate Transitions
- Misfire Film burns
- FxFactory Pro
What About Adobe Premiere Rush Transitions?
In Adobe Premiere Rush, transitions are used to seamlessly move between different video clips in your project.
To add a transition to your project, first, place the playhead on the edit point between the two clips that you want to transition between.
Next, go to the "Transitions" panel, which can be found in the right sidebar.
In the Transitions panel, you can browse through the available transitions and select the one that you want to use.
Once you have selected a transition, you can drag it to the edit point between the two clips.
You can adjust the duration of the transition by dragging the edges of the transition in the timeline.
Additionally, you can customize the appearance of the transition by adjusting the settings in the Transition Properties panel. Y
ou can also add transitions to audio clips by selecting the audio clip in the timeline and using the Transitions panel in the same way.
Premiere Pro Transitions FAQ
How do I add transitions between video clips in Premiere Pro?
Applying transitions in Adobe Premiere Pro is straightforward. After selecting the clip you wish to apply a transition to, navigate to the "Effects" tab, expand the "Video Transitions" folder, and then drag and drop your desired transition onto the clip.
What's the default video transition in Adobe Premiere Pro?
The default video transition in Adobe Premiere Pro is the "Cross Dissolve" transition. You can quickly apply this by selecting your clips and pressing "Cmd + D" (Mac) or "Ctrl + D" (PC).
How do I import Premiere Pro transitions?
To import third-party transitions, download the transition pack, unzip the files, open Premiere Pro, navigate to Window > Essential Graphics, click on the “Install Motion Graphics Template” button, and then select the transition templates you wish to import.
I imported a transition, but Premiere Pro can't apply it. Why?
If Premiere Pro can't apply a transition after importing, it might be due to compatibility issues, outdated software, or sequence settings. Always ensure your software version supports the transition type and that you followed the correct procedure.
When should I use video transitions in my edit?
While there's no strict rule, transitions should aid your project's storytelling. If a simple cut suffices, adding a transition might be unnecessary. However, if a transition enhances your edit's energy or style, it's worth including.
What are some commonly-used video transitions in Premiere Pro?
Some popular transitions include Cross Dissolve, Fade to Black, Dip to White, Wipe (like the clock wipe or Premiere Pro Radial Wipe), and various shape, spin, and zoom transitions.
Are there audio transitions in Premiere Pro?
Yes, Premiere Pro offers various audio transitions like Crossfade, which smoothly transitions between two audio pieces, and Fade In/Out, which adjusts the volume of an audio clip until it's silent.
How do I edit an existing transition's length in Premiere Pro?
Select the transition on your timeline, press "Cmd + D" (Mac) or "Ctrl + D" (PC) to open the effect controls panel, and adjust the transition's length. Alternatively, use the "Ripple Edit Tool" to trim the transition's beginning or end.
Can I set a new default transition in Premiere Pro?
Yes, you can change the default transition in Premiere Pro by navigating to Preferences > Timeline > Default Transition. From here, you can choose a different default transition and set its duration.
Where can I find third-party transition effects for Premiere Pro?
Several third-party transition plugins are available online or as plugins for Adobe Premiere Pro. Examples include DVE Ultimate Transitions and Misfire Film burns. Always ensure the transition pack is compatible with your software version.
Video Editing Related Posts
Adobe Creative Cloud for Video Editing
Top 10 Video Editing Software for Mac
The Benefits of Dual-Monitor Setups for Video Editing
How to Choose the Right Video Editing Monitor for Your Needs
Best Monitors for Video Editing
Best Video Editing Software in 2023
Best Mac for Video Editing in 2023
(Almost) 50 Mistakes Every New Video Producer Makes
Breakthrough AI Tools: Elevate Your Video Production Game!
Table of Contents
- What are Transitions?
- When should I use transitions?
- How to Apply Transitions in Premiere Pro
- What are Some Commonly-Used Video Transitions?
- Types of Audio Transitions in Premiere Pro
- Using clip handles
- How To Edit a Transition
- Working with the default video transition in Adobe Premiere Pro
- How to Import Premiere Pro Transitions
- Working with Issues Like “Premiere Pro Can’t Apply Transition”
- How do I add transitions to all clips in Premiere?
- Third Party Transition Effects for Adobe Premiere Pro
- What About Adobe Premiere Rush Transitions?
- Premiere Pro Transitions FAQ
Video Editing Related Posts
Adobe Creative Cloud for Video Editing
Top 10 Video Editing Software for Mac
The Benefits of Dual-Monitor Setups for Video Editing
How to Choose the Right Video Editing Monitor for Your Needs
Best Monitors for Video Editing
Best Video Editing Software in 2023
Best Mac for Video Editing in 2023
(Almost) 50 Mistakes Every New Video Producer Makes
Breakthrough AI Tools: Elevate Your Video Production Game!
