

Quick answer: the best way to learn Premiere is to finish a small project: create a project, import clips, organize bins, build a rough cut, clean up audio, apply basic color, add captions or graphics, then export a review file.
This guide is the first-project workflow. For broader background, start with What Is Adobe Premiere Pro? or Adobe Premiere Pro for Beginners.
This Adobe Premiere Pro starter guide walks through your first real edit from setup to export.
Instead of explaining only what Premiere is, this page focuses on the order of work: setup, import, organize, rough cut, audio, color, captions, graphics, export, and next steps.
Updated June 2026: Premiere now includes more beginner-relevant workflow help than older starter guides mention, including transcript and caption tools, Frame.io and Adobe Stock panels, Content Credentials on export, Firefly/Firefly Boards handoff, and current system requirements for HD, 4K, and higher-resolution editing. Use those features after the basic first-project workflow makes sense.
This page may include affiliate links.
I only recommend software I would seriously evaluate for real creator or production workflows.
⭐⭐⭐⭐⭐
I pay for Adobe Creative Cloud and have used it every day in my 20-year career as a video editor, producer, and colorist.
Use the Adobe link below to check the current Creative Cloud offer. It can support this site and helps me keep these guides updated. Check current Adobe Creative Cloud offer.
Get Adobe Creative Cloud Now!Before You Start
Premiere is subscription software installed through the Creative Cloud desktop app. You need an Adobe ID and internet access for activation and subscription validation.
If you still need to install it, use How to Download Adobe Creative Cloud Apps. If you are still deciding whether to subscribe, read How to Buy Premiere Pro.
Before editing 4K, long-form, or multicam footage, check Adobe's current Premiere technical requirements. Adobe's April 2026 guidance notes that minimum specs are for HD editing, while recommended specs are for HD, 4K, or higher-resolution work. Those projects can stress storage speed, memory, graphics hardware, and free disk space more than short HD edits.
First Project Workflow Checklist
- Create a dedicated project folder before opening Premiere.
- Save the Premiere project file inside that folder.
- Import only the media you need for the first edit.
- Sort clips into simple bins before cutting.
- Build the story before polishing effects.
- Fix dialogue and music levels before color.
- Add captions, titles, and graphics near the end.
- Export a review file, watch it fully, then make final fixes.
1. Set Up Your Project
Create one main folder for the project before you launch Premiere. Inside it, make subfolders for footage, audio, graphics, exports, and project files.
Open Premiere, create a new project, and save it in the project folder. Use a clear file name such as brand-video-v1.prproj or youtube-edit-first-cut.prproj.
For most first projects, you do not need to change every technical setting immediately. Focus on keeping your files organized and letting the sequence match your main footage.
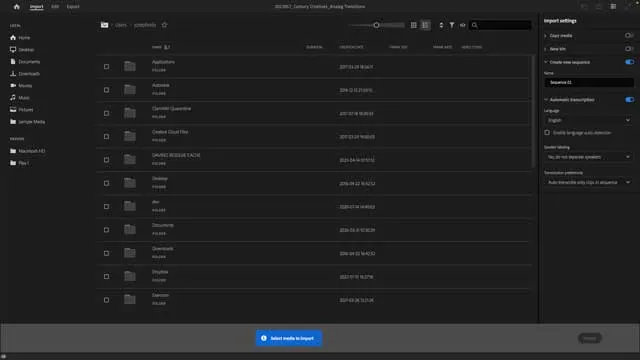
2. Import Your Media
Import your video clips, voiceover, music, logo files, and still images. Use the Import workspace, the Media Browser, or drag files into the Project panel.
Do not import every file from your camera card if you only need a few clips. A smaller project is easier to learn from and faster to troubleshoot.
If Premiere shows offline media later, it usually means files were moved, renamed, or disconnected after import. Keeping all project assets inside one folder makes relinking easier.
3. Organize Your Footage
Create bins for footage, audio, graphics, sequences, and exports. For a simple first project, that structure is usually enough.
Rename important clips with descriptive labels such as intro-shot, main-interview, or product-closeup. You do not need perfect cataloging, but you should be able to find your best shots quickly.
If you recorded multiple takes, mark the strongest ones before cutting. This keeps the timeline from becoming a dumping ground.
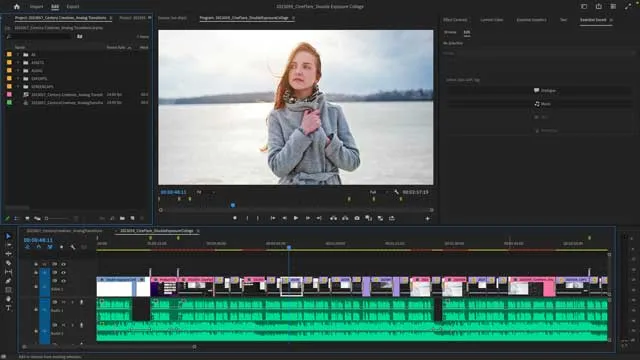
4. Build The Rough Cut
Create a sequence from your main clip or choose a sequence preset that matches your delivery format. For many web videos, that means a standard horizontal or vertical sequence depending on where the video will be published.
Start by placing your best clips in story order. Do not worry about color, transitions, captions, or effects yet.
Trim each clip so the edit moves clearly from one idea to the next. The rough cut should answer one question: does the video work without polish?
5. Clean Up The Audio
Once the rough cut works, make the dialogue or main voice track easy to hear. Viewers will forgive simple visuals more quickly than unclear audio.
Adjust clip volume so speech stays consistent across the timeline. Lower background music beneath dialogue instead of letting it compete.
Use basic audio cleanup tools conservatively. A light pass is usually better than over-processing a beginner project.
6. Make A Basic Color Pass
After audio is stable, move to color correction. The goal is to make clips look consistent, not to create an extreme style.
Start with exposure, white balance, and contrast. If two clips were shot in the same scene, they should feel like they belong together.
Use creative looks only after the footage is balanced. This keeps the edit from hiding technical problems under heavy styling.
7. Add Captions And Graphics
Add captions if the video includes spoken information that viewers may watch without sound. Check generated or typed text carefully, especially names, product terms, and technical phrases.
Keep titles and lower thirds short. The viewer should understand the graphic without pausing the video.
If you add a logo, place it intentionally and avoid covering faces, subtitles, or important screen detail. Graphics should support the edit rather than distract from it.
8. Export The Project
Before exporting, watch the full timeline from start to finish. Look for jump cuts, missing audio, typo errors, awkward black frames, and clips that start or end too abruptly.
Open the Export workspace and choose a format appropriate for your destination. For many online uses, H.264 is a practical review or delivery format, but your final settings should match the platform or client requirements.
Name the export clearly, such as project-name-review-v1.mp4. Keep exports in their own folder so you can tell drafts from final files.

9. What To Learn Next
After finishing one small project, repeat the workflow with a slightly harder edit. Try a talking-head video, a short product demo, a social clip, or a simple interview.
Next, learn keyboard shortcuts, proxy workflows, multicam basics, color scopes, audio mixing, and reusable export presets. Those skills are easier to understand once you have completed a full edit.
If you are comparing Adobe plans, read Adobe Creative Cloud. For official feature context, review Adobe's Premiere features page. You can also check Adobe's current plans through this sponsored link: view Premiere options.
Best For
- Beginners who want to finish a first edit instead of only reading feature descriptions.
- Creators making YouTube videos, social clips, tutorials, interviews, or simple client edits.
- Editors who need a repeatable project workflow before learning advanced tools.
- Users who already installed Premiere through Creative Cloud and want a practical starting sequence.
Skip If
- You only need a definition of Premiere and do not plan to edit yet.
- You are looking for a full professional color grading or sound mixing course.
- You need current pricing details before deciding whether to subscribe.
- Your project is 4K, long-form, or multicam and your computer has not been checked against Adobe's current requirements.
Premiere Starter Guide FAQ
What should my first Premiere project be?
Choose a small project with a clear finish line, such as a 30-90 second video, a short tutorial, or a simple talking-head edit.
A narrow project helps you learn the full workflow without getting stuck in advanced details.
Do I need Creative Cloud to install Premiere?
Yes. Premiere is installed and managed through the Creative Cloud desktop app.
You also need an Adobe ID and internet access for activation and subscription validation.
Should I learn effects before editing basics?
No. Learn timeline editing, trimming, audio levels, basic color, captions, and export first.
Effects make more sense once you can already finish a clean edit.
What should I check before editing 4K footage?
Check Adobe's current Premiere system requirements before editing 4K, long-form, or multicam projects.
Also confirm that your storage, memory, graphics hardware, and free disk space are suitable for the footage.
How do I know when my first edit is finished?
Your first edit is finished when the story is clear, audio is understandable, captions or graphics are accurate, and the export plays correctly from start to finish.
Do one full review after export because problems are often easier to catch in the finished file.