What is Adobe Premiere Pro?
Are you ready to unleash your creative potential and become a pro video editor?
Welcome to our comprehensive Adobe Premiere Pro tutorial, where we’ll guide you through the ins and outs of this powerful software, specifically designed as Adobe Premiere Pro for beginners.
By the end of this post, you’ll be well on your way to creating stunning videos that captivate your audience.
Key Takeaways
- Learn Adobe Premiere Pro - a professional video editing application with an intuitive interface and powerful features.
- Get familiar with the interface to create a personalized workflow, import media files easily, organize into bins for organization & build your sequence.
- Enhance video w/ effects and transitions, adjust effect parameters, add titles & graphics. Work with audio, then export using Adobe Media Encoder!
This page may include affiliate links.
Though I only recommend software that I use and fully believe in.
⭐⭐⭐⭐⭐
I pay for Adobe Creative Cloud and have used it every day in my 20-year career as a video editor, producer, and colorist.
Purchasing Adobe CC through these links will get you the best deal available and support this site.
Get Adobe Creative Cloud Now!Table of Contents
- What Is Adobe Premiere Pro?
- Getting Started With Adobe Premiere Pro
- Understanding The Interface
- Setting Up A New Project
- Importing Media Files
- Importing Video Footage
- Importing Audio Files
- Organizing Media In Bins
- Creating And Editing Timelines
- Building Your Sequence
- Working With Layers
- Basic Editing Techniques
- Enhancing Your Video With Effects And Transitions
- Applying Video Effects
- Incorporating Transitions
- Adjusting Effect Parameters
- Adding Titles And Graphics
- Using The Essential Graphics Panel
- Customizing Text And Styles
- Saving Title Templates
- Working With Audio
- Adding Music And Sound Effects
- Adjusting Volume Levels
- Audio Mixing And Enhancements
- Color Grading And Correction
- Using The Lumetri Color Panel
- Applying LUTs And Color Presets
- Manual Color Adjustments
- Exporting Your Finished Video
- Choosing Export Settings
- Using Adobe Media Encoder
- Previewing And Quality Control
- Summary

Getting Started with Adobe Premiere Pro
It’s no secret that Adobe Premiere Pro is the go-to professional video editing software for countless content creators worldwide.
With an intuitive interface and powerful features, Premiere Pro enables you to create awe-inspiring videos that elevate your editing game to new heights.
Adobe offers a ton of Adobe Premiere Pro tutorials, covering everything from the basics to advanced techniques.
So whether you’re a complete beginner or an experienced editor looking to switch from another software, there’s an Adobe Premiere Pro tutorial tailored to your needs, including a pro tutorial for beginners.
Understanding the Interface
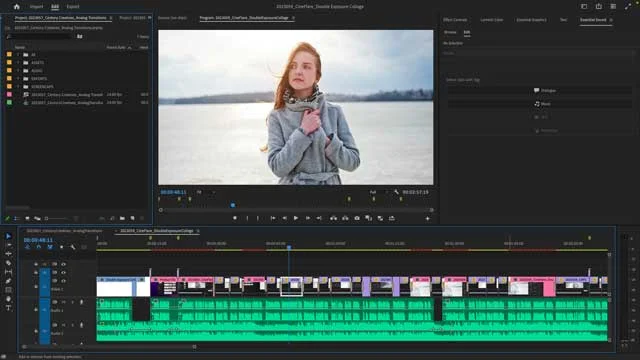
Begin your Premiere Pro journey by getting to know the interface.
The software is divided into three main tabs: Import, Edit, and Export.
The Editing workspace, where you’ll import footage and do the bulk of your work, can be customized to your preferences, including the option to create saved layouts and adjust keyboard shortcuts.
This personalization allows for a smoother and more efficient editing process, so don’t be afraid to tailor the workspace to your liking!
Setting Up a New Project
Start a new project in Premiere Pro by selecting the project preset that matches your footage source.
Project settings determine various aspects of your project, such as format, aspect ratio, and time frame.
In the Scratch Disks tab, select “Same as Project” for all options. This will help ensure optimal performance.
Once you’ve configured your project settings, hit “Create” to begin your editing journey.
Importing Media Files
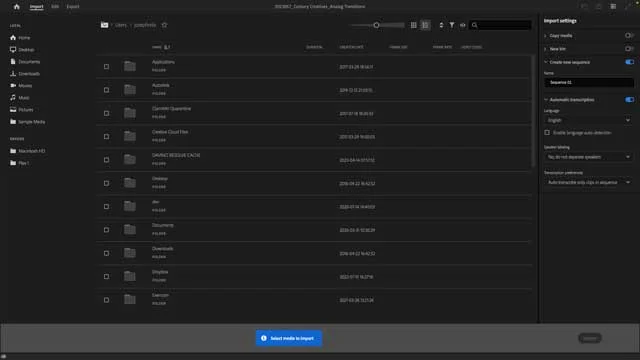
With your project set up, you can begin to import your media files.
Premiere Pro makes it easy to bring in various types of media, such as video footage and audio files, ensuring a seamless editing experience.
Importing Video Footage
Importing video footage into Premiere Pro is a breeze. Simply follow these steps:
- Go to ‘File’ on the toolbar at the top.
- Select ‘Import’ from the drop-down menu.
- Locate your video footage.
- Click ‘Import’ to bring your chosen clips into the software.
With your footage now in Premiere Pro, you’re ready to start crafting your masterpiece.
Importing Audio Files
To import audio files into Premiere Pro, follow the same process as video footage.
Navigate to File > Import, locate your desired audio file, and click ‘Open’ to add it to the Project window.
From music tracks to sound effects, you now have the power to bring your video to life with captivating audio.
Organizing Media in Bins
Maintain an organized project as you import various media files.
Premiere Pro offers a handy feature called “bins,” which function like file folders to sort and store your assets.
To create a bin, right-click an empty space in the Project panel, select ‘New Bin,’ and give it a descriptive name.
With your media assets neatly organized, you’ll spend less time searching and more time editing.

Creating and Editing Timelines
The timeline, where you’ll arrange and edit video and audio layers, is the heart of your Premiere Pro project.
Mastering timelines is key to crafting a polished final product.
Building Your Sequence
To build a sequence, follow these steps:
- Go to File > New > Sequence or click the New Item button in the Project panel and select ‘Sequence’.
- Choose a preset based on your project needs.
- Label your sequence ‘Edit V1’ for easy identification.
With your sequence ready, you can start arranging and editing your media assets.
Understanding the basics of timeline editing, such as adding and deleting clips, is vital.
You can add clips to your timeline by dragging them from the Project panel or by using the 'Insert' or 'Overwrite' buttons in the Source Monitor.
To delete a clip, simply select it and press the 'Delete' key.
You can also move and rearrange clips within the timeline by clicking and dragging them.
If you want to trim a clip, you can do so by dragging the end of the clip left or right.
Remember, the 'Ripple Edit' tool can be your best friend for maintaining sync while trimming.
The timeline also allows you to work with multiple layers of video and audio.
You can stack clips on top of each other, and use the 'Eye' icon to toggle the visibility of each layer.
This is especially useful when working with effects or color grading.
Remember, the timeline is not just for cutting and moving clips. You can also add effects, transitions, text, and graphics directly onto your clips in the timeline.
This is where your video really starts to come to life!
Working with Layers
Premiere Pro’s timeline features video layers (V1, V2, V3) and audio layers (A1, A2, A3). You can rearrange these layers by dragging them within the timeline, allowing you to create complex and visually engaging videos.
Additionally, you can create adjustment layers (File > New > Adjustment Layer) to apply effects across multiple clips.

Basic Editing Techniques
Once your media assets are in the timeline, you can use Premiere Pro’s editing tools to:
border-primary shadow text-dark bg-light
- Trim, cut, and adjust your clips as needed
- Use the Ripple Edit tool to remove the start or end of a clip
- Sync audio by aligning the audio waveform with the corresponding video frame
These are some basic techniques that can help you edit videos and enhance your final product.
Experiment with different editing methods to find the workflow that suits you best.
Enhancing Your Video with Effects and Transitions
Enhance your video and make it stand out by adding effects and transitions using an awesome video editor like Premiere Pro.
It offers a wide range of built-in effects and transitions that can dramatically improve the look and feel of your video.
These effects and transitions can be used to add a professional touch to your video, and can
Applying Video Effects
Applying video effects in Premiere Pro is as simple as dragging and dropping the desired effect onto your clip from the Effects panel.
You can then adjust the effect parameters using the Effect Controls panel to customize the effect’s appearance.
From color correction to stylized visual effects, Premiere Pro’s vast library of effects can help you achieve your desired look.
Incorporating Transitions
Transitions are an essential tool for creating a smooth flow between clips.
Premiere Pro features a variety of transitions, such as cross dissolve, dip to white, and film dissolve.
To add a transition, simply drag and drop your chosen transition from the Effects panel onto the clip in the timeline.
Experiment with different transitions to find the perfect style for your project.
Adjusting Effect Parameters
For fine-tuning your video’s appearance, you may need to adjust effect parameters. These settings control various aspects of the effect, such as color, size, and shape.
By tweaking the parameters in the Effect Controls panel, you can achieve a truly customized and professional-looking result.
Adding Titles and Graphics
Incorporate captivating titles and graphics to convey information and add visual interest to your video clips.
Premiere Pro CC offers a range of tools for creating and editing titles and graphics with ease.
Using the Essential Graphics Panel
The Essential Graphics panel in Premiere Pro is a powerful tool for creating and editing titles.
To access it, simply switch to the Graphics workspace.
From there, you can create new titles, install Motion Graphics templates, and style your titles or graphics using the Edit tab.
Customizing Text and Styles
Customizing text and styles in Premiere Pro is easy.
To create a text box, select the Type Tool and click on the viewer window, then type your desired text.
Deselect the Type Tool and switch to the Selection Tool to edit the text box.
You can change the font, size, color, and effects of your text using the Text tab in Premiere Pro.
For added visual flair, you can also adjust the appearance of your text in the Appearance tab.
Saving Title Templates
To save time and maintain consistency across your video, you can save title templates for future use.
To do this, right-click on your title layer and select ‘Export As Motion Graphics Template’, then choose a folder to save it in.
Now, when you need to add a title with the same style, simply apply the saved template to your new text.

Working with Audio
Audio is a crucial component in any video project.
Premiere Pro offers a variety of tools and features for editing and mixing audio, ensuring that your video has the perfect soundtrack.
From basic volume adjustments to advanced audio effects, Premiere Pro has everything you need to create a
Adding Music and Sound Effects
Adding music and sound effects to your video can greatly enhance its impact and emotional resonance.
To import your audio files, simply follow the same process as importing video footage (File > Import).
Once imported, you can drag your music and sound effect files from the Project panel onto the audio tracks in the timeline.
With your audio in place, you can adjust volume levels, sync audio with video, and edit your audio clips using Premiere Pro’s editing tools.
Adjusting Volume Levels
Balancing the volume levels of your audio is crucial for a professional-sounding video.
Premiere Pro allows you to adjust the volume of individual clips using the Effect Controls panel.
Using the Audio Track Mixer, you can modify the volume of an entire sound track.
Moreover, you can customize other tracks as well.
Keep in mind that background music should typically be between -20 and -35 for optimal balance with dialogue and sound effects.
Audio Mixing and Enhancements
For a polished and professional audio experience, you may need to perform audio mixing and enhancements.
This process involves adjusting and combining multiple audio tracks, as well as applying audio effects like reverb, delay, and equalization.
By fine-tuning your audio, you can achieve a high-quality sound that complements your video and captivates your audience.
Color Grading and Correction
Achieve a professional and visually appealing video with color grading and correction.
Premiere Pro offers a range of color grading tools and techniques to help you enhance the look and feel of your footage.
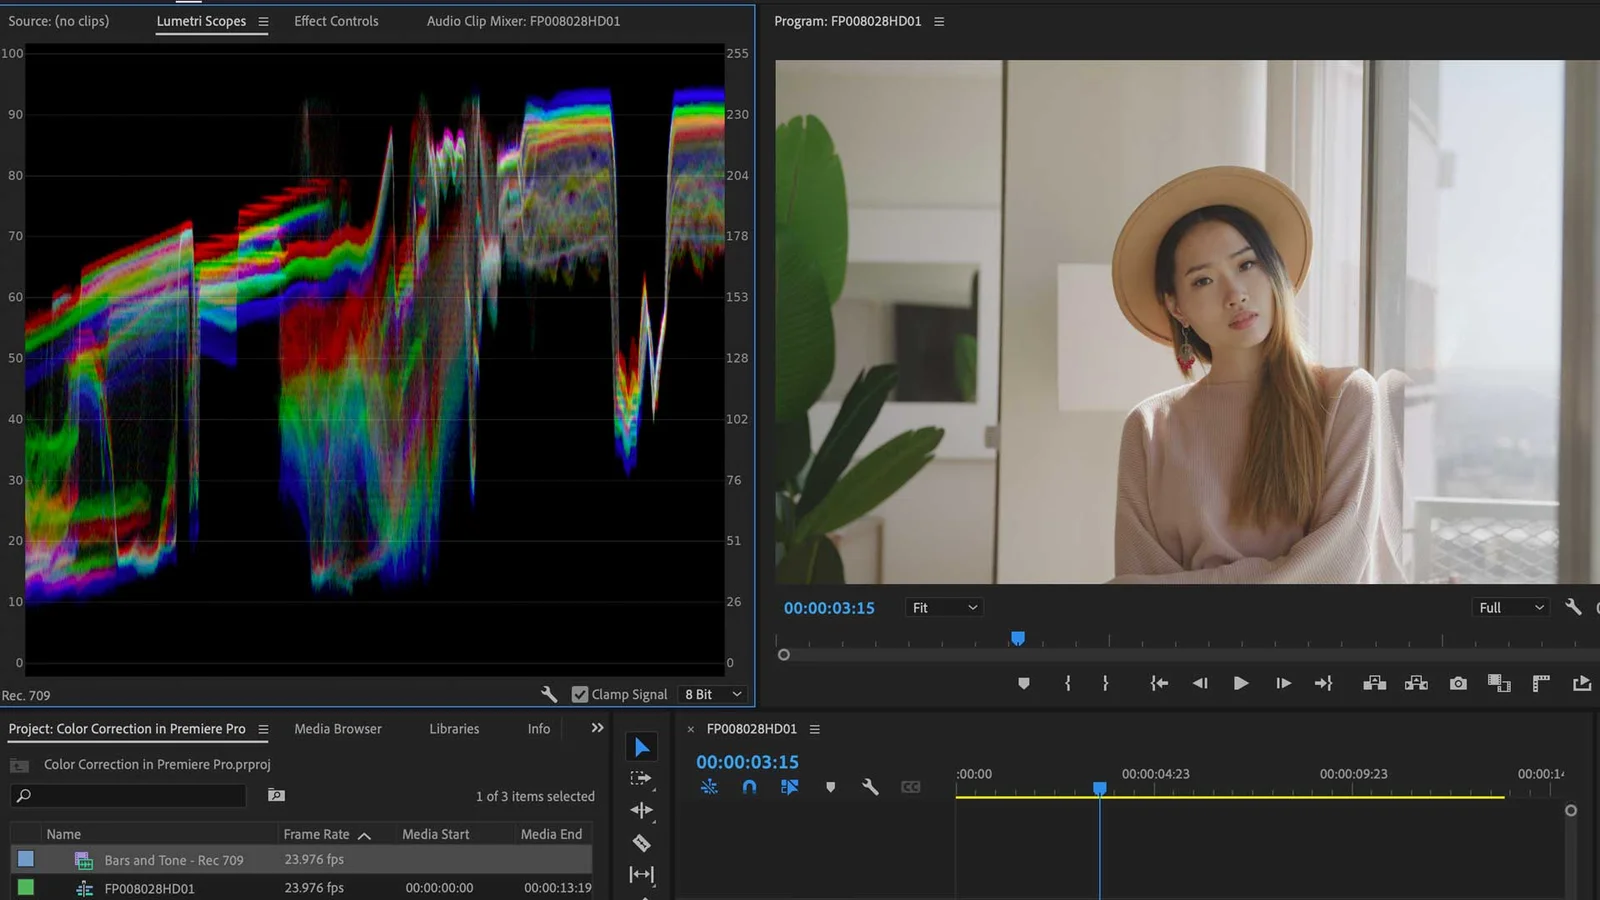
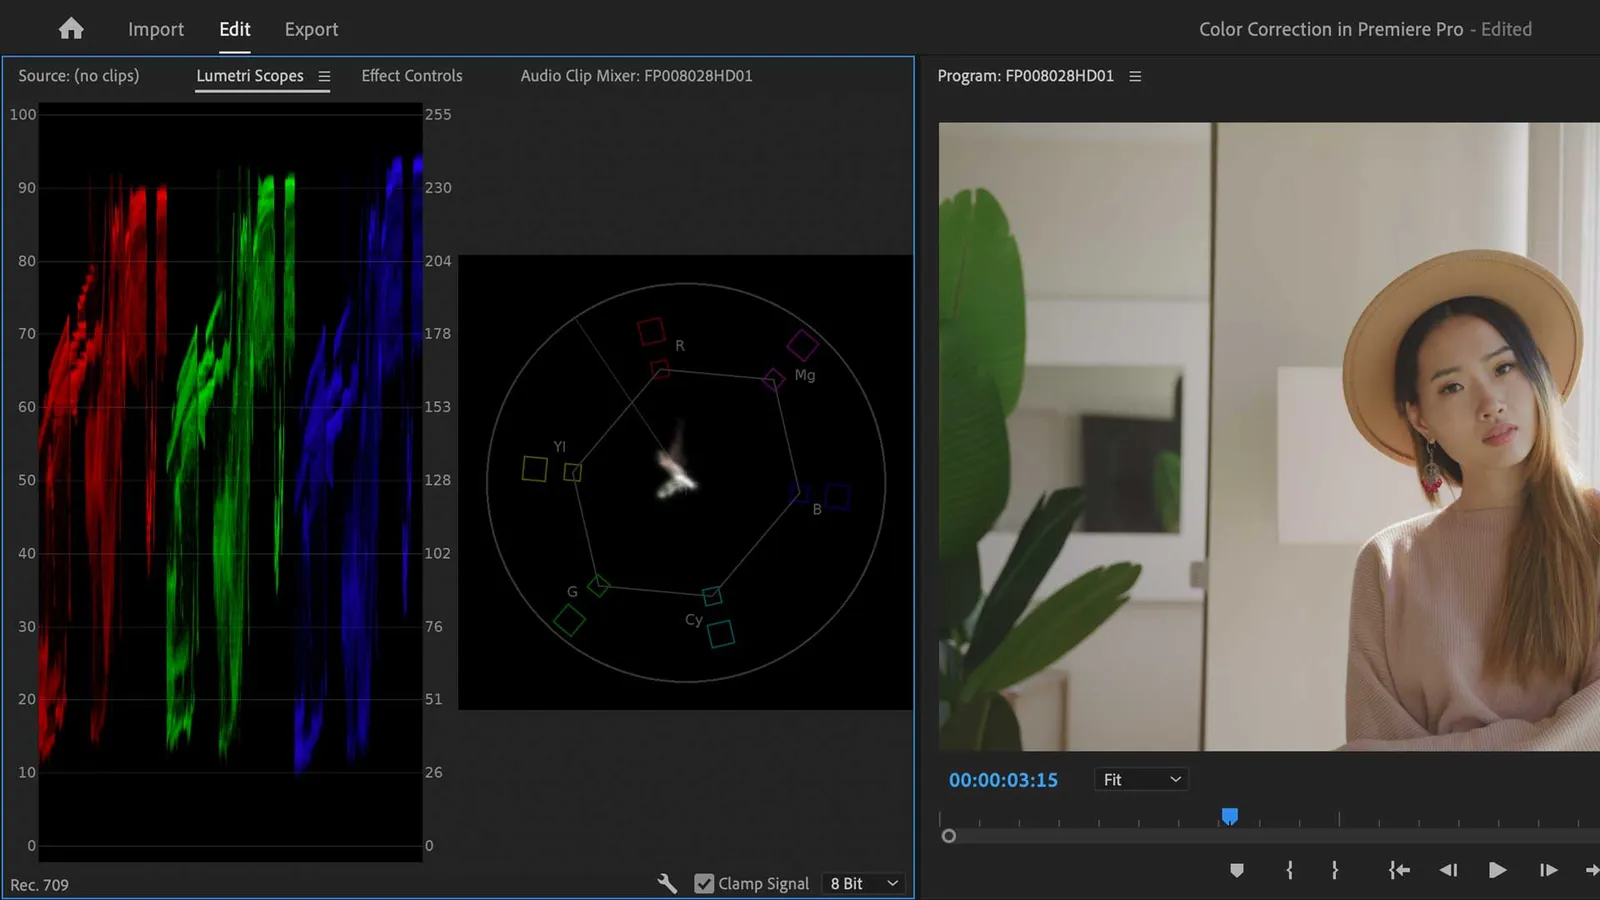
From basic color correction to advanced color grading, you can use the Lumetri Color panel.
Using the Lumetri Color Panel
The Lumetri Color panel in Premiere Pro is your go-to tool for color grading and correction.
Located on the right side of the screen, the Lumetri Color panel offers a range of preset settings, as well as the ability to fine-tune your footage’s color and tone using the provided controls and sliders.
With the Lumetri Color panel, you can adjust the hue, saturation, and luminance of your footage.
Applying LUTs and Color Presets
For a consistent look across multiple clips, you can apply LUTs (Look-Up Tables) and color presets. These tools allow you to quickly apply a specific color grade to your footage, saving time and ensuring visual consistency.
To apply a LUT or color preset, navigate to the Lumetri Color panel and select the desired option.
Manual Color Adjustments
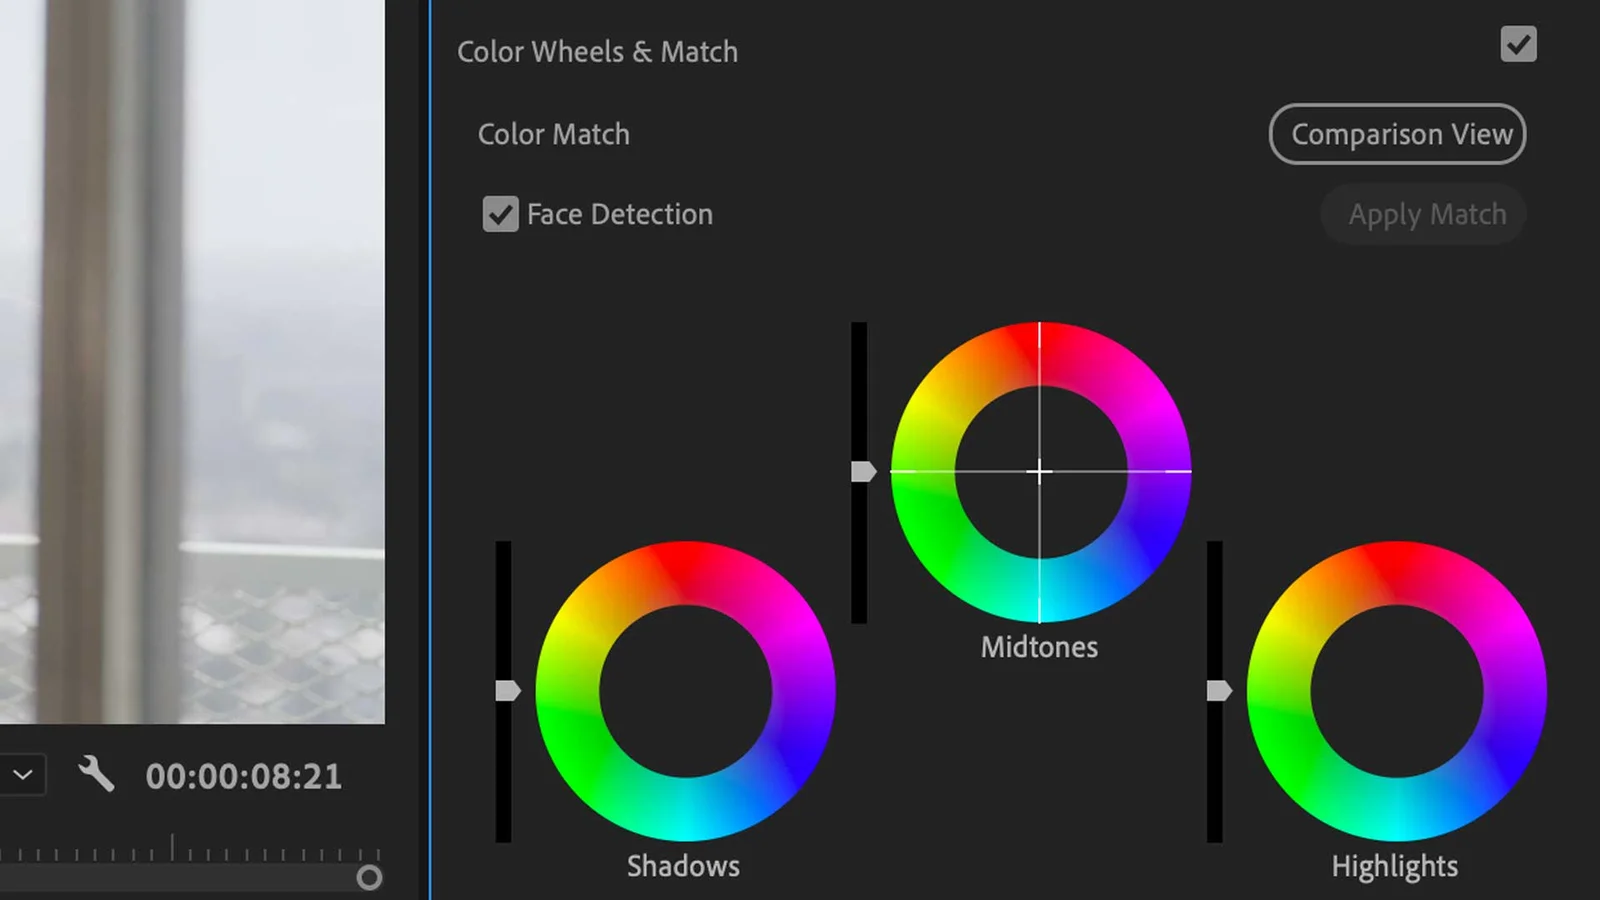
For more precise control over your video’s appearance, you may need to make manual color adjustments. This can involve adjusting the shadows, highlights, and overall color using sliders or color wheels.
When making manual adjustments, it’s essential to make small changes and compare the before and after views to ensure a polished final product.
Exporting Your Finished Video
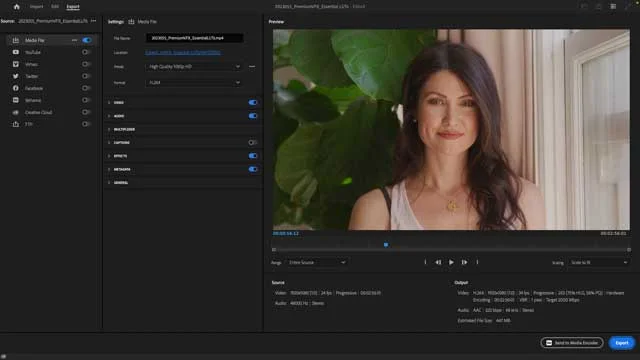
After completing your masterpiece, proceed to export your finished video.
Premiere Pro offers a range of exporting options to ensure your video is optimized for your desired platform and audience.
Choosing Export Settings
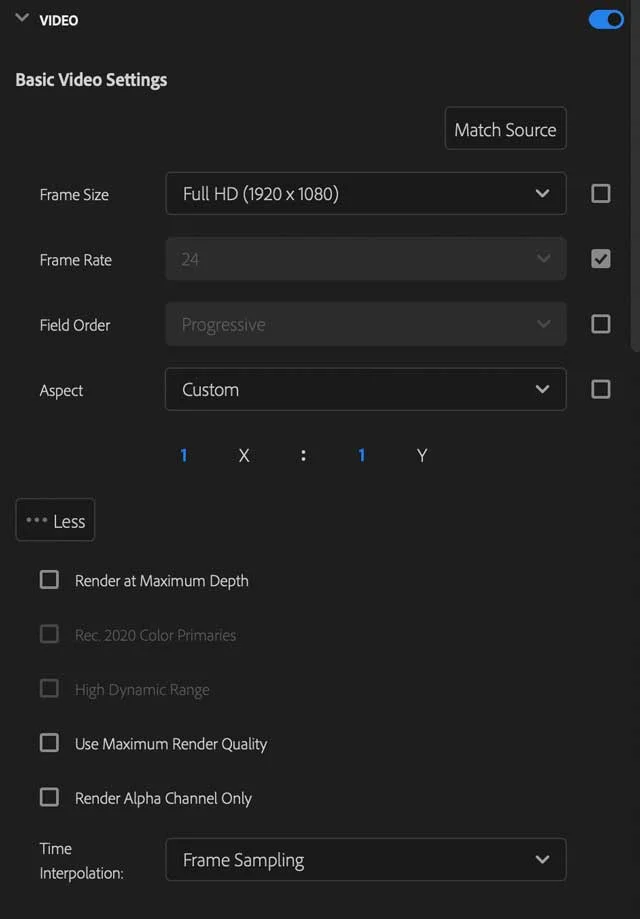
To choose the optimal export settings for your video in Premiere Pro, follow these steps:
- Navigate to File > Export > Media.
- Select your desired format and codec. (H.264 is recommended for web playback).
- Adjust resolution, frame rate, and bitrate settings according to your project needs.
Once you’ve configured your export settings, you’re ready to share your video with the world.
Using Adobe Media Encoder
For batch exporting and background rendering, you can use Adobe Media Encoder, a free tool that comes with Adobe Creative Cloud.
Instead of clicking ‘Export’ in the Export Settings menu, click ‘Queue’ to launch Media Encoder.
This powerful tool allows you to export multiple video files at once while continuing to work on other tasks, streamlining your workflow and saving time.

Previewing and Quality Control
Ensure to preview your video on multiple devices with different screen sizes and resolutions before sharing it.
This ensures that your video looks great across all platforms and allows you to spot any potential issues before sharing.
Also, don’t forget to double-check audio quality using headphones or external speakers to ensure a polished final product.
Summary
Congratulations on completing our comprehensive Adobe Premiere Pro tutorial!
By now, you should have a solid understanding of the software’s features and techniques, allowing you to create stunning videos that captivate your audience.
We hope this tutorial has inspired you to continue exploring the world of video editing and take your skills to new heights.
Premiere Pro Frequently Asked Questions
Is Adobe Premiere Pro easy for beginners?
Adobe Premiere Pro is an advanced software, and requires some prior knowledge and practice before mastering it. However, with the help of tutorials, beginners will be able to use it to edit videos after a few weeks of practice.
How long will it take to learn Adobe Premiere Pro?
It typically takes 150 hours of instruction and independent practice to become an Adobe Certified Professional in Digital Video Using Adobe Premiere Pro, so learning Adobe Premiere Pro can take a significant amount of time.
Is Final Cut Pro or Adobe Premiere better for beginners?
For beginners, Final Cut Pro is easier to pick up and use than Adobe Premiere Pro which has a ton of professional-level features.
Can you buy Adobe Premiere Pro permanently?
Unfortunately, Adobe Premiere Pro is subscription-based software and there is no option to purchase a lifetime license. Your only choice is to buy a month-to-month or annual Creative Cloud plan which will renew automatically until you cancel it.
What are some essential keyboard shortcuts for Adobe Premiere Pro?
Using shortcuts is an easy way to increase your productivity and speed up your workflow. For Adobe Premiere Pro, some essential keyboard shortcuts include I (mark in), O (mark out), J (play backward), K (pause), and L (play forward).

About the Author
Joseph Nilo has been working professionally in all aspects of audio and video production for over twenty years. His day-to-day work finds him working as a video editor, 2D and 3D motion graphics designer, voiceover artist and audio engineer, and colorist for corporate projects and feature films.
Video Editing Related Posts
Adobe Creative Cloud for Video Editing
Top 10 Video Editing Software for Mac
The Benefits of Dual-Monitor Setups for Video Editing
How to Choose the Right Video Editing Monitor for Your Needs
Best Monitors for Video Editing
Best Video Editing Software in 2023
Best Mac for Video Editing in 2023
(Almost) 50 Mistakes Every New Video Producer Makes
Breakthrough AI Tools: Elevate Your Video Production Game!
Related Posts:
Adobe Creative Cloud What Is Series
Adobe Creative Cloud Pricing Explained
Adobe Creative Cloud Pricing and Plans - The Ultimate Resource
Best Adobe Creative Cloud Apps for Graphic Design
How to Install Adobe Creative Cloud on Mac
Adobe Creative Cloud for Photographers
Adobe Creative Cloud for Video Editing
How to Use Adobe Creative Cloud Libraries
Adobe Creative Cloud Subscription Discount
- What Is Adobe Premiere Pro?
- Getting Started With Adobe Premiere Pro
- Understanding The Interface
- Setting Up A New Project
- Importing Media Files
- Importing Video Footage
- Importing Audio Files
- Organizing Media In Bins
- Creating And Editing Timelines
- Building Your Sequence
- Working With Layers
- Basic Editing Techniques
- Enhancing Your Video With Effects And Transitions
- Applying Video Effects
- Incorporating Transitions
- Adjusting Effect Parameters
- Adding Titles And Graphics
- Using The Essential Graphics Panel
- Customizing Text And Styles
- Saving Title Templates
- Working With Audio
- Adding Music And Sound Effects
- Adjusting Volume Levels
- Audio Mixing And Enhancements
- Color Grading And Correction
- Using The Lumetri Color Panel
- Applying LUTs And Color Presets
- Manual Color Adjustments
- Exporting Your Finished Video
- Choosing Export Settings
- Using Adobe Media Encoder
- Previewing And Quality Control
- Summary
Video Editing Related Posts
Adobe Creative Cloud for Video Editing
Top 10 Video Editing Software for Mac
The Benefits of Dual-Monitor Setups for Video Editing
How to Choose the Right Video Editing Monitor for Your Needs
Best Monitors for Video Editing
Best Video Editing Software in 2023
Best Mac for Video Editing in 2023
(Almost) 50 Mistakes Every New Video Producer Makes
Breakthrough AI Tools: Elevate Your Video Production Game!
Related Posts:
Adobe Creative Cloud What Is Series
Adobe Creative Cloud Pricing Explained
Adobe Creative Cloud Pricing and Plans - The Ultimate Resource
Best Adobe Creative Cloud Apps for Graphic Design
How to Install Adobe Creative Cloud on Mac
Adobe Creative Cloud for Photographers
Adobe Creative Cloud for Video Editing
How to Use Adobe Creative Cloud Libraries
Adobe Creative Cloud Subscription Discount
