

Looking to share your videos across Instagram, TikTok, or YouTube?
Movavi Video Editor is the perfect tool to streamline your workflow and export eye catching clips.
In this guide, we’ll walk you through each step to prepare, edit, and export your content so it looks its best on any social platform.
Quick take: Movavi Video Editor is best for creators who want a friendly timeline, built-in effects, AI-assisted cleanup, and simpler exports without jumping straight into a professional editing suite.
Pricing and promotions change often, so check the current Movavi offer before buying.
Best fit: beginner and intermediate YouTube, social, tutorial, family, and small-business videos.
Starting with Movavi Video Editor
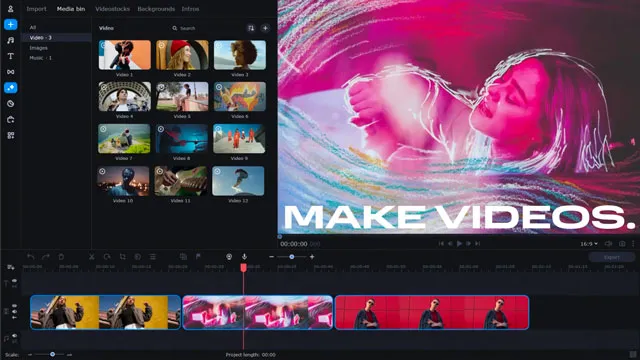
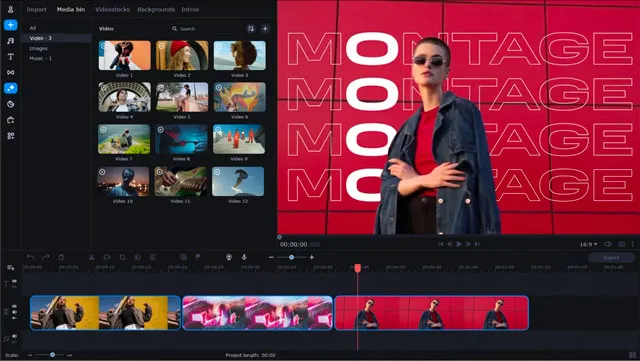
- Download and Open Movavi Video Editor: First, download Movavi Video Editor on your computer. After installing it, open the application to start editing your videos.
- Import Your Video Footage: Before editing, you need to get your video clips into Movavi. Click on the “Import” button or just drag and drop your files into the program.
Editing Your Video
- Trim and Cut: Now, trim out the parts you don’t want and cut your clips to make your video flow nicely.
- Add Filters and Effects: Make your video look cool by adding filters and effects. Movavi has many options like color corrections to play around with.
- Add Transitions: Transitions help your video move smoothly from one clip to the next. Just drag and drop the ones you like between your clips.
- Insert Text and Captions: You can add titles, subtitles, or other text to your video. Change the font, color, and animations to match your style.
- Add Music and Sound: Sound makes your video more engaging. Import music or sound effects, adjust the audio levels, and add fades to make it sound great.
Exporting Your Video for Social Media Overview
- Select the Export Option: Once your video looks good, it's time to get it ready for social media. Click on the “Export” button to see the export settings.
- Choose the Social Media Preset: Movavi has presets for different social media like Facebook, Instagram, and YouTube. Pick the one you need.
- Configure Export Settings: Adjust settings like resolution, frame rate, and video quality to make sure your video looks good on social media.
- Set Output Folder and File Name: Choose where to save your video and give it a name. This makes it easy to find later.
- Export Your Video: Click “Export” and Movavi will prepare your video. The time it takes depends on how long and complex your video is.
How to Export Audio Only From Movavi
If you're looking to extract and save only the audio from your video project, Movavi makes this task straightforward.
Follow the steps below to export just the audio track of your project using Movavi Video Editor:
Export an Audio Track
Hit the Export Button: Click the "Export" button located below the player to open up the Export Settings window.
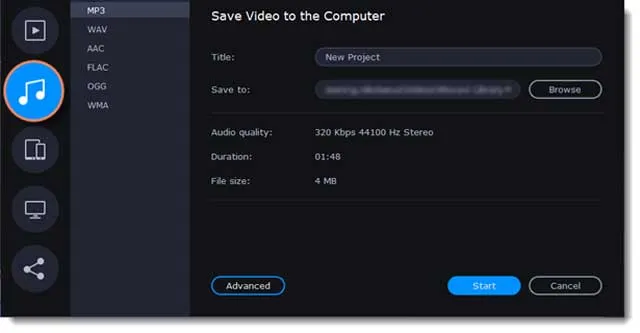
Access Audio File Settings: On the left side of the Export Settings window, click the "Audio File" icon.
Choose an Audio Format:
MP3: This is a common choice as it's supported by almost all media players and devices. However, it may not deliver the highest audio quality especially if the original audio quality isn't great to begin with.
FLAC: This format retains high audio quality but results in larger file sizes. It's a good choice if your original audio is of high quality and you wish to keep it that way.
Remember, a very low-quality file won’t improve in quality by exporting as FLAC. Also, a high-quality file may lose some of its richness if saved to MP3 format, which has a limit of 320 Kbps.
Name Your File and Set Destination:
In the "Save to" field, specify where you want to save your audio file. By default, Movavi will choose the output folder specified in Preferences. If you want a different folder, click the "Browse" button and pick a folder or type the path in the field.
In the "Title" field, type a name for your audio file. Movavi will auto-fill the project's name, but you can change it.
Start the Export: Click the "Start" button and Movavi will begin processing your audio file, saving it to the specified location in your chosen format.
With these simple steps, you can easily extract and save the audio from your video project. Whether you choose MP3 or FLAC, Movavi ensures a hassle-free audio export process.
About Exporting H.264 Video From Movavi
When working with the H.264 codec in Movavi, you have the ability to fine-tune your export settings to match the demands of your project.
Here's how you can dive into the advanced settings of the H.264 codec to ensure a quality export:
Accessing Codec Settings Window
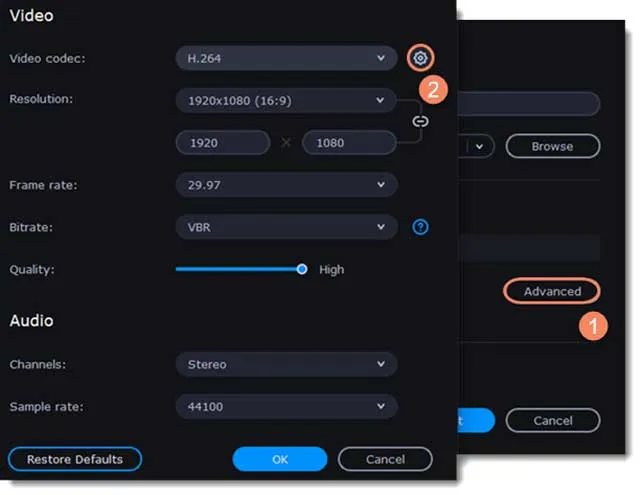
Navigate to Advanced Settings: In the window that appears when you're saving the video to your computer, click on "Advanced" to unveil additional settings.
Open H.264 Codec Settings: Click on the gear icon to access the settings specifically for the H.264 codec.
Adjusting Codec Settings
Two-pass Encoding: Select this option if you're aiming for improved video quality. Be prepared that the export will take a bit longer with this setting turned on.
Video Processing Speed: Determine the speed of video processing. A faster processing speed might lead to lower video quality, so choose accordingly based on your project’s needs.
Processing Preset Selection: Choose a preset based on your video type. Here are the options:
Film: Ideal for high-quality film material.
Animation: Best suited for cartoons.
Retro: Use this for grainy film material.
Slideshow: A good choice for slideshows created with pictures.
Fast Decode: This speeds up video processing by disabling some filters, useful when time is of the essence.
Zero Latency: Optimal for fast encoding and low-latency streaming, ensuring a swift export process.
Apply Settings: Once you've made your selections, click "OK" to apply the new settings.
These steps allow you to customize the H.264 codec settings in Movavi to better align with your project requirements. Whether you're working on a high-quality film or a quick slideshow, these settings ensure you have control over the video processing and export quality.
Uploading to Social Media from Movavi
Movavi Video Editor not only aids in crafting splendid videos but also simplifies the process of sharing them online.
Directly from the Export Settings window, you can upload your creations to YouTube, Vimeo, or Google Drive.
Here’s a step-by-step guide on how to do it:
Upload to the Internet
Access Export Settings: Click the "Export" button to bring up the Export Settings window.
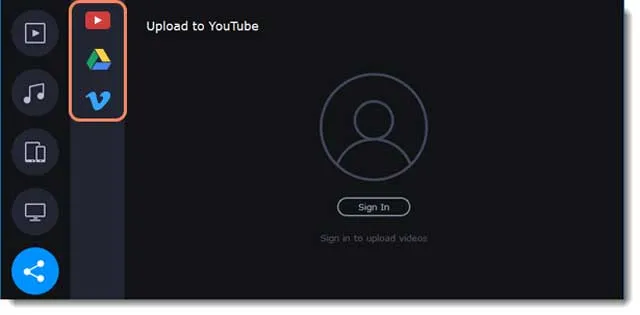
Navigate to Upload: On the left side, click the "Upload" icon.
Select Platform: Choose where you want to upload your video: YouTube, Vimeo, or Google Drive.
Sign In: Click “Sign in”. A page will open in your browser for you to log into your account and give Movavi Video Editor Plus permission to upload videos by clicking "Allow".
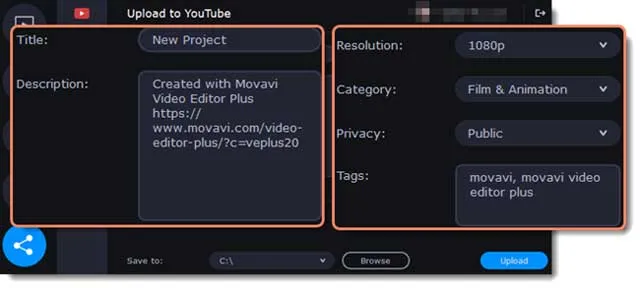
Upload to YouTube
Title and Description: Fill in the "Title" and "Description" fields for your video.
Add Tags: Insert tags to make your video easy to find. Use commas to separate tags and put a hashtag (#) before each one.
Select Category: Pick a category to help viewers find relevant content.
Privacy Settings: Choose who can see your video from the "Privacy" dropdown menu:
Private: Only you and people you choose can view.
Public: Anyone can view and share.
Unlisted: Anyone with the link can view and share.
Upload: Click "Upload" to export and upload your video.
Upload to Google Drive
Title Your Video: Type a title for your video.
Select Folder: Choose where on Google Drive you want to save your video. You can even create a new folder right from here.
Privacy Settings: Decide who can see your video from the "Privacy" dropdown menu:
Private: Only you and selected users can view.
Unlisted: Anyone with the link can view and share.
Upload: Click "Upload" to export and upload your video.
With Movavi Video Editor, sharing your videos online is straightforward, saving you time and effort. So, once your video is polished to perfection, follow these steps to share it with the world.

Exporting from Movavi Frequently Asked Questions (FAQ)
What video formats does Movavi support?
Movavi Video Editor supports many formats like MP4, AVI, MOV, WMV, making exporting easy.
Can I add subtitles and captions with Movavi?
Yes, adding subtitles and captions is easy with Movavi’s text tools.
Does Movavi have special effects?
Yes! There are lots of special effects and filters to make your video unique.
Is there a free trial for Movavi Video Editor?
Yes, you can try Movavi Video Editor for free before you buy it.
Can I change the aspect ratio for different social media platforms?
Yes, you can adjust the aspect ratio to make sure your video looks good on any platform.
Movavi Video Editor makes exporting videos for social media simple and fun. Start creating today and see how easy it is to share your stories on social media with Movavi. Your audience is waiting to see what you’ll create next!

About the Author
Joseph Nilo has been working professionally in all aspects of audio and video production for over twenty years. His day-to-day work finds him working as a video editor, 2D and 3D motion graphics designer, voiceover artist and audio engineer, and colorist for corporate projects and feature films.
Movavi Related Posts:
Discover the Magic of Movavi Video Editor: A Comprehensive Review
Getting Started with Movavi Video Editor: A Step-by-Step Guide for Beginners
Master Movavi: 10 Expert Techniques for Video Editing Success
Powerful Perspectives: Movavi Video Editor vs. Final Cut Pro Revealed
How to Edit 4K Videos Seamlessly with Movavi Video Editor
Elevate Your Videos with Remarkable Transitions in Movavi
The Ultimate Guide to Color Correction in Movavi Video Editor
Breakthrough Movavi Techniques: A New Horizon In Audio Editing
Unlocking Movavi Video Editor: Secrets Of Text & Title Mastery
Accelerate Your Editing Journey: Movavi Tips and Hacks
Discover The Unseen: 5 Rare Features Of Movavi Video Editor
Unlock Steady Footage: A Complete Movavi Video Stabilization Guide
How to Export Videos for Social Media Using Movavi Video Editor
Video Editing Related Posts
Adobe Creative Cloud for Video Editing
Top 10 Video Editing Software for Mac
The Benefits of Dual-Monitor Setups for Video Editing
How to Choose the Right Video Editing Monitor for Your Needs
Best Monitors for Video Editing
(Almost) 50 Mistakes Every New Video Producer Makes
Breakthrough AI Tools: Elevate Your Video Production Game!
Find the Best Export Settings for YouTube Videos Now!
Your Guide on Where To Find Video Editor Remote Jobs
Adobe video workflow guides
- Starting With Movavi Video Editor
- Editing Your Video
- Exporting Your Video For Social Media Overview
- How To Export Audio Only From Movavi
- About Exporting H.264 Video From Movavi
- Uploading To Social Media From Movavi
- Exporting From Movavi FAQ (FAQ)
Movavi Related Posts:
Discover the Magic of Movavi Video Editor: A Comprehensive Review
Getting Started with Movavi Video Editor: A Step-by-Step Guide for Beginners
Master Movavi: 10 Expert Techniques for Video Editing Success
Powerful Perspectives: Movavi Video Editor vs. Final Cut Pro Revealed
How to Edit 4K Videos Seamlessly with Movavi Video Editor
Elevate Your Videos with Remarkable Transitions in Movavi
The Ultimate Guide to Color Correction in Movavi Video Editor
Breakthrough Movavi Techniques: A New Horizon In Audio Editing
Unlocking Movavi Video Editor: Secrets Of Text & Title Mastery
Accelerate Your Editing Journey: Movavi Tips and Hacks
Discover The Unseen: 5 Rare Features Of Movavi Video Editor
Unlock Steady Footage: A Complete Movavi Video Stabilization Guide
How to Export Videos for Social Media Using Movavi Video Editor
Video Editing Related Posts
Adobe Creative Cloud for Video Editing
Top 10 Video Editing Software for Mac
The Benefits of Dual-Monitor Setups for Video Editing
How to Choose the Right Video Editing Monitor for Your Needs
Best Monitors for Video Editing
(Almost) 50 Mistakes Every New Video Producer Makes
Breakthrough AI Tools: Elevate Your Video Production Game!
Find the Best Export Settings for YouTube Videos Now!
Your Guide on Where To Find Video Editor Remote Jobs
Adobe video workflow guides