
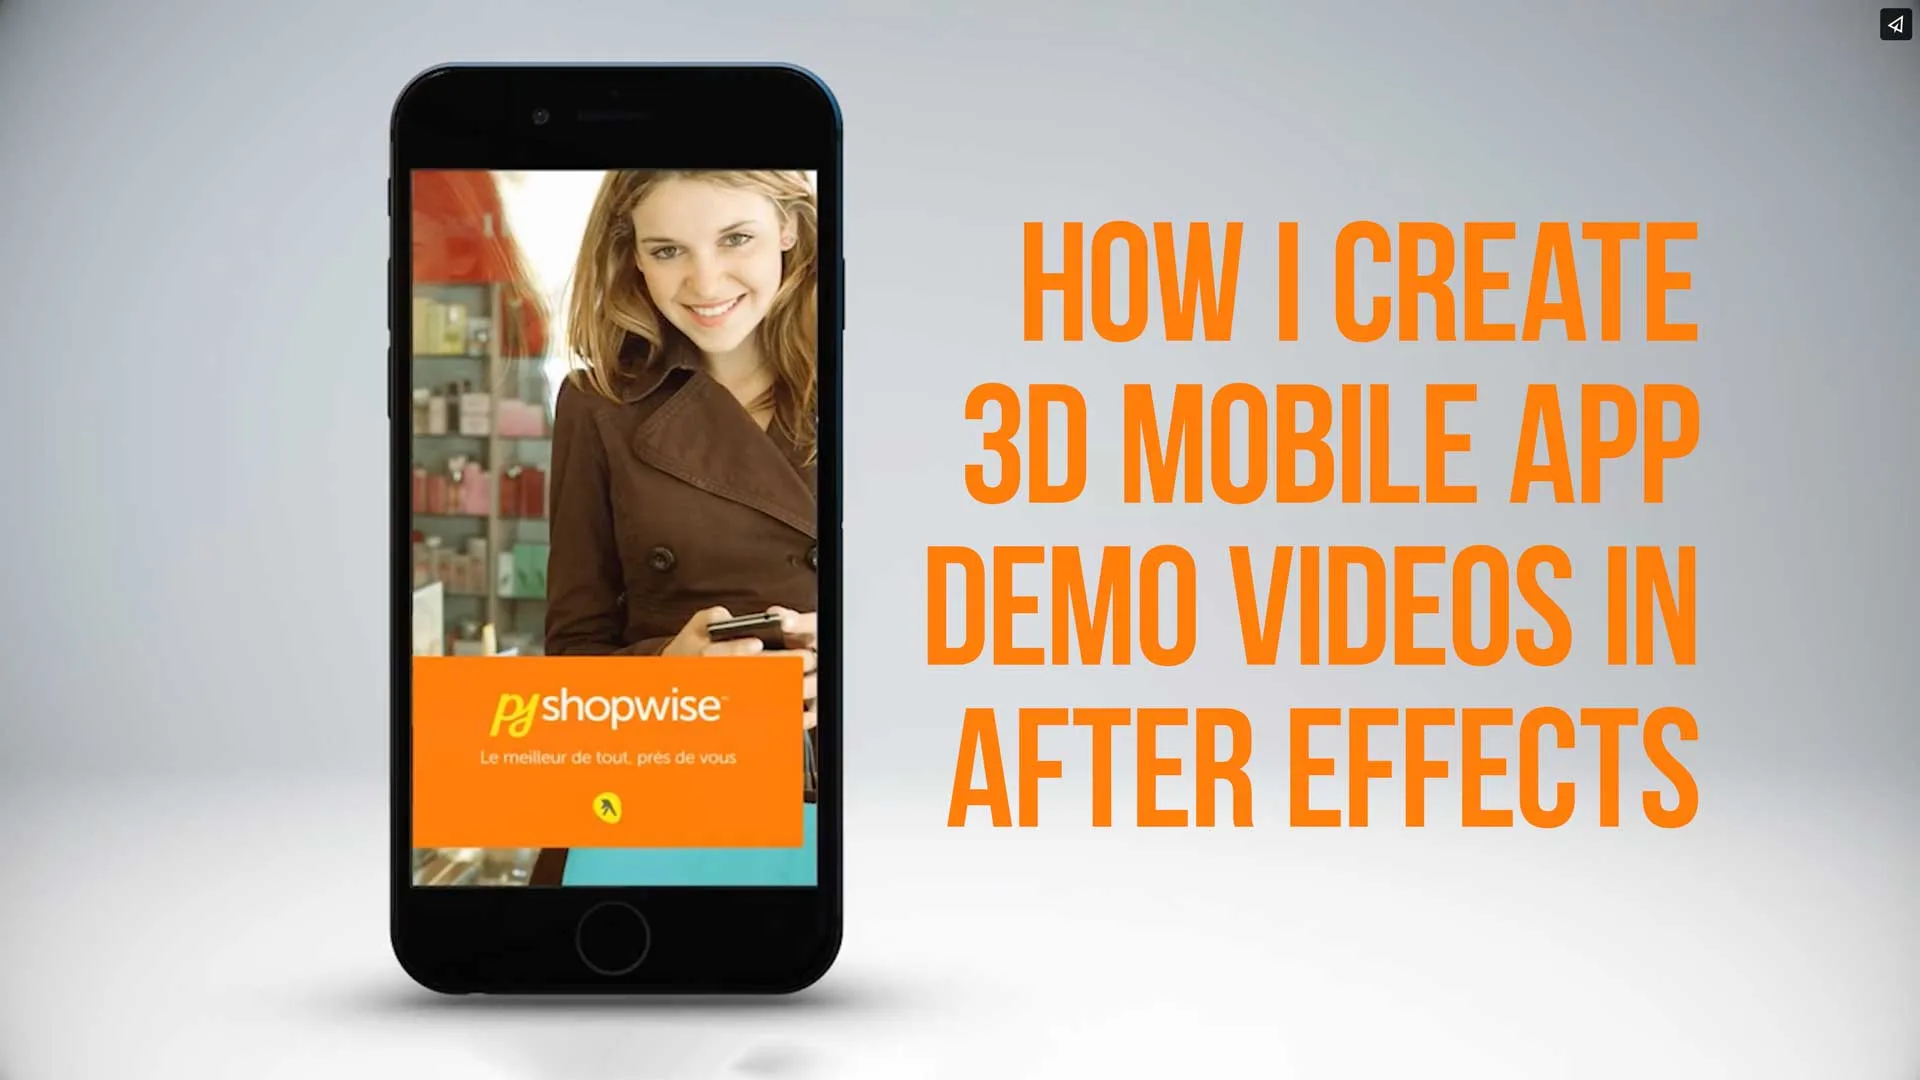
In my almost 20 years creating mobile app promo videos for iOS and Android at HiLo Media, I've honed our workflow to the point where we can create 3D animated device app demo videos quickly for clients, especially startups on a tight budget.
What started as simple, 2D animated iOS App Demo Videos with screens from an app composited with a PSD still image of an iPhone has graduated to much more compelling 3D animations created in Adobe After Effects.
First off, if you don't yet own Adobe After Effects or any of the Adobe Creative Cloud apps, use my links to get the best deal on Adobe Creative Cloud and support this site.
Here's an in-depth look at our workflow creating these videos, including some examples of app demo videos we've created in the past.
iOS Demo Video examples follow the tutorial.
This page may include affiliate links.
I only recommend software I would seriously evaluate for real creator or production workflows.
⭐⭐⭐⭐⭐
I pay for Adobe Creative Cloud and have used it every day in my 20-year career as a video editor, producer, and colorist.
Use the Adobe link below to check the current Creative Cloud offer. It can support this site and helps me keep these guides updated. Check current Adobe Creative Cloud offer.
Get Adobe Creative Cloud Now!Table of Contents
- Cinema 4D Vs Element 3D
- iOS App Demo Video Workflow
- Setup
- Element 3D Setup
- Lighting Your 3D Model
- Master Environment Tweaks
- Final Lighting Tweaks
- Shadows / Ambient Occlusion
- After Effects Camera
- Final Look
- Screen Captures
- Editing
- Compositing
- Fake Finger
- Final Delivery
- Some Of Our Favorite Mobile App Demo Video Examples:
Here is How I Create a Mobile App Demo in Adobe After Effects
Cinema 4D vs Element 3D
The first decision we had to make was between using a powerful 3D environment like Maxon's Cinema 4D or a 3D plugin like Video Copilot's Element 3D. There are pros and cons for each workflow.
What is Cinema 4D?
Maxon's Cinema 4D is a popular high-end solution for creating complex animations and motion graphics. It has a steep learning curve, but once you get the hang of it, there's almost no limit to what you can create.
Cinema also integrates well with After Effects, which is our compositing software of choice.
What is Element 3D?
Element is a plugin for After Effects that allows you to create and animate complex three-dimensional objects. It's much easier to learn than Cinema, but it doesn't have nearly as many features.
The Verdict?
Although we still use Cinema 4D for more complex 3D animations, including some product videos that require us to take a client's CAD model and animate it, for mobile app promo videos, Element 3D has proven the way to go due to its ease of use and lower learning curve vs. a more complex 3D environment like Cinema 4D.
Plus the renders tend to be a lot quicker and the functionality is everything we need to create an iOS app demo video.
iOS App Demo Video Workflow
After a thorough pre-production process, we'll begin production, animation, and edit of the iOS demo video.
Setup
I'll set up the device in Element 3D first, to get the look and lighting right for the mood and style we've established with the client.
We've searched many stock 3D model sites and settled on a group of Mac and iOS devices to use in Element 3D. Included with this product is an After Effects file that is already set up, which you can use if you're just starting out. I prefer to just use the Element 3D model files and set up the After Effects Compositions from scratch.
If you have different 3D model needs, do your own search and specify an Element 3D model as opposed to something for Maya, Blender, Cinema 4D, etc.
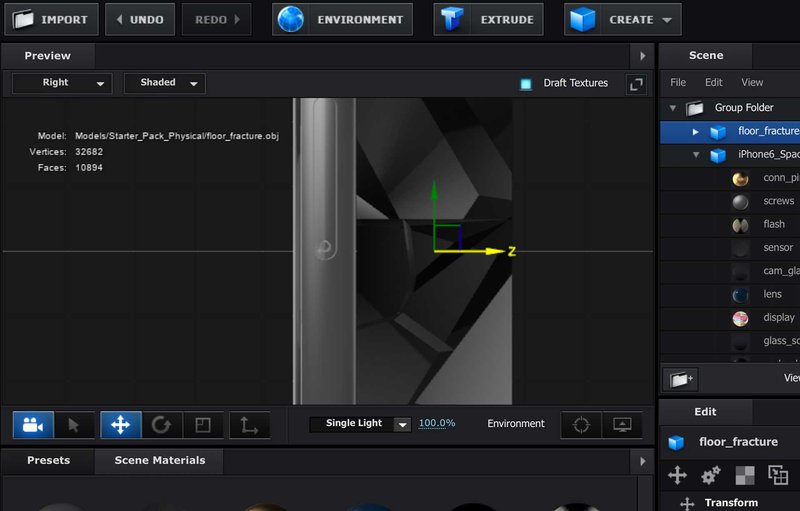
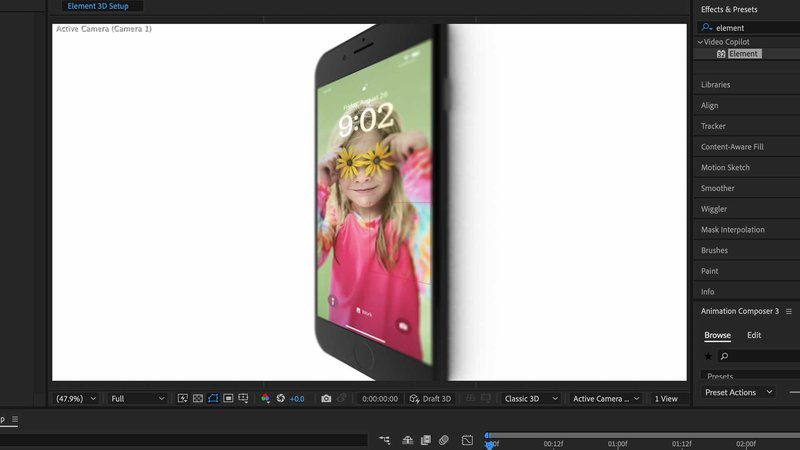
Element 3D Setup
There are a ton of tutorials that will help get you going in Element 3D but here's a quick overview of how I set up the 3D model for the app promo video.
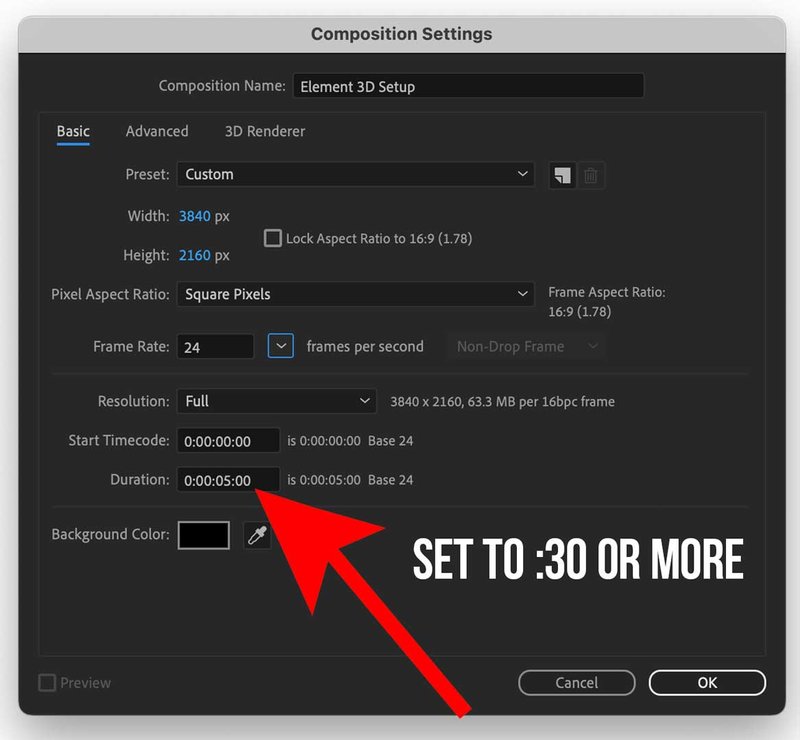
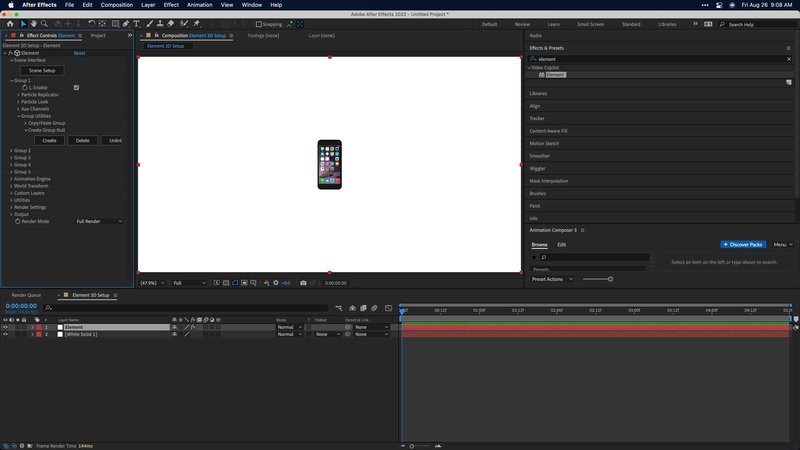
I'll create a new After Effects composition at the desired resolution of the finished video (Usually 1080P or 4K).
I'll usually name it Element 3D setup as it will be a master setup template for all other sequences in the video.
I'll usually make it way longer than I need for any given scene (like :30), since this will be our master scene and it's easier to shorten it then lengthen it when you're copying and pasting the elements into other scenes (more on this in a minute).
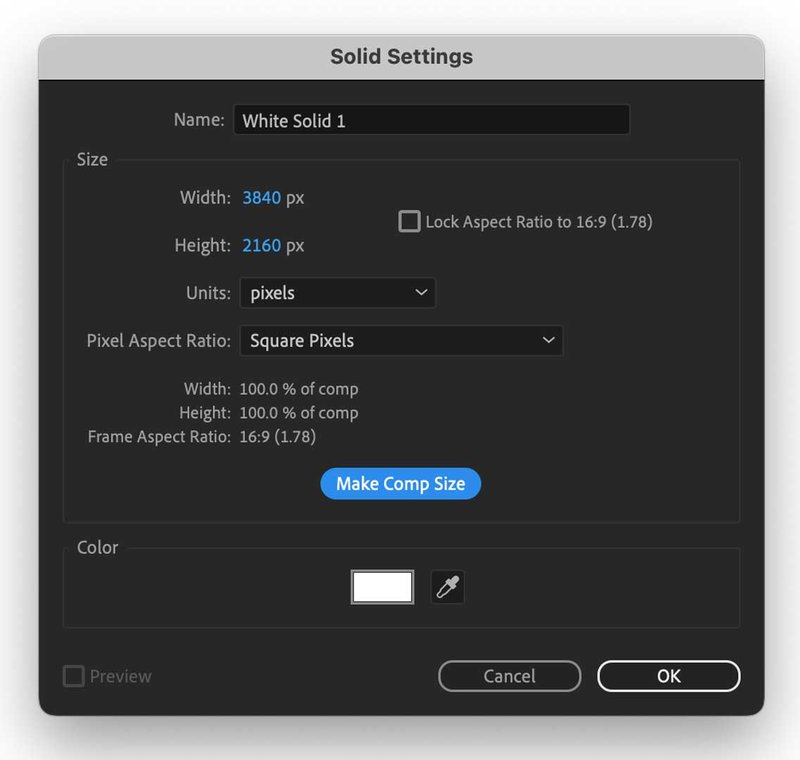
Next I'll add a solid background (usually white, to start, unless we're going for a different look with the client).
Then I'll duplicate it and rename the second solid Element, and then add the Element 3D effect to this layer.
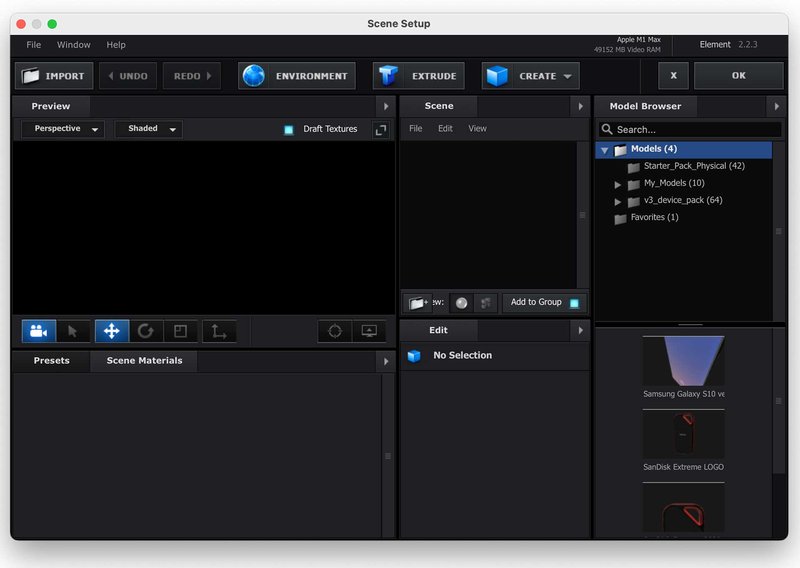
Next, I'll go to the Element Plugin in the Effect Controls for that layer and click "Scene Setup".
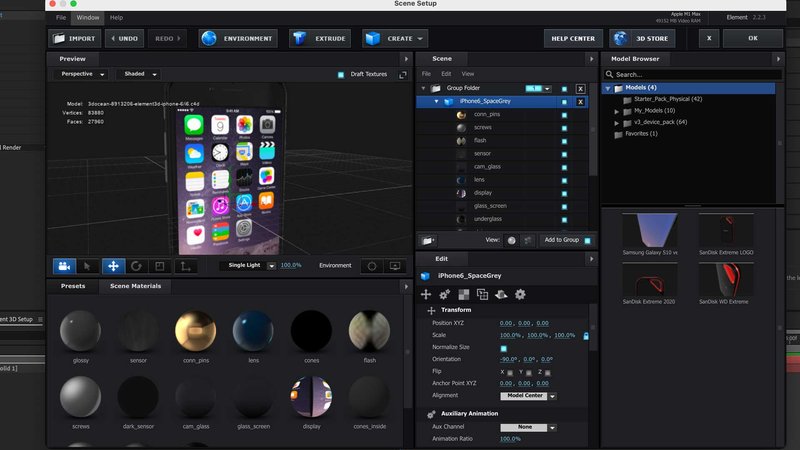
This will launch the Element interface.
I'll then click Import and then load up the .e3d file.
At this point, I might make sure the 3D model is oriented correctly.
I'll hit OK to load up the model and return to After Effects. The model should now be sitting on my white background.
While it's not to hard to control the position, scale, and rotation of the 3D model within the Element plugin parameters, I like the option they give you to create a Group Null.
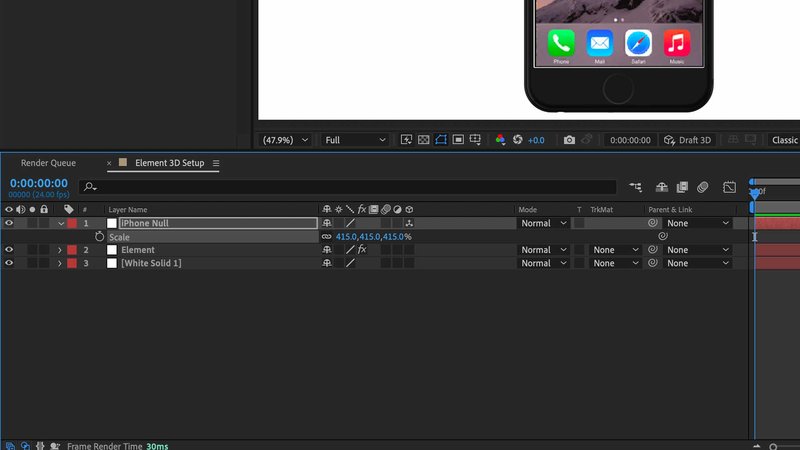
Go to Group 1 / Create Group Null and click Create.
This will create a null object that you can use to move, scale, or animate the iPhone separate from the Element layer. I usually rename it something logical, like iPhone Null.
Now I'll scale up the iPhone so it fills up the Composition Viewer.
Mobile App Screen Setup
Most Element models will have a generic screen included, but I like to start the process of getting the screen going here.
I'll either load up a still image or a stock video clip from the app (more on mobile app screen captures in a minute) so I can get an idea of the brightness of the screen and how it interacts with any lighting in the scene.
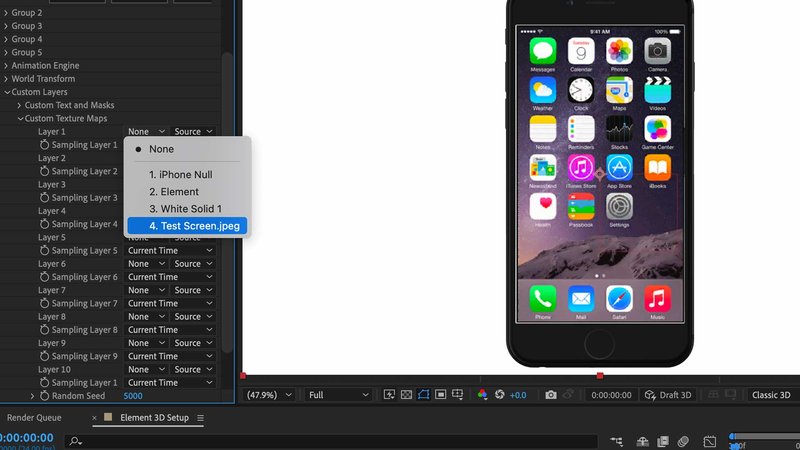
Simply import your screen and drop it in the composition as a layer. I usually put screen layers at the bottom so they don't interfere with anything else in the comp.
Next, go to the parameters of the Element plugin and twirl down Custom Layers / Custom Texture maps. For Layer 1, click the drop-down that says None and choose your screen layer.
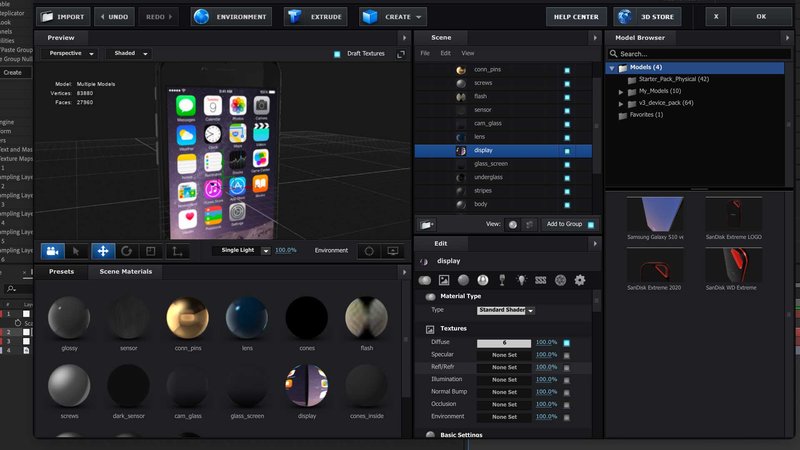
Next, click Scene Setup again to launch the Element window. Find the layer that is called Screen or Display. Toggle the on/off button next to that layer to verify it's the screen and not the glass of the 3D model.
Choose the layer and then below in the edit pane, you'll see it has a texture loaded up in its Diffuse Texture layer. This layer is generally used for solid colors or images for the 3D model.
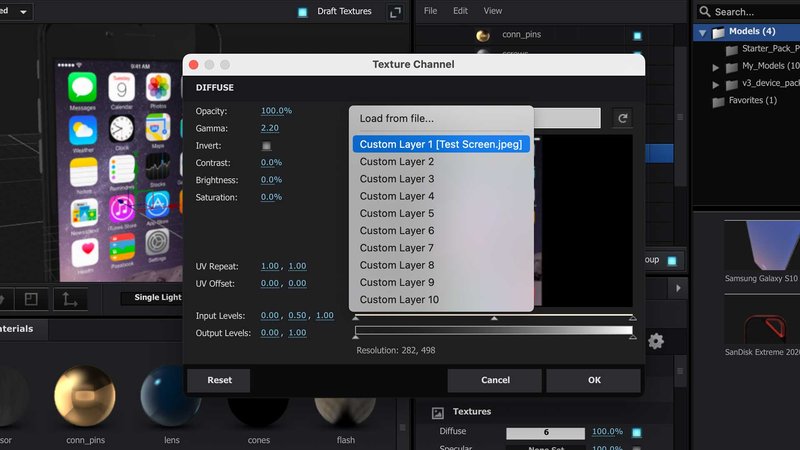
Click the texture button and a Texture Channel chooser will pop up. Click the drop-down menu and choose Custom Layer 1, which will have the name of the layer next to it that you chose in the Element Parameters.
Click OK and go check it out in your After Effects Comp.
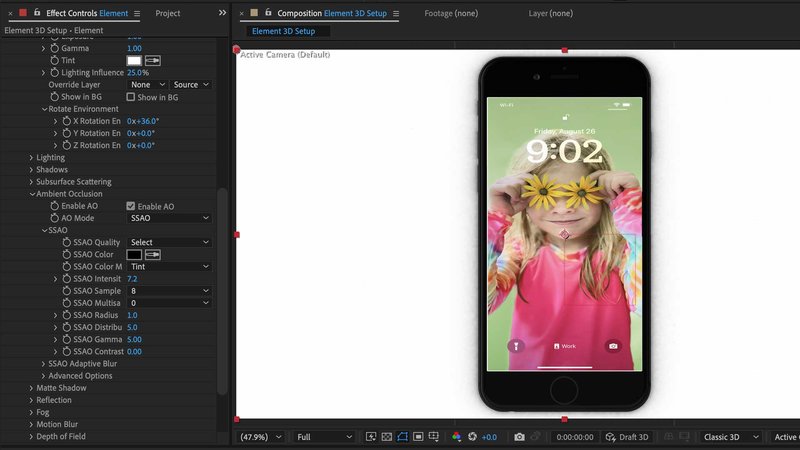
Lighting your 3D Model
Next, I'll set up any lighting and shadows on the 3D model. You can certainly light the model using After Effects lights. I find the most realistic and simple way to light a model is with an environment.
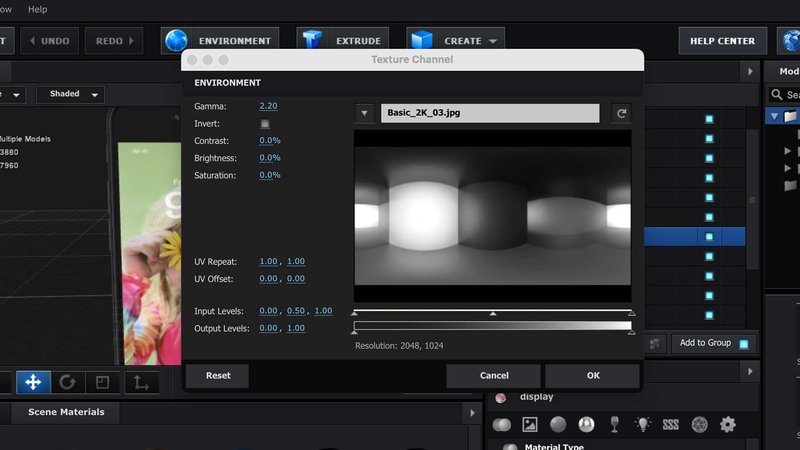
Go back to the Scene Setup window. If you click and drag the model to rotate it in the view, you can see the effect of the environment map reflected on the model.
You can always raise or lower the amount of reflection on each layer of the 3D model (in this case, glass, body, etc) if you're not seeing enough reflection or it's just too much.
At the top of the window is an Environment button. Element includes some default HDR images to use an environment maps. The default environment map (at least in my version of element), is called Basic 2K_03. It is an HDR map of what looks like some soft lights in a studio.
Here you could load up a custom layer from After Effects if you've downloaded an HDR environment map elsewhere. Or use one of the many included environment maps that come with Element. Click the name of the HDR map and the chooser should open up the folder with all the included maps. Search through them until you find something you like. I recommend trying a few to make sure they look good on your model and within the graphics you create for your branding.
What is an HDR Image?
An HDR image is a 32-bit image that has a very large range of colors and brightness levels. They are used in Element to create realistic environment reflections on the surface of your mobile app model.
You can find HDR images all over the internet or use the included maps with Element 3D
What Kind of Environment Map Should I Choose?
My personal taste is to use the realistic environments like rooms and office spaces. This will give you lots of little reflections and highlight pops on your 3D model. Or simply use the default HDR map to look like you filmed the model in a studio and you can get those pleasant slices of light from virtual softboxes that will move across your model as it rotates.
Master Environment Tweaks
Once you're happy with the environment you've chosen, you can make master tweaks to it by leaving the Scene Setup and going to the Element 3D Plugin / Render Settings / Physical Environment.

Here you can make changes to Exposure, Gamma, and Tint. Mostly I adjust the rotation under Rotate Environment. This will get little slices of light perfect on the front of your 3D model. I try to keep glares off of anything important in the interface and get a nice softbox slice of light across the front.
Getting your environment right is a huge step towards a realistic mobile device 3D model look.
Final Lighting Tweaks
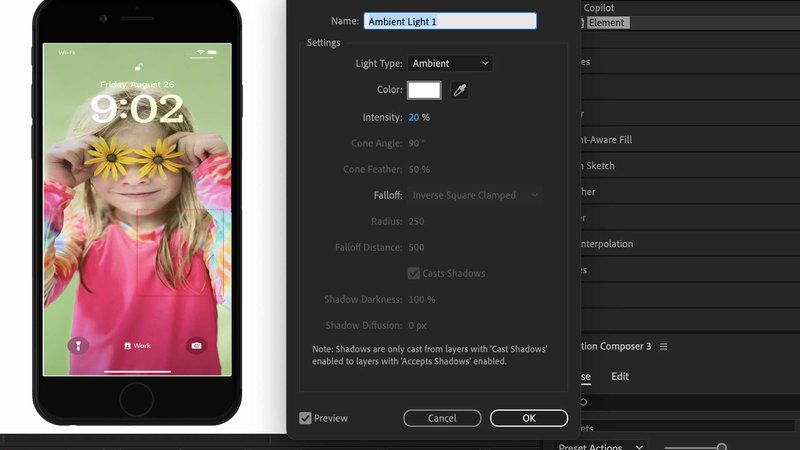
Though I said I don't generally use the stock after effects lighting, sometimes I find it necessary to add an ambient light to brighten the device. Right-click in your layers and choose New / Light and then choose an Ambient light. Start low, like an intensity of 20% and adjust from there.
Shadows / Ambient Occlusion
For more realism I'll work with Shadows and Ambient Occlusion.
What is ambient occlusion?
In computer graphics, ambient occlusion is a shading and rendering technique used to calculate how exposed each point in a scene is to ambient lighting. The technique is used as a way of adding more realism to the rendering of a scene by taking into account shadows cast by surrounding objects and self-shadowing.
If you'd like the illusion of the 3D model sitting on something, go into scene setup and add a flat plane into the scene. This can either be a visible part of your scene or you could use it simply as a shadow catcher. Make sure it's in the same folder as the phone so you can see them at the same time.
I'll add a "Floor" into the scene from the Model Browser. I'll scale, rotate, and position it so it's right behind the phone model, like the model is laying on a solid surface. Sometimes it's easiest to roughly position the floor, then move to one of the side orthogonal views in the Preview Window (like "Right"), to really fine tune the position of the floor.
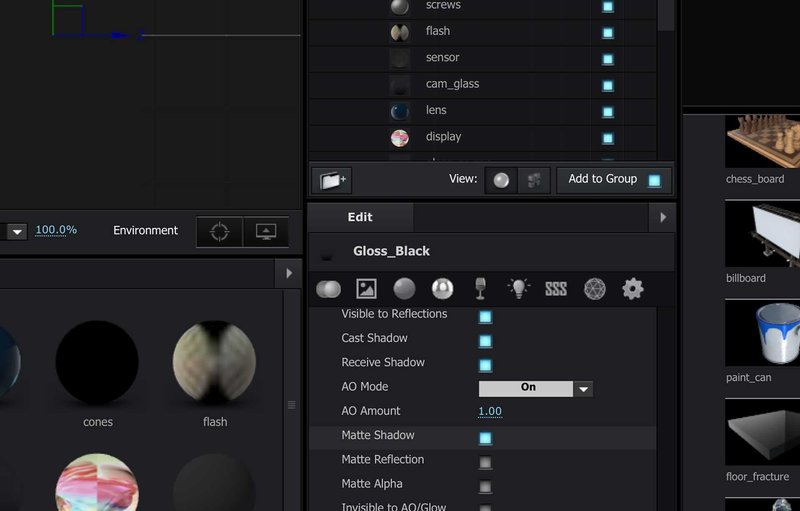
I'll go to the floor 3D model, choose its texture, and scroll down to Advanced and choose Matte Shadow. This means only shadows on this surface will be visible in the composition, not the model itself.
Hit OK to go back to After Effects. Next, in Element / Render Settings, twirl down Ambient Occlusion and click Enable AO. You should see a shadow appear on the "invisible" floor. Mess with the intensity settings if you don't see it.
There are two modes you can use for Ambient Occlusion: SSAO, which is the default, and Ray Tracing. I like to use SSAO for speed's sake because it doesn't take as long to render. You can always switch to a high-quality Ray Tracing preset for final render.
After Effects Camera
The final thing I'll do is set up an After Effects Camera by right-clicking and choosing New / Camera. In subsequent animated sequences, I'll either animate the camera (if there are other elements on screen) or simply animate the iPhone model.
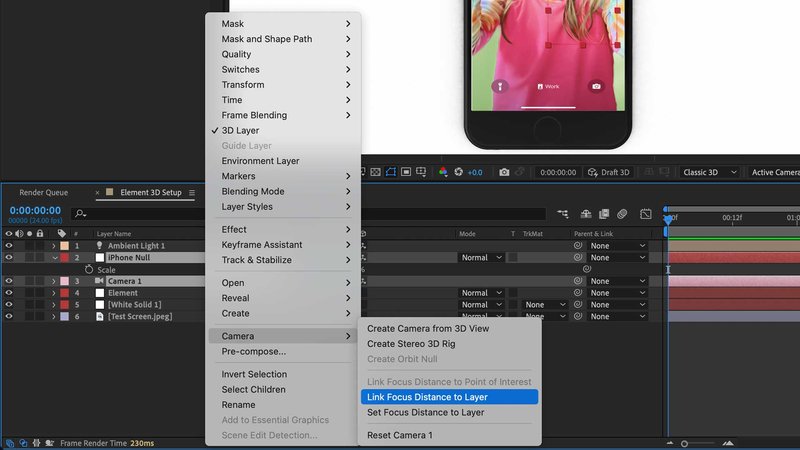
At this point, I might consider adding depth of field to the After Effects camera. The easiest way to do this is to select the camera and the iPhone Null object, right-click on the camera and choose Camera / Link Focus Distance to Layer. Now the iPhone will be in focus if you turn on Depth of Field in the camera controls.
I like to make this field shallow so the edges of the phone will be out of focus if you rotate it but the screen will always be in focus if it's facing the camera. Adjust the Depth of Field to taste in the camera settings. Try not to go overboard and make it look like a macro shot, just some subtle depth of field will add some realism whether the viewer is aware of it or not.
Also, Depth of Field will add render time, be aware.
Final Look
This is an optional step, but generally I like to add an Adjustment Layer to the top of the stack to design a final "look". This could include things like
- A subtle vignette over the entire shot so it's not too flat
- A noise effect set to like 2% that adds a very subtle grain over the entire shot. This is a 3D rendering trick to make things look more realistic and smooth out any 3D model artifacts
- Any color correction or contrast curves
And now we're set up!
Screen Captures
Next we need to create screen captures for our app demo video. Think of screen captures like any other piece of raw footage . . . take your time to create them, do things multiple times and get them right. We will be editing the footage in Premiere Pro before we commit them as composites with our 3D model.
If you're on a Mac, the free way to grab screen captures on an iPhone is by connecting your device to your Mac via USB. Then launch QuickTime and choose New Movie Recording. Next to the Record Button, you can choose the source, which will be the iPhone.
Hit record, do your thing, and you're done!
Our preferred method for screen captures is using Telestream Screenflow. It's a similar workflow but I like the option of making a few rough edits and saving the Screenflow project file. Then I can export any format out for editing in Premiere (Usually H.264 as anything higher resolution is overkill for screen captures).
Editing
Next, I'll edit sequences in Premiere Pro, usually to voiceover. Because screencaptures are super easy to manipulate, for proper timing, we use a lot of speed changes and still frames to make the actions line up to voiceover perfectly.
Also, as for "cuts" like between different actions or between different scenes, we will edit these as jump cuts in the Premiere Pro timeline. We can handle these logically in After Effects by creating different camera angles and logical scene change cuts in the compositing stage.
Pro Tip: once the screen captures are edited to voice, we will generally output this video and call it a "Content Cut" to send to the client.
They can approve all screen captures chosen or make revisions / suggestions at this point and you can make further edits before you spend a lot of time compositing in After Effects.
Compositing
When I'm ready to move to the compositing stage, I usually have placed markers for different "scenes" that I can send individually to After Effects by selecting the footage / right-clicking / and choosing Create After Effects Composition.
When you get to After Effects, make sure your screen caps composition is exactly the size of your screen captures so you don't get any cropping or black bars around your footage when it's composited onto the screen of your device.
Next, duplicate your master iPhone scene and name it something logical: Scene 1 for example. Drag your first screen captures sequence into the bottom of the iPhone scene and set it up as Custom Layer 1 like we did in the setup. This will make your screen automatically comp onto the iPhone screen. Remove the generic screen from the setup.
Note: if your screen looks strange at all when composited on the device (distorted, cropped, scaled or rotated), fix this in the screen capture precomp. It might not be the right size or orientatation for your 3D model.
Next, set the length of the device animation scene to be the same as your screen captures scene.
Now you can animate as you wish. I usually add subtle movements to the camera, like slow pushes and pulls. If I need to cover a cut, I'll often stack another camera at the cut and make it look like a zoom change cut or second camera. You can also cover cuts with 360 rotations of the 3D model if that's a style you're going for.
As for the phone itself, add subtle rotating moves (think -5 degrees to +5 degrees on an axis). This will add nice movements and make the environment lighting move across the face of the 3D model for nice realism.
Further Compositing
We usually do some further compositing and motion graphics like:
- Supporting text on screen with the phone
- Anything we need to "fake" in the interface, like covering up personal information, creating fake email addresses, etc.
Fake Finger
Adding a "fake finger" to register clicks on the device makes the video easier to follow for the viewer. Usually we simply add a small circle to register any interaction. I'll set it to 80% opacity and add a very subtle drop shadow.
I'll make sure it's not sitting on screen when it doesn't need to be there (fading it in and out). I'll make sure all motions are natural and not too fast. I make movements gently curved (instead of straight lines) and ease in and out instead of linear animations.
A "click" is noted by a quick pop in scale, say from 100% to 90% and back. Click!
Final Delivery
I find it best to output the animations to ProRes (or other high resolution video file) and edit them back into the Premiere Pro timeline. Then I'll output a proof to the client.
And that's how we create an iOS Demo Video!
Some of our favorite Mobile App Demo Video Examples:
This was one of the first videos where we used the above techniques. Instead of laying down the phone is standing upright with a shadow below it and a proper 3D background behind it. Everything moves nicely as the camera animates around the scene.
YP Shopwise iOS Video (French)
This example is similar to the Chrends promo. It also happened to get about a zillion views on social media.
This video is simple and very effective. We left multiple iPhones sitting on a solid surface and the camera pans between them, with the color change noting the two different users. And yes, Ukelele music was in vogue then.
This is another of my favorites. Though it's a Mac app, we feature multiple laptops, tablets, and phones in the video, all using the Mobile App Demo techniques spelled out above.
SanDisk Extreme 3D Promo Video
While not a mobile device, this little hard drive model made for a fun video. We took a CAD model from production (one they use to actually manufacture these hard drives) and we textured it in Cinema 4D. Some of the explode animations were actually done in Cinema 4D but the clips where the camera moves around the hard drive and there are other devices in frame were all done in Element 3D using the above techniques.

About the Author
Joseph Nilo has been working professionally in all aspects of audio and video production for over twenty years. His day-to-day work finds him working as a video editor, 2D and 3D motion graphics designer, voiceover artist and audio engineer, and colorist for corporate projects and feature films.
Related Posts:
Adobe Creative Cloud What Is Series
Adobe Creative Cloud Pricing Explained
Adobe Creative Cloud Pricing and Plans - The Ultimate Resource
Best Adobe Creative Cloud Apps for Graphic Design
How to Install Adobe Creative Cloud on Mac
Adobe Creative Cloud for Photographers
Adobe Creative Cloud for Video Editing
How to Use Adobe Creative Cloud Libraries
Adobe Creative Cloud Subscription Discount
Adobe Creative Cloud Student Discount
Adobe creator and buying paths
Adobe Creative Cloud for Video Creators
Adobe Photography Plan vs Photoshop Single App
Best Adobe Creative Cloud Apps for YouTubers
Adobe Express for YouTube Thumbnails
Adobe Stock Licensing for YouTube and Client Work
Adobe app explainers and storage
What Is Adobe Photoshop Elements?
What Is Adobe Premiere Elements?
What Is Adobe Character Animator?
Adobe Rush migration paths
Premiere Rush Discontinuation FAQ
Video Editing Related Posts
Adobe Creative Cloud for Video Editing
Top 10 Video Editing Software for Mac
The Benefits of Dual-Monitor Setups for Video Editing
How to Choose the Right Video Editing Monitor for Your Needs
Best Monitors for Video Editing
(Almost) 50 Mistakes Every New Video Producer Makes
Breakthrough AI Tools: Elevate Your Video Production Game!
Find the Best Export Settings for YouTube Videos Now!
Your Guide on Where To Find Video Editor Remote Jobs
Adobe video workflow guides