

Waves Abbey Road Saturator is a saturation/distortion plugin that combines two Abbey Road console-model paths with an EMI TG12321-style compander and EQ before and after the distortion stages. The selectable console section offers TG, REDD, or Off, while the stereo component can process the full stereo signal, only the mid, or only the sides. [1][2]
The useful thing about it is not just “more saturation.” The signal path is explicitly structured as Input → Pre EQ → Compander → Saturator → Post EQ → Output. That means you can decide what reaches the nonlinear stages, what the compander emphasizes, which console model supplies the saturation, and then reshape the result afterward. [1]
My Short Version
Start at the documented 0 dB Input Gain default and adjust for your source using the input-level LED as a guide. Saturator Gain has a documented default of 50; choose Saturator Mix for the amount of processing you want, since the guide does not specify a default. Leave Pre EQ flat until you know which frequencies you want to shape before the nonlinear stages. [1]
For a cleaner comparison between console colors, keep the compander contribution low and switch between TG and REDD. For more frequency-selective excitement, use the compander’s HP/LP selectors and Ratio. In stereo, M and S modes let you distort the center or sides rather than the entire stereo image. [1]
The manual documents the controls and architecture; it does not make this article a hardware-null test or a listening comparison. I did not measure harmonic spectra, clipping curves, noise, CPU use, or correspondence to original Abbey Road hardware.
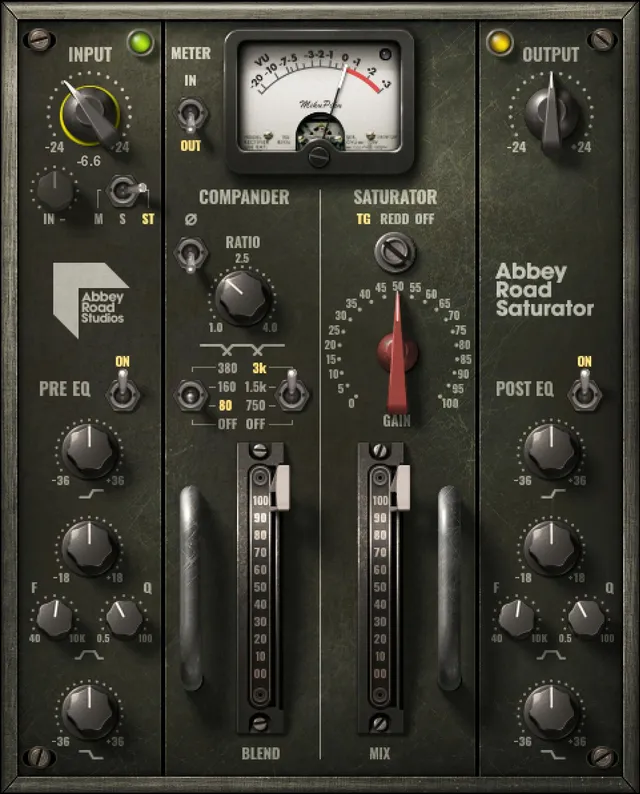
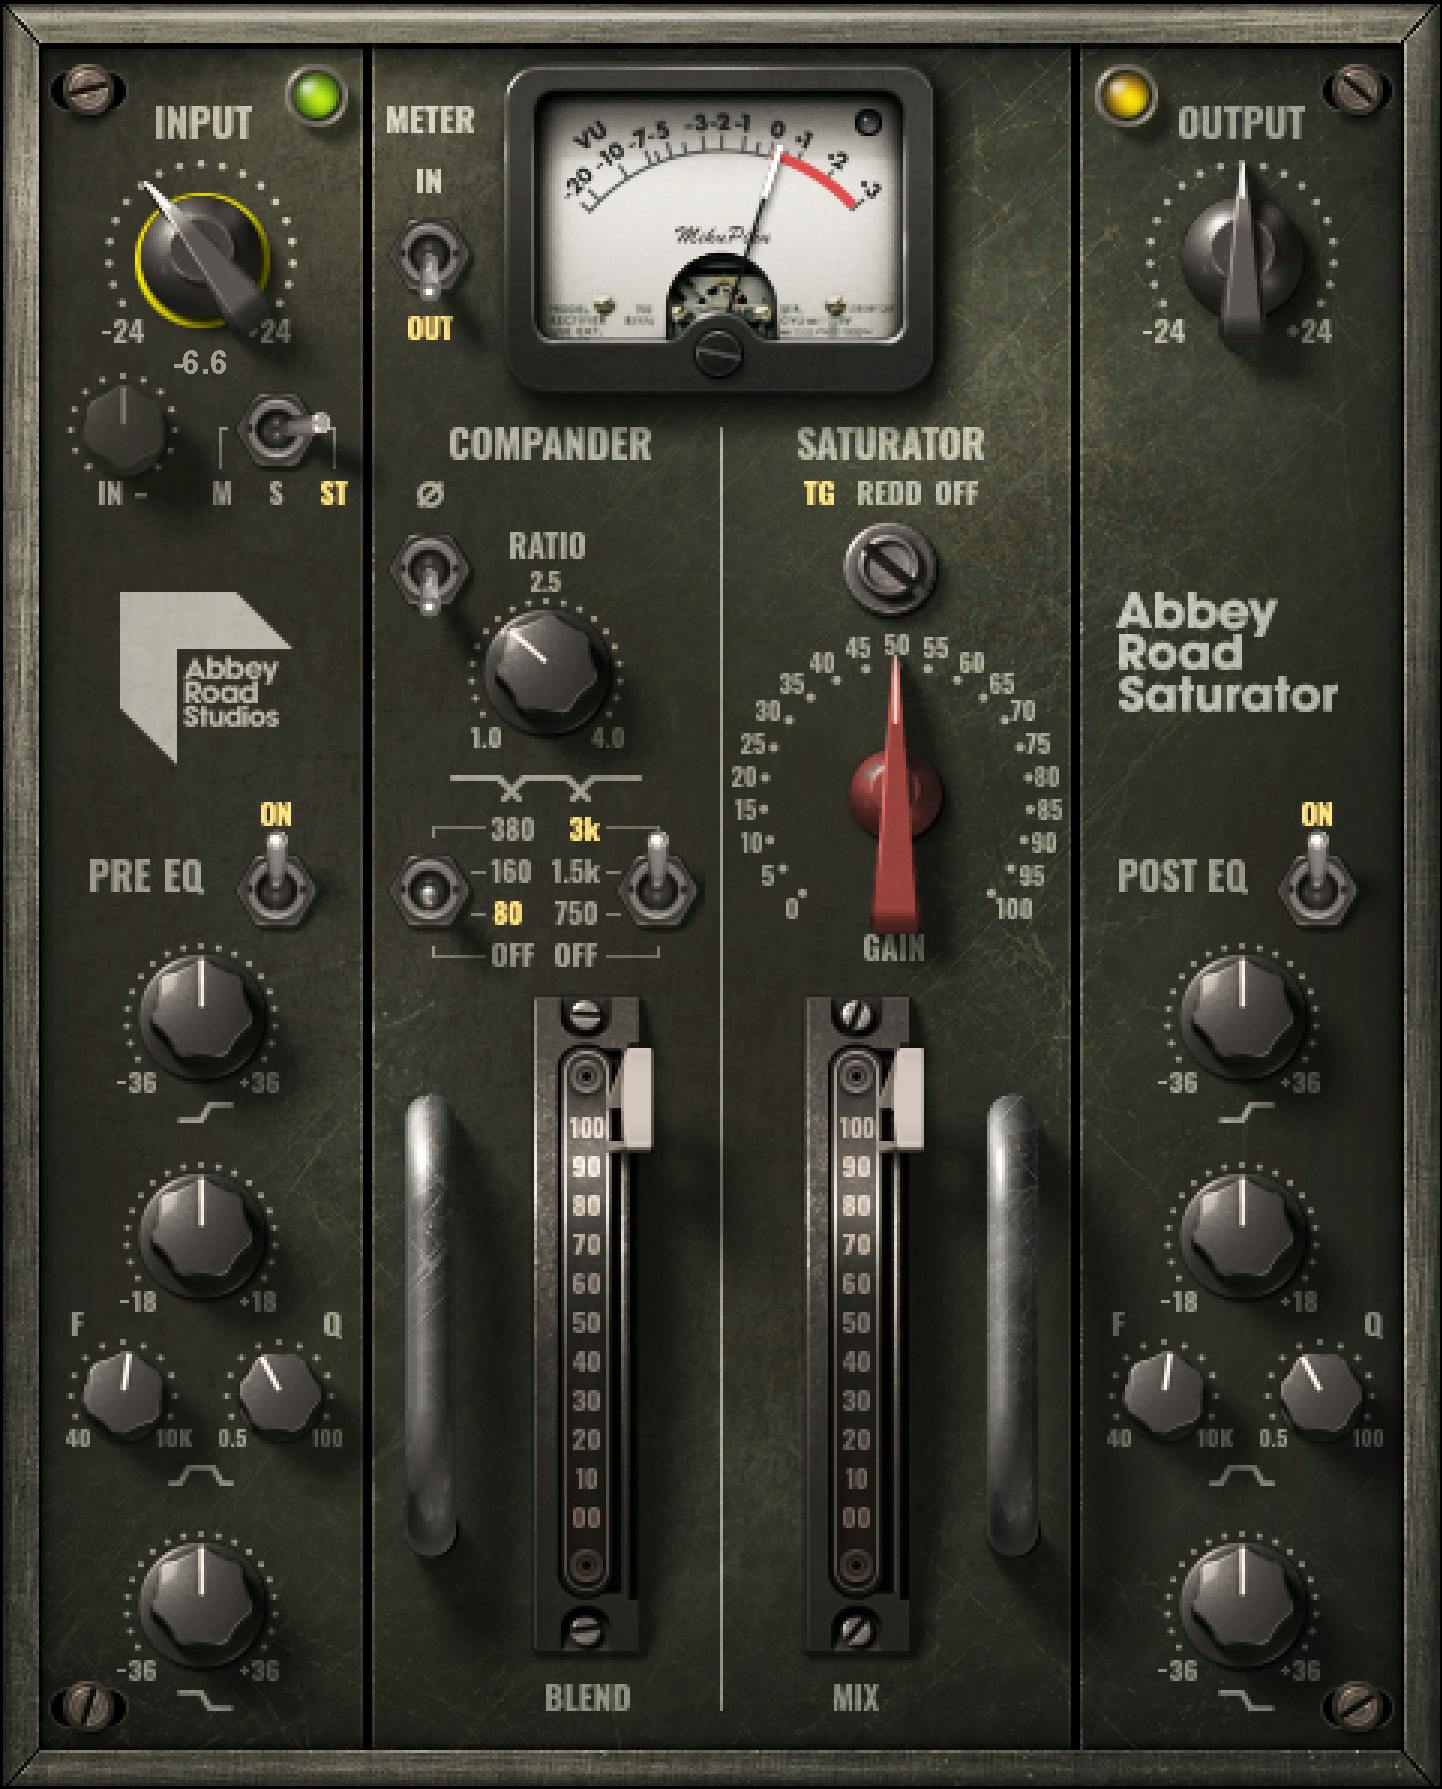
Components and signal flow
Abbey Road Saturator has mono and stereo components. Their interfaces are the same except that the mono component does not have an active stereo input selector. [1]
The documented processing order is:
Input → Pre EQ → Compander → Saturator → Post EQ → Output. [1]
That order matters. Pre EQ changes what reaches the nonlinear stages. Post EQ changes the already-processed result. The compander sits before the console saturation stage, so its frequency emphasis changes what subsequently hits the saturator.
Input Gain
Input Gain sets the plugin input level. [1]
- Range: -24 dB to +24 dB
- Default: 0 dB [1]
Because this is ahead of the processing chain, changing Input Gain can change how hard the nonlinear stages are driven. The manual specifically notes that adjusting gain in the DAW instead can produce a somewhat different result, so the plugin's own Input control should not be treated as a purely cosmetic trim. [1]
Input peak LED
The LED above Input is a level-status indicator rather than an adjustable parameter. [1]
- Blank: input may be too low for the intended processing behavior.
- Green/yellow: appropriate operating level.
- Red: input clipping. [1]
The manual says internal clipping is unlikely, but also notes that input level influences the result. This article does not turn the LED colors into a measured calibration standard.
Stereo Mode: ST, M and S
The stereo component offers three processing selections: [1]
- ST — processes the stereo image together.
- M — distorts/processes the middle while leaving the sides unprocessed by this path.
- S — distorts/processes the sides while leaving the middle unprocessed by this path. [1]
This selector is inactive as a stereo-processing choice in the mono component because there is no stereo image to split.
Mid/Side input level
When the stereo component is in M or S, the adjacent input-level control adjusts that selected mid or side signal independently of the main plugin input. [1]
- Range: -24 dB to +24 dB
- Default: 0 dB
- Inactive in ST mode. [1]
This gives you a second drive-stage decision when processing only one stereo domain.
Pre EQ On/Off
Pre EQ On/Off bypasses or engages the three-band EQ before the compander. [1]
Use this switch when you want to compare the nonlinear chain with and without frequency shaping ahead of it. Because the EQ is pre-processing, its effect is not equivalent to matching the same curve after saturation.
Pre EQ Low Shelf
The Pre EQ low shelf has a fixed frequency and adjustable gain: [1]
- Frequency: 200 Hz
- Gain: -36 dB to +36 dB
- Default gain: 0 dB [1]
Cutting lows here means less low-frequency energy enters the compander/saturator. Boosting them means more.
Pre EQ Bell
The Pre EQ bell is the fully tunable middle band. [1]
- Gain: -18 dB to +18 dB, default 0 dB
- Frequency: 40 Hz to 10,000 Hz, default 740 Hz
- Q: 0.5 to 100, default 4.05 [1]
A narrow Q can target a small range before distortion; a broader Q changes a wider part of the signal feeding the nonlinear stages. That is a conceptual workflow observation, not a measured distortion-response claim.
Pre EQ High Shelf
The Pre EQ high shelf is fixed at 2550 Hz, with -36 dB to +36 dB of gain and a 0 dB default. [1]
Use it when you specifically want more or less upper-frequency energy entering the compander and saturation stages.
Compander Phase
Phase reverses the phase of the compander module. Waves describes the character shift as moving between a “pulling” and “pushing” quality depending on source material. [1]
The important factual point is that this is module phase reversal, not the master output-polarity button of a conventional utility plugin.
Compander Ratio
Ratio changes which frequency region is emphasized by the compander behavior. [1]
- Range: 1.0 to 4.0
- Default: 2.0 [1]
Waves says lower settings cause more low-frequency material to be soft-clipped/compressed, while higher settings shift the effect toward higher frequencies. [1]
That wording is more specific than treating Ratio as a normal broadband compressor ratio; this control is part of the modeled compander behavior.
Compander High Pass and Low Pass
The guide lists these numerical selections and defaults for the compander's stepped HP and LP controls: [1]
High Pass:
- 80 Hz
- 160 Hz
- 380 Hz
- Default: 80 Hz [1]
Low Pass:
- 750 Hz
- 1.5 kHz
- 3 kHz
- Default: 3 kHz [1]
The manual identifies the default pair as the maximum compander bandwidth. Narrow these controls when you want the compander stage concentrated on a smaller frequency region.
Compander Blend
Blend crossfades between the input signal and the compander output. [1]
- Range: 0 = input signal to 100 = compander output
- Default: not specified in the current guide [1]
At 0, the documented blend is the input signal; at 100, it is the compander output. The guide does not prescribe a Blend default. [1]
Console Type: TG, REDD and Off
Console Type selects the saturation model. [1]
- TG
- REDD
- Off
- Default: TG [1]
Waves identifies REDD as the valve/tube-derived console path and TG as the solid-state path. The official product page and guide describe different saturation characters, but this article does not rank them or claim a listening result. [1][2]
Off removes the console saturation stage while leaving the rest of the plugin architecture available.
Saturator Gain
Gain sets the amount of saturation generated by the selected console model. [1]
- Range: 0 to 100
- Default: 50 [1]
The manual gives an approximate behavior split:
- 0–50: increasing harmonic distortion while retaining clean headroom.
- 50–100: moves from gentle clipping toward heavier crunch. [1]
These are vendor-described regions, not distortion measurements from this article.
Saturator Mix
Mix blends the overall processed signal with the dry input. [1]
- Range: 0 = dry to 100 = processed
- Default: not specified in the current guide [1]
This is the easiest way to reduce the total processing contribution without rebuilding the internal stages.
Post EQ
The Post EQ is after the compander and saturator, immediately before Output. [1]
Its filters use the same documented values as the Pre EQ: [1]
- Low Shelf: 200 Hz, -36 to +36 dB, default 0 dB
- Bell Gain: -18 to +18 dB, default 0 dB
- Bell Frequency: 40 Hz to 10 kHz, default 740 Hz
- Bell Q: 0.5 to 100, default 4.05
- High Shelf: 2550 Hz, -36 to +36 dB, default 0 dB [1]
Using Pre and Post EQ together
Waves documents a specific technique for protecting a frequency area from the distortion stages: attenuate it with the Pre EQ, then apply roughly the opposite amount with the Post EQ. [1]
The conceptual result is that the protected range hits the nonlinear processing less strongly and is restored afterward. Waves uses low frequencies as the common example. Treat the two EQs as a before/after pair rather than assuming identical curves in two positions are redundant.
Output and limiter activity
Output sets the final plugin output level. [1]
- Range: -24 dB to +24 dB
- Default: not specified in the current guide [1]
The plugin has an output limiter fixed at -0.9 dB. The LED beside Output indicates limiter activity. Waves warns that heavy limiting changes the sound, so the limiter should not be treated as an invisible safety stage when it is working hard. [1]
VU source and headroom calibration
A single VU meter can display input or output according to the source switch. In the stereo component, it displays the louder of the left and right channels. [1]
The small meter screw controls headroom calibration: [1]
- Range: 8 dB to 24 dB
- Example: at an 18 dB setting, -18 dBFS = 0 VU. [1]
The current guide does not state a factory/default headroom value, so none is asserted here.
WaveSystem toolbar
The shared WaveSystem toolbar provides preset save/load, comparison, undo/redo, and interface resizing. [1]
Those controls are workflow utilities, not additional saturation parameters.
A practical workflow
Start with the plugin at documented defaults where available and keep the Pre/Post EQ flat. Set Input so the level indicator is operating sensibly rather than automatically driving it red. Compare TG and REDD at the same surrounding settings. [1]
Then decide whether the compander is part of the sound you want. Use its HP/LP selectors to choose the affected band, Ratio to shift its behavior, and Blend to control how much reaches the later saturation stage.
Only after that, use Pre EQ to change what gets distorted and Post EQ to reshape what comes out. In stereo, try M or S only when you intentionally want the nonlinear processing confined to the center or sides.
These are conservative workflow suggestions derived from the documented architecture, not listening-test results.
Best for / skip if
Abbey Road Saturator is best suited when you specifically want a colored nonlinear chain with controllable console model, compander and pre/post spectral shaping rather than a single saturation knob. [1][2]
Skip it when the job is simply transparent gain or conventional EQ. A standard trim/EQ can be a clearer choice when you do not want the compander or modeled console stages.
Limitations and evidence boundary
This is a documentation-led controls reference: it reports behavior and values described in the current Waves guide, without promising coverage of every interface state or undocumented value. No hardware comparison, null test, harmonic measurement, noise measurement, CPU benchmark, host test, or listening test was performed.
The current guide does not publish defaults for Compander Blend, Saturator Mix, Output, or VU headroom calibration. Those are left explicitly unspecified rather than inferred from the artwork.
Related products
For other Waves color options, see Magma BB Tubes, described by Waves as a tube-saturation plugin, and Kramer Master Tape, modeled on a vintage reel-to-reel tape machine.
Bottom line
Abbey Road Saturator is a structured nonlinear chain: input and stereo-domain drive, pre EQ, a frequency-selective TG12321-style compander, REDD/TG console saturation, post EQ, output limiting and metering. [1][2]
Its distinctive workflow is deciding not only how much distortion to add, but what frequencies and what part of a stereo signal reach each nonlinear stage.
Sources
Checked October 16, 2026. No listening, native-host, hardware or measurement test was performed.
- Waves Abbey Road Saturator User Guide, current product-linked guide. The mono/stereo component page and processing-section interface page were visually inspected during this writing pass.
- Waves Abbey Road Saturator product page, current product identity and feature summary.
- Waves Graphic Library, current reusable-product-image permission: attribution/backlink to the relevant Waves product page is required.
FAQ
What does Abbey Road Saturator do?
It combines a TG12321-style compander, selectable REDD or TG console saturation, and EQ before and after those stages. The documented path is Input → Pre EQ → Compander → Saturator → Post EQ → Output. [1]
What is the difference between the mono and stereo components, and what do ST, M, and S do?
The components share the same interface, but the mono component has no active stereo input selector. In the stereo component, ST processes the stereo image together; M processes the middle while leaving the sides unprocessed by that path; S processes the sides while leaving the middle unprocessed by that path. [1]
What does Input Gain change, and what do the peak-light colors indicate?
Input Gain sets the level entering the processing chain; its documented range is −24 to +24 dB, with a 0 dB default. The manual describes the Input LED as blank when input may be too low, green/yellow at an appropriate operating level, and red for input clipping. [1]
How do Pre EQ and Post EQ differ?
Pre EQ is before the compander and saturation stages, so it changes the frequencies entering them; Post EQ is after those stages and reshapes the processed result. Waves also describes cutting a frequency area with Pre EQ and applying roughly the opposite adjustment with Post EQ to restore it afterward. [1]
What do Compander Ratio and its High Pass/Low Pass controls do?
Waves says lower Ratio settings emphasize more low-frequency material in the compander behavior, while higher settings shift it upward; the documented range is 1.0–4.0 with a 2.0 default. The guide lists HP selections of 80, 160, and 380 Hz and LP selections of 750 Hz, 1.5 kHz, and 3 kHz; the documented default pair is 80 Hz and 3 kHz. [1]
What does Compander Blend control?
Blend crossfades between the input signal and the compander output: 0 is input and 100 is compander output. [1]
How do the TG and REDD settings differ, and what do Saturator Gain and Mix control?
Waves describes REDD 17 as a valve desk with a typically edgier, more aggressive saturation, and TG12345 as a solid-state desk with a rounder, often warmer character; these are vendor descriptions, not a listening comparison here. Saturator Gain ranges from 0 to 100, defaults to 50, and has approximate behavior regions described in the guide. Mix blends dry input and processed signal from 0 (dry) to 100 (processed). [1]
How do the VU meter and output limiter indicator work?
The meter can show input or output; in stereo it displays the louder of the left and right channels. Its headroom calibration ranges from 8 to 24 dB—for example, at 18 dB, a −18 dBFS reference tone reads 0 VU. The fixed output limiter is set to −0.9 dB, and the LED beside Output indicates limiter activity; Waves cautions that heavy limiting affects the sound. [1]

About the Author
Joseph Nilo has been working professionally in all aspects of audio and video production for over twenty years. His day-to-day work finds him working as a video editor, 2D and 3D motion graphics designer, voiceover artist and audio engineer, and colorist for corporate projects and feature films.