
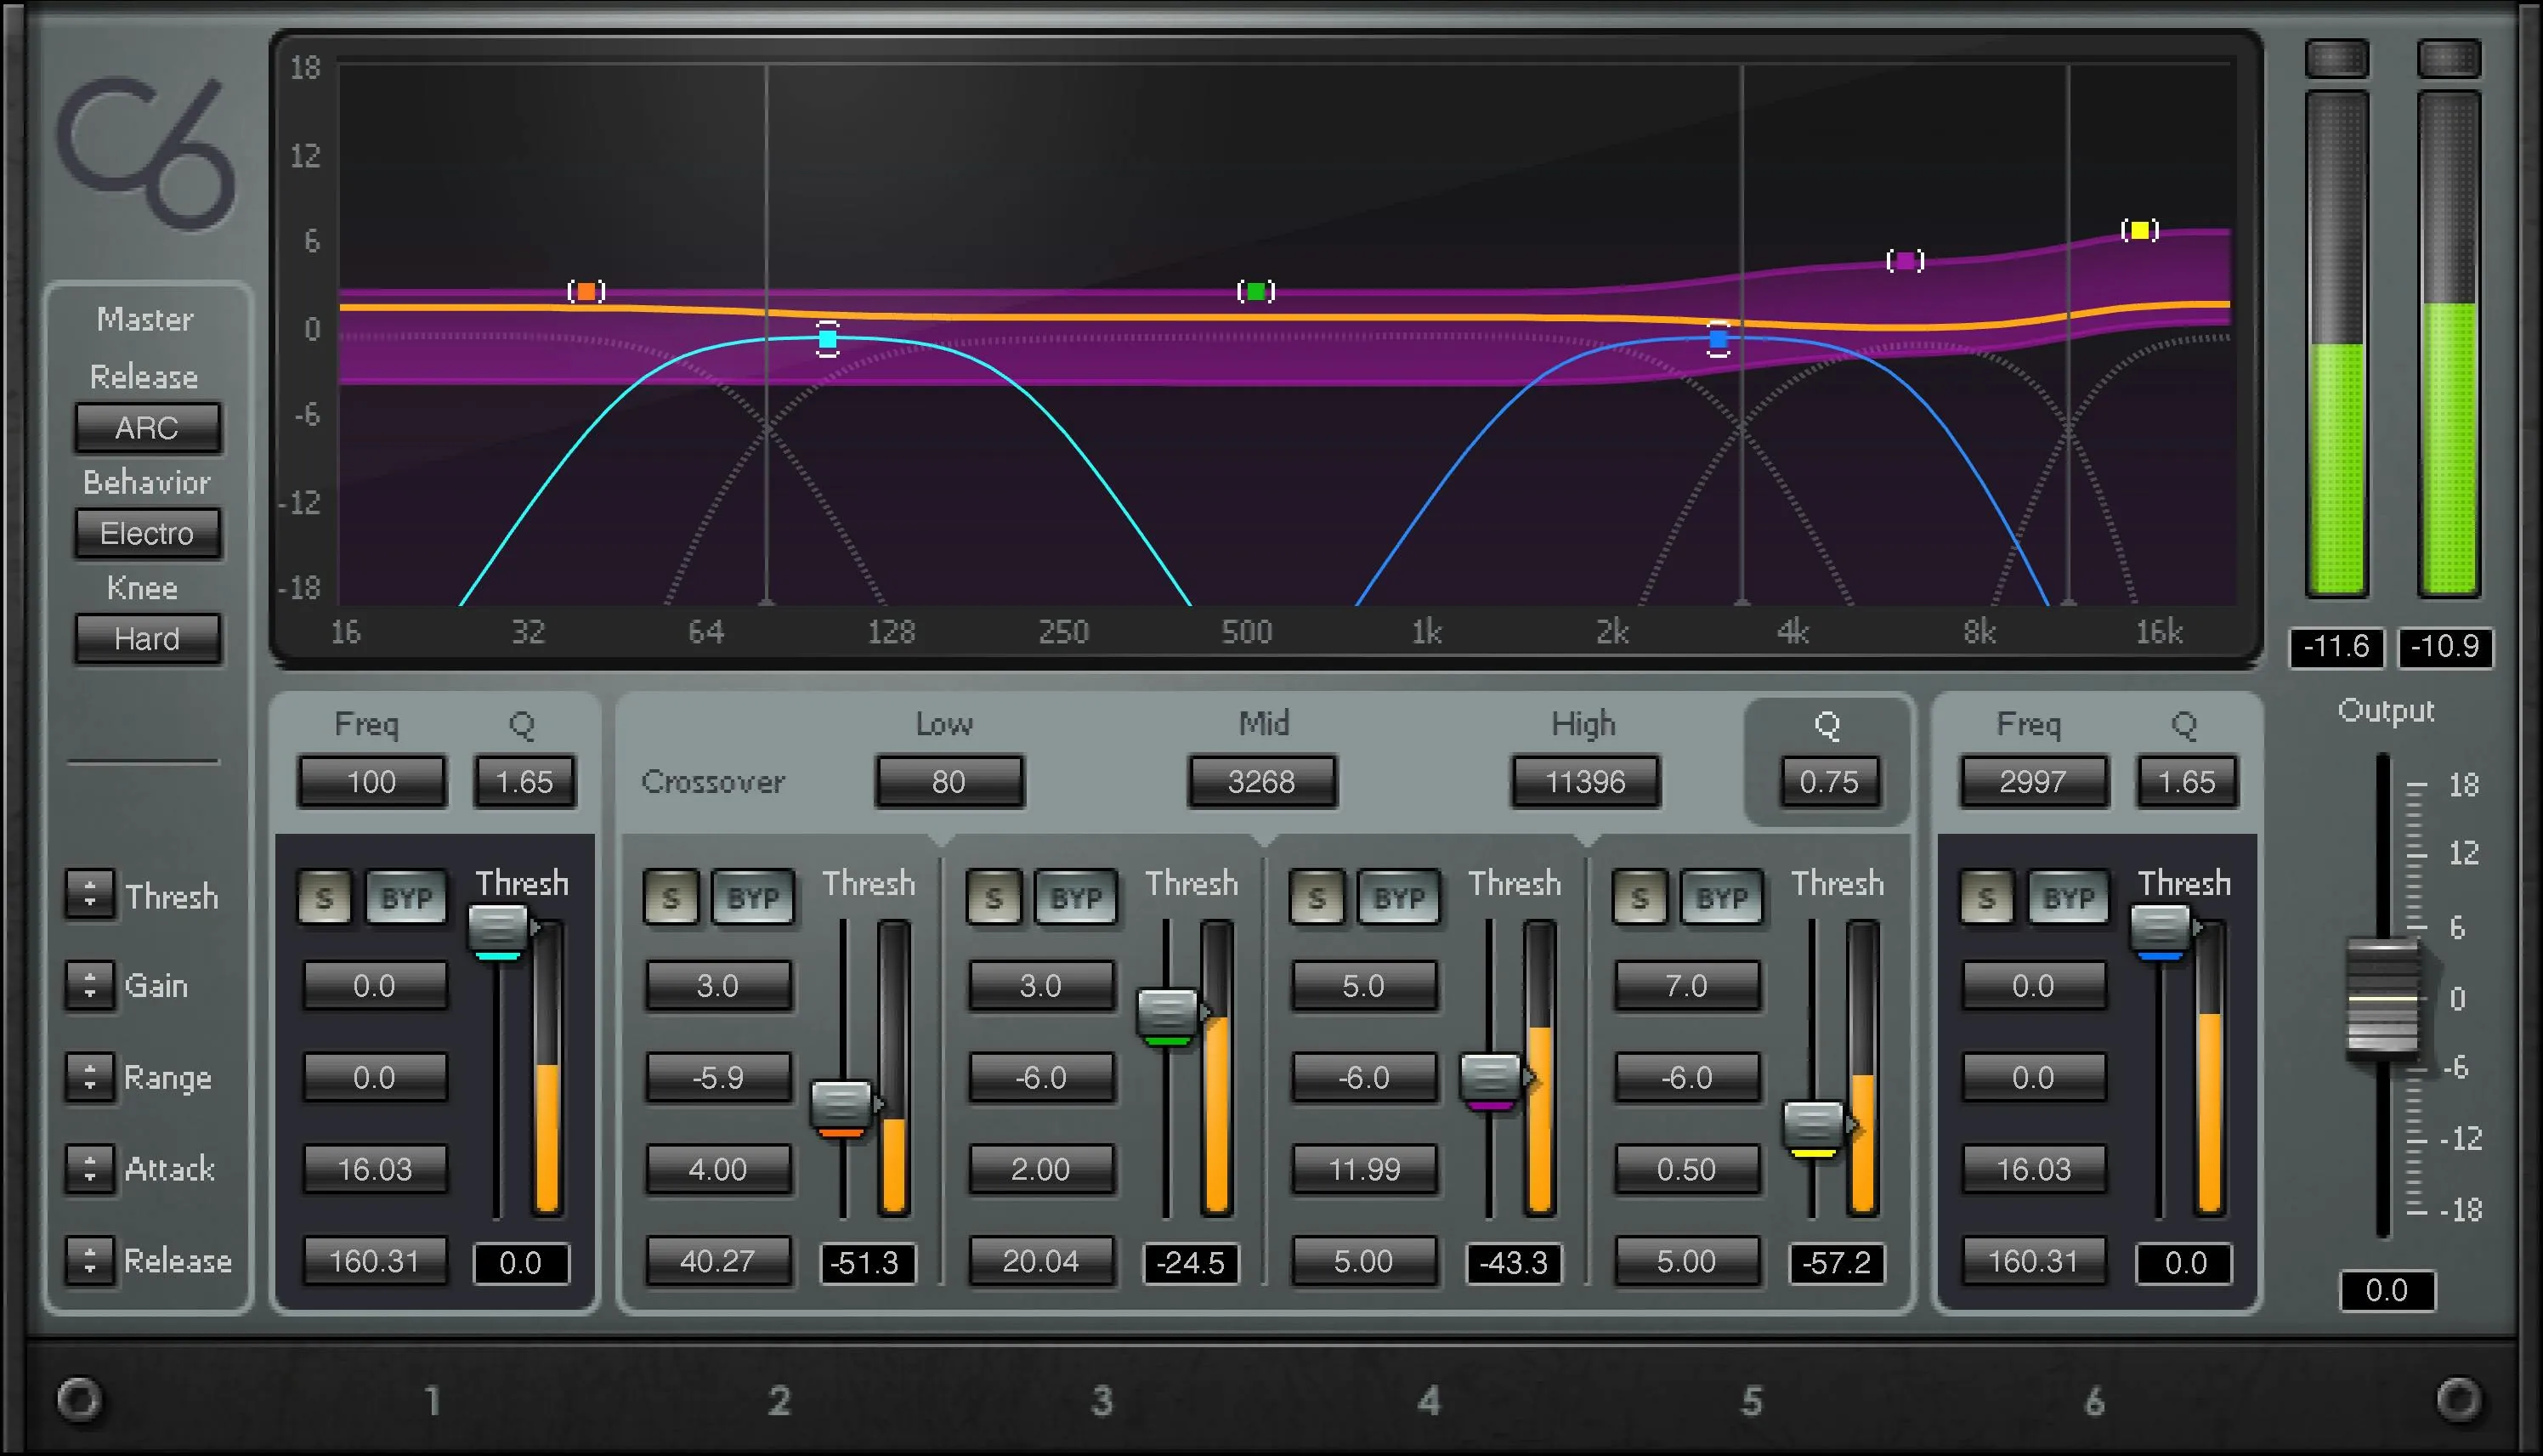
Waves C6 combines four crossover-based dynamics bands with two independently positioned floating bands. Each band can change level dynamically, while Gain supplies a fixed tonal adjustment. The SideChain components also let each band respond to an internal or external detection signal. [1][2]
The important distinction is four plus two, not six identical slices of the spectrum.
This guide explains the documented controls and suggested evaluation methods. It does not claim a new listening test.
About the imagery: the cover is an AI-generated editorial illustration. The plugin interface is official Waves product artwork, not a capture of a listening test.
My Short Version
Use C6 when broad frequency regions and a couple of more specific problems need different treatment.
The central four bands can shape broad dynamic balance. The floating bands can address a narrower area without moving those crossover boundaries.
Start with one problem and one active band. Range limits how much dynamic change you allow; Threshold decides where that change happens. Using every band is not a requirement.
The four-plus-two layout
Bands 2, 3, 4 and 5 form the crossover network. Three boundaries divide them. Moving a boundary changes both neighbouring regions.
Bands 1 and 6 float independently. Each has its own Frequency and Q setting, so a narrow area can be addressed without rebuilding the four-band split. [1, pp.3–4,7]
That distinction is useful for a vocal with broad tonal variation and an occasional sharp frequency. It does not make C6 an automatic separator of speech, room noise and reverberation.
Every band control
The following controls apply to all six bands. They are explained once because their roles repeat; the floating-band and sidechain differences follow separately.
Threshold
Threshold sets the signal-level region around which dynamic processing responds. The documented range is -80 to 0 dB. It works with Range rather than with a separate Ratio knob. [1, p.11]
A threshold is not an instruction to remove every sound below a certain level. Start by deciding which frequency behavior is unwanted, then make the band respond to that behavior.
Do not assume the same threshold will behave identically in a narrow floating band and a broad low-frequency band. They receive different energy.
Range
Range sets the maximum dynamic gain change: -24 to +18 dB. Negative values produce downward gain change; positive values provide upward change. Zero removes dynamic movement while leaving fixed Gain available. [1, p.11]
A useful way to work is to set a modest permitted change first, then adjust Threshold to decide when the band approaches it.
A bigger Range is not more accurate processing. It is a larger change you have permitted. The gain structure can also be arranged for low-level effects, so read Range together with Gain rather than treating its sign as the whole result.
Gain
Gain is the band's fixed output offset, documented from -18 to +18 dB. The graph shows it alongside the dynamic range. [1, p.11]
This is where C6 can behave as an equalizer even without dynamic movement. A band with Range at zero can still boost or cut through Gain.
When comparing a dynamic adjustment, check that a fixed boost has not made the result seem preferable merely by changing the tonal balance or level.
Attack
Attack controls how quickly the band starts its dynamic response. The documented range is 0.50–500 milliseconds. [1, p.11]
Choose it against the onset you want to retain or restrain. A brief consonant and a sustained resonance are not the same problem.
Start with enough time to hear the difference between settings, then choose the least disruptive response for the task. This is a method, not a universal setting recommendation.
Release
Release controls recovery, with a documented setting range of 5–5,000 milliseconds. Manual versus ARC mode changes how that setting is used. [1, pp.8,11]
Listen beyond the troublesome moment. A band that stays reduced too long may alter the next word or note. A very fast recovery can create a different unwanted effect.
The numerical setting alone does not fully describe the response when ARC and the selected Behavior are involved.
Solo
Solo auditions an individual band after its processing. [1, p.12]
Use it briefly to identify the region you are changing, then return to the complete signal. A soloed band is not meant to sound like a finished vocal on its own.
Bypass
A band's Bypass defeats both its dynamics and its Gain setting. To disable only the dynamics while retaining its fixed EQ contribution, set Range to zero instead. [1, p.12]
That distinction prevents a misleading comparison. Turning Bypass on can remove a fixed tonal adjustment as well as the moving gain.
Frequency, crossovers and Q
Low, Mid and High crossover points
The three crossover markers set the boundaries between bands 2–5. Adjust them in the graph or through their value windows. Moving one changes the material received by two neighbouring bands. [1, pp.9–10]
Choose boundaries for the source and the task, not because a favourite preset divides every mix in a universally useful way. Recheck neighbouring thresholds after a substantial move.
The guide does not provide a complete numerical endpoint/default table for each crossover. A setting shown in a screenshot is not treated as a factory specification here.
Shared Q for bands 2–5
The shared crossover Q controls the slope and overlap of the four-band division. The documented range is 0.10–0.75; higher values produce sharper separation. [1, p.11]
This is not the same control as the Q of a floating band. Changing it affects the crossover system rather than one independent bell-shaped region.
Frequency of floating bands 1 and 6
Each floating band has its own Frequency setting. Use it to position that band's processing independently of the three main crossover points. [1, pp.3,7]
This is useful when one narrow area needs attention but the broad balance is already arranged sensibly. It is not a reason to place both floating bands on the same symptom without understanding the combined effect.
Exact frequency endpoints and defaults are not stated in the control-reference text. They should be verified in the target version rather than borrowed from F6 or another Waves equalizer.
Q of floating bands 1 and 6
Each floating band has independent Q, documented from 0.35 to 60. These controls are unaffected by the shared crossover Q. [1, p.11]
Use the band shape and the sound together to choose how narrowly the treatment focuses. The manual loosely calls both kinds of Q crossover-slope controls, but its layout and overview clearly distinguish the independent floating bands from the main crossover matrix.
Global controls
Global Threshold, Gain, Range, Attack and Release
Each global adjustment moves the corresponding values across all bands while preserving their relative offsets. These are linked adjustments—not an extra seventh processing band. [1, p.8]
Global Threshold shifts overall sensitivity. Global Gain moves the band's fixed gains together. Global Range changes the permitted dynamics. Global Attack and Global Release move the timing settings together.
Use these after the individual relationships make sense. A global change can disturb a carefully tuned floating-band repair along with the broad bands.
Master Release: Manual or ARC
Manual uses the selected release setting as a fixed value. ARC adapts release to the programme, using the band setting within that behavior. [1, p.8]
ARC is an adaptive option, not evidence that distortion or pumping is impossible. Compare the recovery on the actual passage.
Behavior: Electro or Opto
Behavior changes the release shape. In the manual's description, Opto slows as reduction approaches zero, whereas Electro recovers more quickly near zero and more slowly at greater reduction. [1, p.8]
This is a release-behavior choice, not a claim that C6 becomes an exact model of a particular named hardware compressor.
Knee
Knee changes the transition between softer and harder dynamic action across the bands. [1, p.8]
Think about whether a problem should be addressed gradually or more decisively. Do not equate a harder knee with better intelligibility.
The guide states the Soft–Hard behavior but does not provide a dependable complete numerical endpoint/default specification. The displayed example is not promoted to a universal default.
The SideChain components
C6 supplies Mono, Stereo, SideChain Mono and SideChain Stereo components. The SideChain versions add per-band Source and Listen controls, plus the shared SC Mode. [1, pp.4,12–13]
Source: Internal or External
Each band can use Internal, the default, or External detection. External requires an actual key signal routed in the host; selecting the option does not create that routing. [1, p.12]
The key controls when gain changes. It does not replace the audio being processed or automatically mix the key into the output.
Listen
Listen auditions the detector signal. With Internal selected, this is the post-filter, pre-compression input. With External, it is the filtered external key. The manual says dynamics are disabled and grayed while this monitoring mode is active. [1, pp.12–13]
Return Listen to normal before evaluating or exporting the result. Detector audition is a setup aid, not the finished audio.
SC Mode: Split or Wide
Split, the documented default, feeds each detector the region defined by the band's frequency settings. Wide feeds each detector the whole sidechain frequency range. [1, p.13]
This describes the detection signal, not a switch that changes C6 into a one-band compressor. Keep the trigger and the processed audio separate in your thinking.
Graph, meters and final Output
The Dynamic Line shows the resulting gain shape, not a spectrum-analyzer measurement of the incoming recording. The shaded area visualizes permitted dynamic change. [1, pp.9–10]
Horizontal marker movement adjusts frequency; vertical movement changes Gain; Option/Alt plus vertical movement adjusts Range. On the crossover bands, a frequency move also affects the neighbouring region. [1]
The band meters provide level context for Threshold. The output section has an overall gain fader from -18 to +18 dB, plus output meters and a clip indicator. Click inside the meter area to reset the clip indication. [1, pp.7,11–12]
Neither the graph nor the output display establishes LUFS or final encoded true peak. Use the loudness guide for that separate check.
Presets and common toolbar
WaveSystem provides About, Undo/Redo, preset loading/saving, Previous/Next, Setup A/B, Copy A/B, window sizing and help. The newer preset browser adds search, Factory/User/Favorite views, favorites, Copy/Paste, Reset to Default and Detach. [3][4]
A/B compares settings within C6, not necessarily against full bypass. Before judging a preset, inspect all bands, Solo, Bypass and sidechain monitoring so a hidden state does not decide the comparison for you.
A focused first use
Identify the problem before drawing a curve. Choose either a broad crossover band or a floating band based on how much of the spectrum actually needs to change.
Start with a limited Range. Adjust Threshold so the band responds to the intended moments, then choose timing against those moments and the material that follows them.
Return from Solo or Listen, compare levels, and evaluate the complete signal. Add another band only for a distinct remaining problem.
This is a suggested workflow, not a tested C6 setting for Joseph's recordings.
Related plugins
C4 provides the four-band crossover approach without C6's two floating bands. The difference is useful when deciding whether the extra controls solve a real task.
F6 is another dynamic-EQ reference when independently placed frequency bands are central to the job. Its controls and band structure should not be assumed identical to C6.
Sibilance concentrates on a narrower vocal problem. A dedicated de-esser can be a clearer choice than a six-band setup when that is all the recording needs.
The Waves hub connects these choices with the existing licensing and workflow guides.
Bottom line
C6 is most useful when its extra separation gives you a clearer decision. Four broad regions and two floating bands provide flexibility, but they also provide more ways to change material that was already working.
Set the maximum change deliberately, find the intended trigger, and keep the whole signal—not the moving graph—as the final reference.
Sources
Checked September19,2026. No sonic benchmark claimed.
- Waves C6 User Guide, pp.3–13.
- Waves C6 product page.
- WaveSystem User Guide.
- Current Waves preset instructions.
- Waves Graphic Library.
Frequently Asked Questions
What is the difference between C6's four crossover bands and two floating bands?
Bands 2 through 5 share three crossover boundaries, so moving a boundary changes neighboring regions. Bands 1 and 6 sit outside that crossover matrix and have their own Frequency and Q controls for independently positioned processing.
What is the difference between Range and Threshold in Waves C6?
Range limits the maximum dynamic gain change, while Threshold sets the signal-level region around which that change occurs. Range is documented from -24 to +18 dB and Threshold from -80 to 0 dB.
Does setting a C6 band's Range to zero bypass the band?
No. Range at zero removes the band's dynamic movement but leaves its fixed Gain available. Band Bypass defeats both the dynamics and the Gain setting.
Can every C6 instance use an external sidechain?
The manual lists separate C6-SideChain Mono and C6-SideChain Stereo components in addition to the standard components. In a SideChain component, each band can select Internal or External detection, but External still requires a key signal routed by the host.
What does Split versus Wide mean in the C6 sidechain section?
It changes the detector feed. Split gives each band the sidechain region defined by that band's frequency settings, while Wide gives each band the full sidechain frequency range. It does not create or mix an external key signal.
What happens when C6 SideChain Listen is enabled?
Listen auditions the filtered detector signal. The manual says dynamics are disabled and grayed out during this monitoring mode, so turn Listen off before judging the processed result.

About the Author
Joseph Nilo has been working professionally in all aspects of audio and video production for over twenty years. His day-to-day work finds him working as a video editor, 2D and 3D motion graphics designer, voiceover artist and audio engineer, and colorist for corporate projects and feature films.