
Waves L1 combines look-ahead peak limiting with level maximization. The L1+ component adds output quantization, dither and noise-shaping options, while the documented modern edition also provides automatic release and a True Peak Domain choice. [1][2]
Lowering Threshold can make the output louder as well as increase limiting. Out Ceiling establishes a different boundary: the output peak level you permit in the selected mode.
Neither control sets the integrated loudness of a whole programme by itself. That remains a separate measurement and delivery decision.
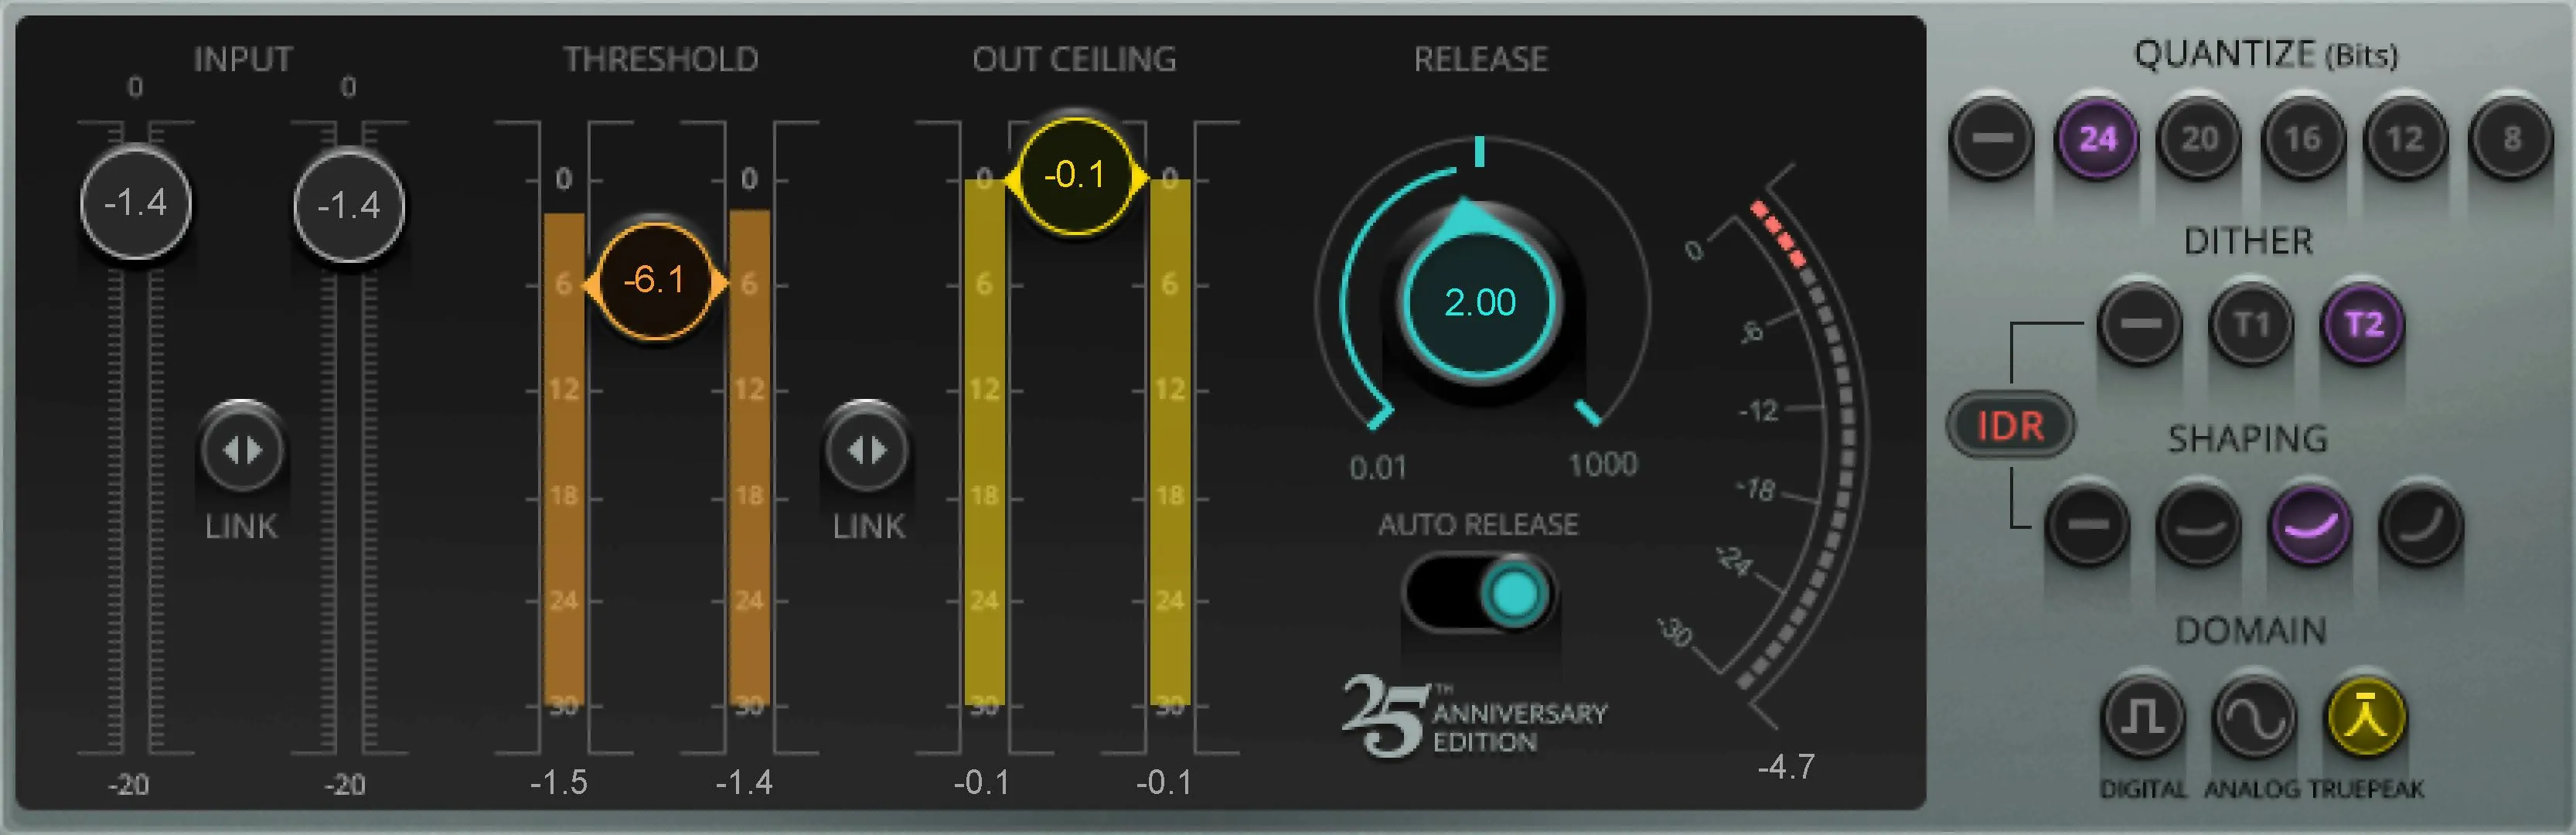
About the imagery: the cover is an editorial illustration. The plugin interface is official Waves product artwork, not a capture of a listening or compliance test.
My Short Version
Choose the appropriate component first. Use Threshold for the amount of peak control and Out Ceiling for the intended upper limit.
Compare the sound at similar playback levels. A louder master is not automatically a better one.
Use the IDR options only as part of a deliberate final-bit-depth workflow. Do not add dither repeatedly because several plugins offer the same option.
This is a source-based explanation, not a new L1 listening or compliance test.
L1 versus L1+
The manual identifies an L1 limiter in Mono and Stereo, without IDR, and a stereo L1+ Ultramaximizer with the full quantization and IDR section. L1+ also exposes input faders. [1, pp.5–8]
These are component differences within the product. They are not a reason to create three competing articles.
Select the component for the task. A limiter placed within a processing chain and a final-output processor making a bit-depth decision do not have the same responsibilities.
The limiter controls
Threshold
Threshold sets where limiting begins. Its difference from Out Ceiling also produces the level increase described in the manual. Lowering Threshold while leaving Ceiling fixed therefore changes more than the amount of visible gain reduction. [1, pp.8–9]
Use a representative loud passage, but also listen to the transition into quieter material. If the processing changes the movement or impact you wanted, back off rather than treating the reduction meter as a target.
The guide illustrates a 0 to -30 threshold scale but omits a separate formal Threshold range/default entry from its controls chapter. This page does not invent an endpoint or factory default from the example screenshot.
Out Ceiling
Out Ceiling sets the maximum peak level for the selected limiting domain. The manual states negative infinity to 0 dBFS, default 0 dBFS. [1, p.17]
A default is not a delivery recommendation. Choose headroom for the actual destination and verify the final encoded file.
If another processor changes the signal after L1, that later stage can change the peaks too. A ceiling belongs to a specific point in a signal path, not every file that will ever be made from it.
Threshold/Ceiling Link
The Link control between these two faders moves them together. Waves describes using this relationship to evaluate limiting with less of a loudness advantage. [5]
It is a comparison aid, not a substitute for measurement. Recheck the result after restoring the final ceiling and after any other gain changes.
Do not confuse this Link with the separate stereo-input Link in L1+.
Release
Release sets the recovery time after a peak. The documented range is 0.01–1,000 milliseconds, default 100 milliseconds. [1, p.17]
Judge it against the material following the peak. The shortest available release is not automatically the most transparent choice.
The guide also gives much shorter example values in its workflow chapter. Those are example recommendations for particular uses, not the same thing as the documented factory default.
Auto Release / ARC
Auto Release adapts recovery to the signal, using the Release setting within its operation. The documented choices are On/Off, default Off. [1, pp.9,17]
An adaptive mode is another behavior to evaluate, not proof that aggressive limiting becomes inaudible. Compare the next note or syllable as well as the peak itself.
L1+ input controls
Left and right Input
L1+ supplies input attenuation faders with a documented negative infinity to 0 dBFS range, default 0. The basic L1 limiter relies on the host for input-level adjustment instead. [1, pp.8,16]
Use the individual faders deliberately. An unintended left/right difference can alter a stereo balance before the limiter.
Input Link
Holding and dragging the input Link moves the two input faders together while retaining their offset. It is an adjustment gesture rather than an instruction to erase an existing channel difference. [1, p.17]
A linked movement should not be mistaken for a check that the channels started at the same level.
IDR: bit depth, dither and shaping
These controls concern the signal's final digital resolution. They are not extra loudness or EQ knobs.
Quantize
The documented output choices are None, 8, 12, 16, 20 and 24 bits. They concern output quantization, not the source file's input bit depth. [1, pp.18–19]
Match this to the intended downstream workflow. Choosing 16 bits here does not, by itself, prove that the host's exported container is configured correctly.
None avoids this quantization step. Very old L1 behavior differed around the 24-bit option; do not follow an old tutorial without checking its version.
Dither
Dither offers None, Type 1 and Type 2. Waves describes different tradeoffs between low-level distortion and added noise for the two types. [1, pp.11–12,19]
Make this choice at the appropriate final reduction in precision rather than enabling it casually at several stages. Retain a higher-resolution source for later revisions.
No new noise-floor measurement or claimed audible difference between the types was produced for this guide.
Shaping
Shaping offers None, Moderate, Normal and Ultra. It redistributes the noise spectrum rather than eliminating the dither or turning the plugin into a conventional EQ. [1, pp.14,19]
The manual reserves more aggressive shaping for appropriate final-output contexts and discusses potential consequences of later processing. Treat that as a reason to plan the chain, not to choose the most dramatic-sounding name.
Exact starting choices depend on the intended output. This page does not replace a delivery specification with a universal dither preset.
Domain: three different peak-control choices
Digital
Digital controls sample peaks against Out Ceiling. It does not mean that every reconstructed peak between samples is guaranteed to remain at the same level. [1, p.20]
For a final encoded delivery, check the actual file with the required measurement method.
Analog
Analog is the manual's alternative peak-control approach for the reconstruction behavior it describes. It is not the same thing as adding tape saturation or modeled analog noise. [1, pp.15,20]
Do not choose it solely because the word analog sounds preferable. Select the documented mode for the intended use and check the result.
True Peak
True Peak uses interpolated, oversampled peak detection. The guide says this mode adds 16 samples to the processing path. That is a documented mode increment, not a measured total latency for Joseph's computer. [1, p.20]
This modern option is easy to miss in older L1 tutorials. Still, a mode switch is not proof that every subsequent codec or gain change will preserve the measured result.
Meters and interface views
The input meters show independent channel peaks. The output section shows the outgoing levels, while the reduction display reports the limiting activity. The manual lists the reduction-meter span as -30 to 0 dB; displayed numeric readings and artwork should not be treated as a separate parameter range. [1, pp.16–17]
The guide does not document a complete held-value/reset contract for every numerical display. Do not assume a specific reset gesture from a different Waves limiter.
The Modern/Legacy button changes the view while retaining the processing behavior. It is an interface option, not an old-versus-new sound selector. [1, pp.6–7]
Presets and common toolbar
About identifies the plugin. Undo/Redo revisit edits. Preset load/save and Previous/Next manage settings. Setup A/B compares two setups; Copy A/B makes them identical before an adjustment. The toolbar also provides sizing and documentation. [3]
The current preset browser adds search, Factory/User/Favorite views, favorites, Copy/Paste, Reset to Default and Detach. Its appearance can differ from the older toolbar in the L1 manual. [4]
A/B is not the same as full bypass. Before comparing presets, check whether their Domain, quantization and dither choices also changed.
A practical order of work
Finish the mix decisions first. Choose whether this instance is only limiting or also handling final quantization.
Set the intended ceiling and evaluate a modest amount of limiting. Use the linked-fader comparison where helpful, then check recovery and the complete programme at a comparable level.
Make the IDR choice deliberately, export with the intended file settings, and inspect that exported file. Use the separate LUFS and true-peak guide rather than assuming a loudness target from the limiter's name.
These are proposed workflow checks. They are not a newly tested mastering chain or a guarantee of compliance.
Related plugins
L2 is the existing next reference for understanding a related limiter's controls. Do not assume every L1 Domain or IDR choice appears identically there.
WLM Plus combines loudness metering with additional processing in its Plus components. A loudness reading answers a different question from an attenuation meter.
RComp is a more appropriate control reference when the track needs compression shaping rather than final peak limiting.
Use the Waves resource hub for the broader chain and licensing guides.
Bottom line
Threshold, Ceiling and Release describe the limiting decision. Quantize, Dither and Shaping describe a separate final-resolution decision. Domain changes the peak-control approach.
Keep those jobs distinct. Make the file louder only when it still sounds and measures appropriately for its destination.
Sources
Checked September 19, 2026. No new listening or compatibility test.
- Waves L1 User Guide, components pp.5–8, controls pp.16–20 and supporting IDR discussion.
- Waves L1 product page.
- WaveSystem guide.
- Waves preset instructions.
- Waves limiter comparison and linked-fader guidance.
- Waves Graphic Library.
Frequently Asked Questions
What is the difference between Waves L1 and L1+?
L1 is a mono or stereo wideband limiter without IDR. L1+ is stereo only and adds input faders plus the full output-quantization, dither, noise-shaping, and Domain section; the limiter section itself is otherwise shared.
How do Threshold and Out Ceiling differ in L1?
Threshold determines where limiting begins; lowering it also raises level by the difference between Threshold and Out Ceiling. Out Ceiling sets the maximum output peak for the selected Domain. Neither control sets a programme's integrated loudness target by itself.
What does the Link control do in L1?
The Link between Threshold and Ceiling moves those faders together to reduce the loudness advantage while judging limiting. L1+ has a separate input Link: click-hold and drag it to move the left and right input faders together while retaining their existing offset.
What do Release and Auto Release do in L1?
Release sets how quickly the limiter recovers after a peak; the documented range is 0.01-1,000 ms and the documented default is 100 ms. Auto Release, default Off, adapts recovery to the signal while operating within the range set by Release.
When should I use L1+'s Quantize, Dither, and Shaping controls?
Use them only when this L1+ instance is deliberately handling final output resolution. Quantize offers None, 8, 12, 16, 20, or 24 bits; Dither offers None, Type 1, or Type 2; Shaping offers None, Moderate, Normal, or Ultra. Avoid casually dithering again at multiple stages.
What is the difference between Digital, Analog, and True Peak Domain in L1+?
Digital constrains sampled peaks to the ceiling; Analog uses Waves' alternate approach for controlling reconstruction behavior; True Peak uses oversampled, interpolated detection for inter-sample peaks. The manual says True Peak adds 16 samples to the processing chain, not that total host latency is always 16 samples.

About the Author
Joseph Nilo has been working professionally in all aspects of audio and video production for over twenty years. His day-to-day work finds him working as a video editor, 2D and 3D motion graphics designer, voiceover artist and audio engineer, and colorist for corporate projects and feature films.