
Waves CLA MixHub is a console-style channel-strip system built around individual channel instances plus a shared Bucket View that can control as many as 64 tracks from one plugin window. Each channel contains fixed Input and Output sections plus reorderable EQ, Dynamics and insert positions; Bucket View groups tracks into eight buckets of up to eight channels. [1][2]
The key architectural point is that Bucket View is a controller, not a separate summed audio path. The actual processing remains in the individual CLA MixHub instances on the tracks. That lets one plugin window expose many channels without routing all audio through a new “mixer inside the mixer.” [1]
My Short Version
Use CLA MixHub like a modular channel strip. Set the Input stage first, including analog modeling and filters. Build the processing order by dragging EQ, Dynamics and the insert into the order you want. Use Output for final fader, width/pan and metering. [1]
When a session becomes large, assign MixHub instances to Buckets. Eight buckets × eight slots gives the documented 64-track control surface. Bucket View changes the remote controls for those instances; it does not add another audio summing stage. [1][2]
Choose the stereo mode deliberately. Stereo uses a summed dynamics sidechain with common dynamics values, Duo lets left and right dynamics react separately, and M/S processes mid and side paths separately. [1]
Many control functions are fully documented, but the current guide does not publish complete numerical ranges/default tables for every EQ, dynamics and filter control. Those values stay explicitly unspecified rather than being read from pixels or guessed.
Channel View, Bucket View and Expanded View
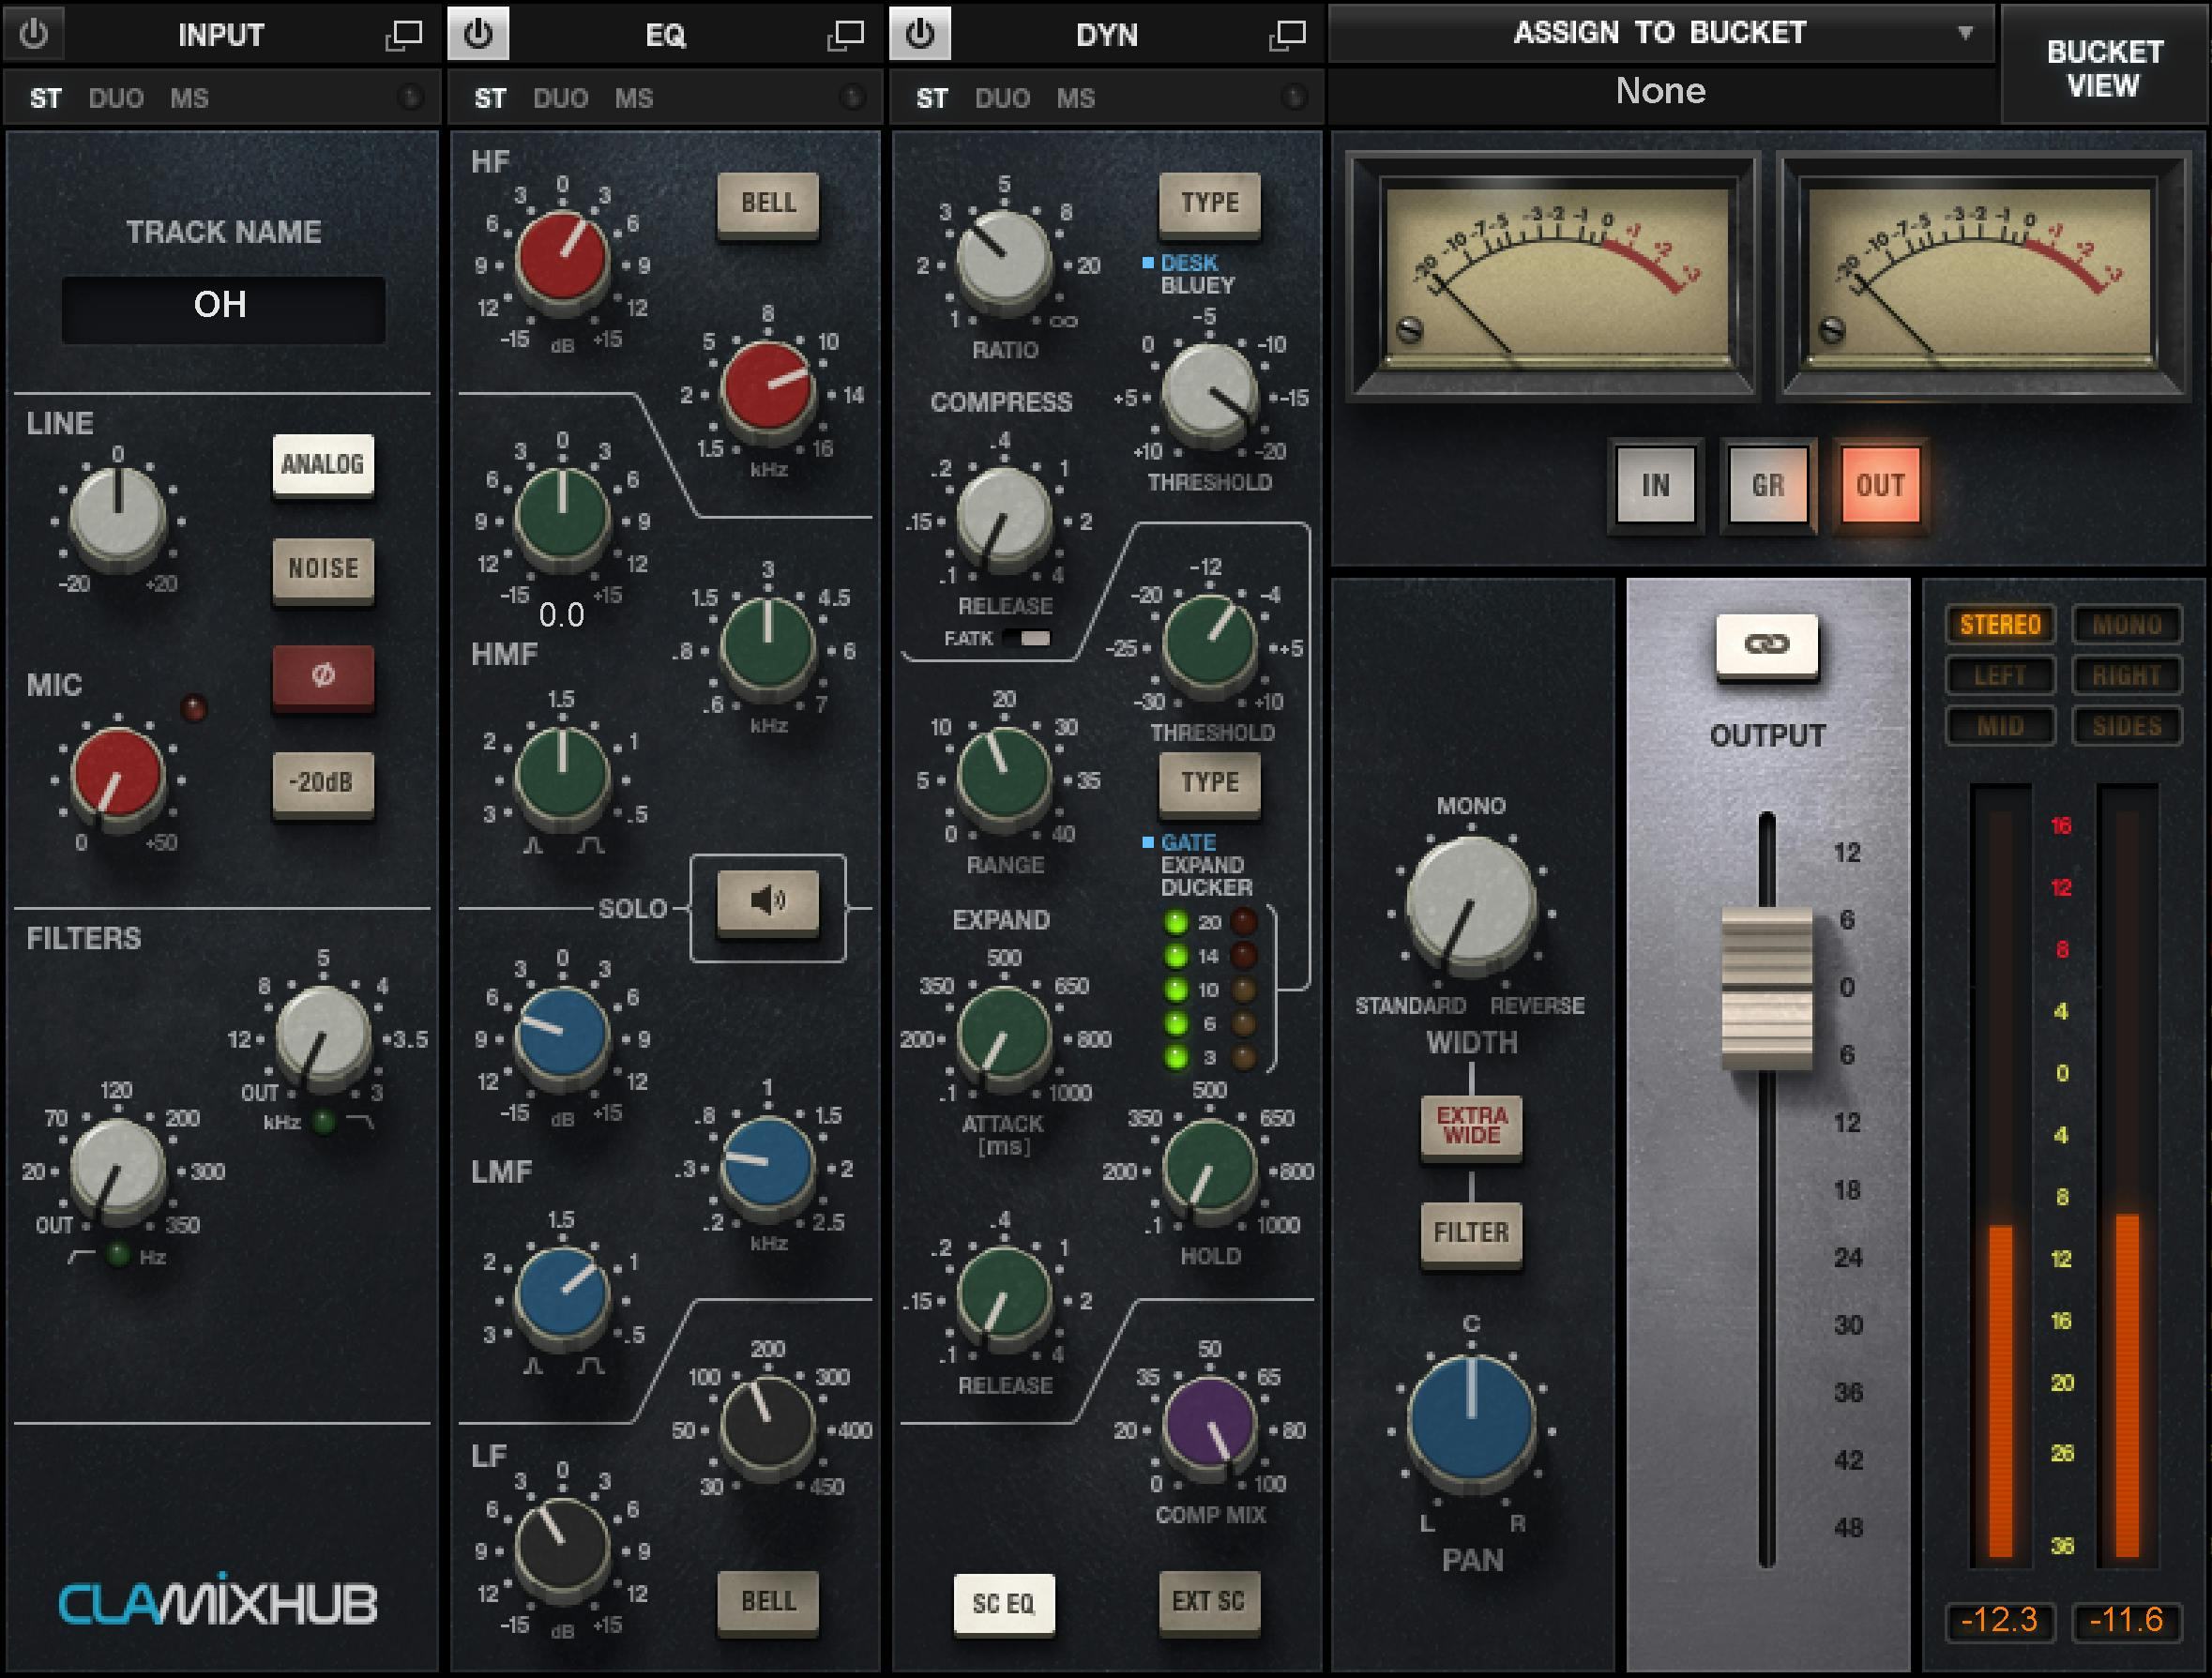
The manual describes three main working views. [1]
- Channel View shows one full CLA MixHub channel with numerical values and routing.
- Bucket View shows up to eight assigned channels together for console-style control.
- Expanded View opens a module in greater detail, including stereo-link and sidechain controls where applicable. [1]
Bucket View deliberately omits some graduation/value labels for visual cleanliness. That does not mean the underlying controls lose their values; it is a display difference between views. [1]
Processing order
The signal flow runs left to right. Input and Output remain fixed at the ends of the chain. The EQ, Dynamics and insert modules can be dragged into different orders between them. [1]
That means “EQ before compression” versus “compression before EQ” is a real routing choice in MixHub, not merely a visual rearrangement.
No order is presented here as universally superior. Choose it for the task and verify the active module order in the current channel.
Module On/Off
The Input, EQ and Dynamics modules each have a Module On/Off control. Turning one off removes that module from DSP while audio passes to the next module. [1]
Track Name and Module Type
The Input, EQ and Dynamics headers show the Track Name and Module Type and open Expanded view. In supported hosts, track names copy into MixHub; otherwise, the guide says to rename them in MixHub. It recommends track names of six characters or fewer because longer names must be abbreviated. [1]
These are organizational/navigation controls; they do not themselves alter the audio.
Clip indicator
The common module header includes a red Clip indication. The manual says it lights when module input comes within approximately 4 dB of internal clipping. [1]
This is a warning/status indicator, not a gain control. The retrieved guide does not document a separate hold duration for this module-level indicator, so none is invented.
Stereo Mode
Stereo instances provide three documented processing modes: Stereo, Duo and M/S. [1]
Stereo
In Stereo mode the signal remains left/right. The dynamics sidechain is summed so the left/right channels share the same dynamics control values and gain-reduction behavior. [1]
Duo
In Duo mode the left and right channels are processed with separate dynamics sidechains. This can create different compression/gating behavior on each side when the material differs. [1]
M/S
In M/S mode the plugin converts the stereo signal into mid and side paths for separate processing, then returns the module output to stereo. [1]
The manual notes that module output is stereo even when the internal mode is M/S. Do not confuse M/S mode with a permanently encoded M/S output format.
Expanded stereo Link
Expanded modules provide Link for paired stereo controls. [1]
Linking corresponding controls preserves their existing offset rather than necessarily forcing both sides to an identical absolute setting. This matters when you intentionally created a left/right or mid/side difference before linking. [1]
Input: Line
Line sets input gain at the modeled console input. [1]
When Analog is enabled, increasing Line gain also increases the amount of modeled nonlinear behavior/THD described by Waves. When Analog is disabled, Line behaves as clean gain rather than driving the modeled input stage. [1]
The current guide does not publish a complete numeric range/default table for Line in the retrieved text; this article does not infer one from the knob graphics.
Input: Mic
Mic adds up to 50 dB of input gain and can drive the modeled input more strongly when Analog is enabled. [1]
This is a modeled console input-gain function. It is not a substitute for physical microphone preamplification before the converter.
Analog
Analog enables or disables the modeled console nonlinear behavior. [1]
- Default: On [1]
With Analog Off, the manual says Line and Mic act as pure gain, modeled THD is removed from both the input and output stages, and CPU use is reduced. [1]
That makes Analog one of the most consequential architecture switches in the plugin: it is not just a noise switch.
Noise
Noise turns modeled console noise on or off. [1]
The current guide explains the function but does not publish an explicit factory default in the retrieved text. The article therefore does not assert one.
Noise is separate from the Analog switch. Do not describe it as a denoiser or gate.
Phase
Phase applies a 180° polarity inversion. [1]
It is a polarity control, not a continuously variable phase-rotation tool.
-20 dB Pad
The -20 dB Pad reduces input level by 20 dB. [1]
Use it when the input stage is being driven harder than desired and you want a fixed attenuation before the remaining channel processing.
Input low-pass and high-pass filters
The Input section includes LP and HP cutoff controls. [1]
The guide documents their low-pass/high-pass roles but the retrieved control text does not provide a complete numeric range/default table. Those ranges remain unspecified here rather than being estimated from the interface.
EQ overview
The EQ module provides four main bands: high, high-mid, low-mid and low. [1]
- High and Low can switch between shelving and bell behavior.
- High-Mid and Low-Mid have gain, frequency and Q.
- Channel View also provides solo functions for the mid bands. [1]
The current manual describes the functions but does not publish exhaustive numeric range/default tables for all EQ parameters in the retrieved text; no values are fabricated.
High EQ
The HF section provides: [1]
- Gain
- Frequency
- Bell toggle, switching the high band between shelf and bell behavior. [1]
High-Mid EQ
The HMF section provides: [1]
- Gain
- Frequency
- Q
- A Solo audition function in Channel View. [1]
Solo creates a band-pass audition around the selected cutoff so you can identify what the band is targeting. The manual distinguishes this Channel View function from the more compact Bucket EQ view. [1]
Low-Mid EQ
The LMF section provides Gain, Frequency, Q and the same type of Channel View solo audition. [1]
Again, the current retrieved guide does not provide a complete numeric control table; ranges/defaults remain unspecified here.
Low EQ
The LF section provides Frequency, Gain and a Bell toggle to switch between shelf and bell behavior. [1]
Dynamics: Desk versus Bluey
The compressor section provides two compressor models/types: Desk and Bluey. [1]
The manual describes Desk as the console-style feed-forward VCA compressor and Bluey as the CLA-76-derived model. The selected compressor type is linked between stereo channels. [1]
This article does not claim that Bluey is identical to a standalone CLA-76 instance; it only reports the model relationship documented in MixHub.
Compressor Ratio
Comp Ratio sets compressor ratio. [1]
The current guide documents the control but does not provide a complete numeric options/default table in the retrieved text. No ratio list is guessed.
Compressor Threshold
Comp Threshold determines the level at which compression acts. [1]
The retrieved manual does not supply an exhaustive numeric range/default table here, so those values remain unspecified.
Compressor Release
Release controls how quickly gain reduction recovers after the detector signal falls. [1]
No undocumented milliseconds range/default is inferred.
Compressor Attack
Attack is a two-state control: Slow / Fast. [1]
This is one place where the manual defines the options explicitly; do not describe MixHub’s compressor attack as continuously variable.
Gate/Expander/Ducker Threshold
The second dynamics path has its own Threshold for the Gate/Expander/Ducker function. [1]
The selected processor mode determines what happens when the detector crosses the threshold.
Gate Range
Range controls how much attenuation/level change the gate-style processor can apply. [1]
The current guide does not expose a complete numeric range/default table in the retrieved text.
Gate / Expander / Ducker mode
The processor-type selector chooses: [1]
- Gate
- Expander
- Ducker
These are genuinely different dynamics behaviors, not preset names for the same function.
Dynamics gain-reduction meter
The Dynamics module uses a five-LED gain-reduction display. [1]
The left portion reports Gate/Expander/Ducker action; the right portion reports compressor gain reduction. This is a readout, not a control.
Gate Attack
The gate-style processor has a continuous Attack control. [1]
This is distinct from the compressor’s Slow/Fast attack switch.
Gate Hold
Hold controls how long the Gate/Expander/Ducker stage remains in its active/open state before release behavior proceeds. [1]
Gate Release
Gate Release is in the Gate/Expander/Ducker section; the manual describes it as controlling the Ducker’s release time. [1]
The guide does not publish a numeric timing range/default here.
Compressor Mix
Comp Mix blends dry and compressed signal for parallel-style compression inside the module. [1]
The function is documented; an exact range/default is not claimed where the guide text does not publish it.
External Sidechain
EXT SC enables an external sidechain when an active sidechain signal is patched; this changes the detector input, not the main audio input. The guide notes that Pro Tools supports only one sidechain channel. [1]
Sidechain EQ On/Off
The Dynamics module includes SC EQ On/Off. The manual notes that the SC EQ button remains inactive until the variable sidechain-EQ control has been moved away from zero. [1]
That UI behavior is useful: an “off-looking” SC EQ state may simply mean no sidechain-EQ amount has been established yet.
Expanded sidechain Listen
Expanded Dynamics provides SC Listen Mode Select: G auditions the gate detector and C auditions the compressor detector. Stereo tracks have separate left/right listen selection. [1]
These are detector-audition controls, not additional mix outputs.
Sidechain routing
The expanded sidechain section allows filter/EQ resources to be routed to different detector paths. [1]
The manual documents these choices: [1]
- FLTR to the Gate/Expander/Ducker detector or to the compressor detector.
- EQ to the Gate/Expander/Ducker detector or to the compressor detector.
- FLTR+EQ → DYN to feed the combined filtering/EQ into the full dynamics detector path. [1]
The expanded view also provides stereo-side Link behavior for paired sidechain controls. [1]
This is detector routing; it does not necessarily mean the sidechain EQ/filter is being inserted into the audible program path.
Output VU meters and calibration
The Output section provides VU metering with the documented reference 0 VU = +3 dBu. Calibration screws adjust the meter reference. [1]
The meter selector can display: [1]
- Input
- Compressor gain reduction
- Output
These VU controls are separate from the digital PPM/clip metering described below.
Output faders and Link
The Output faders control output level. [1]
The manual emphasizes that they do not alter input level or compressor gain reduction. The stereo Link behavior preserves an existing offset when the paired faders are linked. [1]
That is useful when you have deliberately offset two sides and want subsequent moves to retain the relationship.
Output Selector
The Output Selector sets the format of the plugin’s output signal: Stereo, Mono, Left, Right, Mid or Side. [1]
This output-format selector is separate from the per-module Stereo/Duo/M/S processing mode.
PPM meters, clip and peak reset
The Output section includes PPM-style meters with digital clipping at 0 dBFS. [1]
The manual documents click-to-clear behavior for the clip indication and the Peak Level readout. These resets clear held meter states; they do not change the audio level. [1]
Stereo Width
Width moves through a stereo-image range that includes Standard, narrowing toward mono, and continuing through Reverse polarity/channel-image behavior. [1]
The manual’s conceptual scale is more important than an invented numeric range: Standard is the normal stereo relationship, mono collapses width, and further movement reverses the stereo image. [1]
Extra Wide
Extra Wide extends the stereo widening effect by altering phase and reducing mid information. [1]
Waves explicitly recommends care with this mode and suggests parallel-style use when appropriate. That is a vendor caution, not a listening verdict from this article.
Width Filter
The Width section includes a low-frequency shelf/filter around 200 Hz before the width processing. [1]
Its purpose is to help maintain low-frequency center integrity when using extreme width changes. It is not the same as the Input HP/LP filters.
Pan
Pan interacts with Width. The manual says Pan is effective when Width is positioned between Standard and Reverse, with wider settings allowing more pan movement. [1]
That means Width changes the available panning behavior; Pan is not fully independent of the stereo-image control.
Plugin Insert
CLA MixHub includes an insert slot for another supported Waves plugin. [1][2]
Current official Waves update/release documentation also says individual CLA MixHub Input, EQ and Dynamics modules can be loaded as insert plugins inside the MixHub insert slot. [3]
This guide does not establish support for every Waves plugin, host or insert configuration.
Bucket View architecture
CLA MixHub provides eight buckets, each containing up to eight channel slots, for a maximum of 64 assigned tracks. [1][2]
Mono and stereo MixHub instances can coexist in the same bucket. Track assignments do not need to follow DAW track order. [1]
Again, Bucket View is a remote control surface over the individual MixHub instances; the audio remains on those tracks.
Bucket selector, Mode, Assign, Lock and Clear
The Bucket panel includes: [1]
- Bucket selector — chooses the current bucket.
- Mode — changes the active Bucket control mode/module context.
- Assign — enters track-assignment workflow.
- Lock — prevents tracks from moving within the bucket.
- Clear — clears the current bucket; the manual says this operation is undoable.
- Channel View — returns to the selected channel’s full view. [1]
Double-click a bucket-name box to rename that bucket. [1]
Clear is not a global “remove every MixHub instance” command.
Track assignment and sorting
The assignment list can be sorted by Track Name, Bucket Name or None. Each bucket accepts up to eight tracks. [1]
The per-track menu provides: [1]
- Assign
- Copy Preset
- Paste Preset
- Paste Preset to All
- Remove Track [1]
Paste Preset to All applies the copied preset to tracks in the current bucket and only to the current processing mode (Input, EQ, Dynamics or Output). [1]
WaveSystem toolbar and Bucket undo/redo
CLA MixHub uses the shared WaveSystem toolbar. The manual documents up to 32 undo/redo steps. [1]
Channel View also provides the ordinary save/load, A/B comparison and setup-cycle behavior. Bucket assignment/clear actions participate in the documented undo workflow where specified. [1]
CLA MixHub Lite
The current product page says CLA MixHub Lite is included for lighter CPU use. Current official Waves update/release documentation identifies Mono and Stereo Lite components added for optimized CPU performance. [2][3]
The current linked V3 user guide does not provide a complete separate control-by-control table describing every internal difference between the full and Lite components. Therefore this article states only the documented distinction—optimized/lighter CPU component variants—and does not invent omitted modeling stages, reduced oversampling or altered sound.
Current vendor latency specification
The current product technical data reports the standard CLA MixHub plugin at 59 samples of native latency at 44.1/48 kHz and 20 samples at 88.2/96 kHz. [2]
Those are Waves’ current vendor specifications, not host measurements from this article. No latency value is asserted for Lite unless the current official technical table explicitly identifies it during Work verification.
Host/view limitation
Bucket View support is host-specific. Waves’ current product page is inconsistent: its banner lists MultiRack, SuperRack, eMotion LV1 Mixer and eMotion ST Mixer as unsupported, while separate structured support text lists eMotion LV1, SoundGrid Studio and MultiRack. The same support text also says Bucket assignment is not supported in BandLab and opening a plugin inside MixHub’s insert point is not supported in Studio One. Check current support information for your specific host; the page does not provide one reconciled Bucket View list. [2]
A practical MixHub workflow
Set the Input stage first: choose Analog/Noise behavior intentionally, establish Line/Mic gain, use Pad when needed and trim unwanted bandwidth with HP/LP filters. Then choose the desired order for EQ, Dynamics and the insert. [1]
For stereo channels, set Stereo, Duo or M/S before fine-tuning paired dynamics. If you need detector shaping, use Expanded Dynamics so you can explicitly route the filter/EQ to the intended Gate/Expander/Ducker or compressor path. [1]
At Output, use the fader for final level, meter in the mode that answers your question, and treat Width/Extra Wide as intentional stereo processing rather than default enhancement. Finally, organize related tracks into Buckets for session-wide control. [1]
Those are conservative workflow suggestions based on documented architecture. No “CLA setting,” console sweet spot or listening preference is claimed.
Practical uses
MixHub is useful when you want a console-style channel workflow and fast access to many tracks without opening each insert one at a time. Bucket View is the distinctive operational feature; reorderable modules and detailed stereo/sidechain routing make it more flexible than a fixed-order channel strip. [1][2]
It can also be used as an ordinary single-channel processor without Bucket View. The multi-track controller is optional to the audio processing itself.
Best for / skip if
It is best suited to sessions where a repeatable channel-strip architecture plus central multi-track control is valuable. [1][2]
Skip the Bucket workflow when your host does not support it or when a simpler single-purpose processor is more appropriate. If you need precise published numeric ranges for every EQ/dynamics knob in advance, note that the current linked manual does not expose exhaustive range/default tables for all controls.
Limitations and documentation boundaries
The current Waves product page uses both custom 4400-series and personal 4000-series wording when describing the modeled console lineage. This article therefore refers to CLA MixHub as a Waves/CLA console-style model without trying to resolve that vendor wording into a more specific hardware-history claim. [2]
No console-hardware comparison, THD/noise measurement, CPU benchmark, host automation test, Bucket performance test or latency measurement was performed.
Where the manual does not publish numerical ranges/defaults for EQ, filter or dynamics controls, they remain unspecified. The functions and modes described here follow the reviewed guide without reading uncertain numbers from interface pixels.
Related guides
The live Waves RComp guide is relevant for a simpler dedicated compressor. The live Waves F6 guide covers a dedicated dynamic EQ rather than MixHub’s console EQ/dynamics workflow. The Waves Audio Post Resources hub can also be used if currently live.
Bottom line
CLA MixHub combines a modular Input/EQ/Dynamics/insert/Output channel strip with Bucket View control of up to 64 MixHub tracks. Its processing architecture includes reorderable middle modules, Stereo/Duo/M/S modes, detailed dynamics-sidechain routing, output metering/width/pan controls and session-level bucket assignment tools. [1][2]
The current documentation also identifies lighter-CPU CLA MixHub Lite Mono/Stereo components and current Waves update notes add MixHub’s own Input/EQ/Dynamics modules as insert choices. [2][3]
The control functions described above follow the reviewed V3 guide; numeric ranges/defaults absent from the guide remain unspecified.
Sources
Checked October 17, 2026. No listening, hardware, CPU, latency, host or automation test was performed.
- Waves CLA MixHub V3 User Guide, current product-linked guide. The official Input-module interface/control page was visually inspected during this writing pass.
- Waves CLA MixHub product page, current feature, component, technical-data and support-context information.
- Waves Release Notes, March 17th, 2019 section, rechecked October 17, 2026: Lite Mono/Stereo and individual Input/EQ/Dynamics module insert additions. These are vendor feature notes, not a test of a particular current host/build.
- Waves Graphic Library, current product-image entry and attribution/backlink requirement.
FAQ
How many tracks can CLA MixHub control in Bucket View?
The guide describes eight buckets of up to eight tracks each, for up to 64 host tracks. Each assigned track needs its own CLA MixHub instance.
Can mono and stereo instances share a bucket?
Yes. The guide lists Mono and Stereo components and says they can be assigned within the same bucket.
Does Bucket View process or sum the audio itself?
No. The guide describes it as a virtual controller for the individual plugin inserts; processing takes place on those track instances, not in the bucket.
Can I change the order of CLA MixHub modules?
Yes. EQ, Dynamics and Insert can be dragged to change their signal-flow position; Input and Output cannot be repositioned.
How do Stereo, Duo and M/S differ in the Dynamics module?
Stereo sums left and right in the sidechain so dynamics apply equally. Duo processes left and right sidechains separately. M/S processes mid and side sidechains separately. The module output remains stereo.
What happens when I turn a module off?
For the documented Input, EQ and Dynamics modules, Off removes that module from DSP while audio continues to the next module.
What does Clear do in the Bucket panel?
Clear removes assignments only from the selected bucket, and the guide says that action can be undone with the WaveSystem Toolbar.
What does Paste Preset to All affect?
It applies the copied preset to all tracks in the current bucket, but only for the current processing mode.

About the Author
Joseph Nilo has been working professionally in all aspects of audio and video production for over twenty years. His day-to-day work finds him working as a video editor, 2D and 3D motion graphics designer, voiceover artist and audio engineer, and colorist for corporate projects and feature films.