Waves Doppler creates a moving-source effect by changing pitch, level, panning, air damping and reverb along a drawn path. The key controls are the path’s start and end positions, its curved center handle, Track Time and Center Time. Center Time sets when the pitch effect peaks; it is not the spatial center handle.
This is a documentary control guide, not a listening review. I have not run Doppler or tested it in a host. The product page currently lists V9–V17 and Stereo plus Mono-to-Stereo components; that listing does not prove installation support or behavior in a particular system.
My Short Version
Use the Space Display to draw where a sound begins, travels and ends relative to the listener. Track Time sets the duration; Center Time sets when the pitch effect peaks, initially at half of Track Time according to the manual. The separate Center Handle bends the spatial path up or down. Moving that handle does not set Center Time.
Choose whether the track repeats continuously or runs once, then choose an Energy or Manual trigger for one-shot playback. Shape the motion first; the manual calls the path and timing the main determinants of the Doppler effect. Its Gain, Pan, Pitch, Air Damp and Reverb controls then scale the accompanying effects. The manual calls 100% a reasonable realistic setting for several controls, but that is vendor guidance—not a physical calibration or result from this guide.
Treat the output meters as visible readouts, not proof of calibration. The manual does not give a complete numeric range for Track Time, Center Time or Reverb Time. It separately shows Brightness on a 0.0–1.0 scale; do not apply the broader 0–200% statement to that field.
What Doppler does
The Doppler effect is the perceived pitch change as a sound source moves toward or away from a listener. Doppler pairs a path-and-time display with related changes in pitch and level, stereo placement, high-frequency damping and a generated reverb tail. Waves describes those behaviors on its official Doppler product page; no example here was processed or auditioned.
This can help with a designed pass-by, moving vehicle, spacecraft or other sound effect. It is not a conventional pan control: the manual ties the pitch and level curves to the source’s path and timing, while also allowing designers to exaggerate or suppress the secondary “reality” effects.
Draw the path, then set its timing
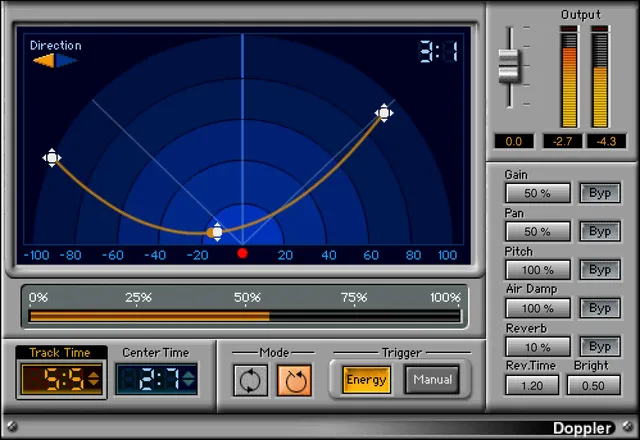
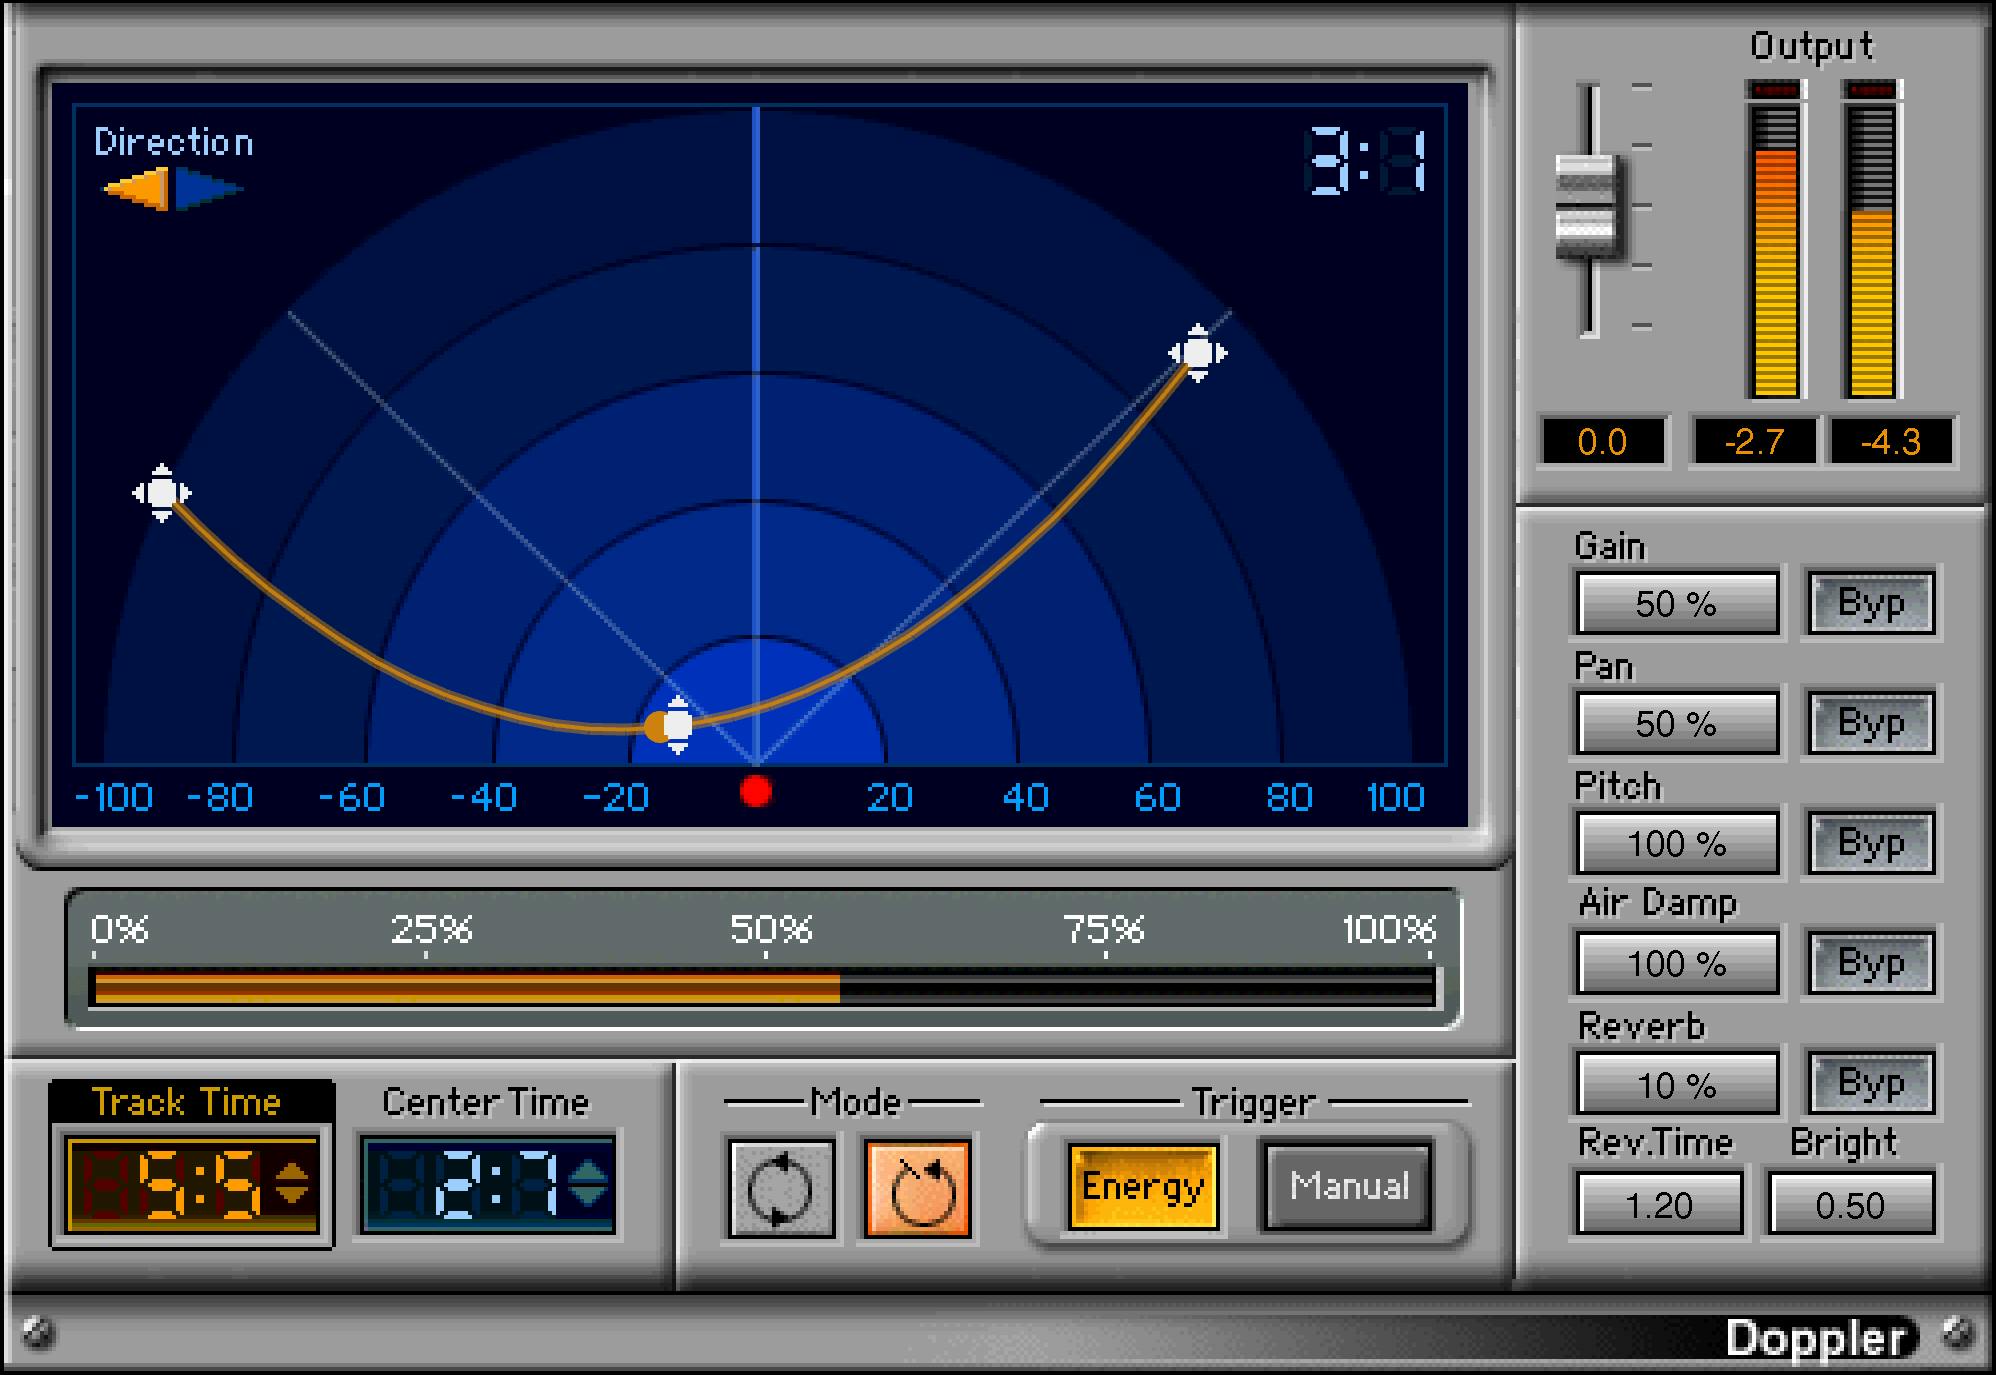
The Space Display places the listener at the red origin point. The orange track shows the source path, with draggable Start and End handles and a Center Handle that moves vertically to curve the path. Direction arrows set the travel direction. An elapsed-time readout shows progress through the cycle and resets at the start of a new cycle.
Track Time is the total length of the track, in seconds. The guide says it can be shorter than the sound segment or region. It does not publish an overall numeric range or a universal default. Center Time is the time at which the pitch effect peaks; the guide says it generally defaults to half of Track Time. Earlier values make the source approach more quickly before the pitch peak; later values make the approach slower before the peak and speed the departure. No numeric Center Time range is specified.
Keep the two center controls separate: the Center Handle changes the curve in space, while Center Time moves the pitch peak in time. The path’s shape, its distance from the listener and the timing all interact, so a faster pass may require a different path to preserve a similar effect. Those are the manual’s explanations, not measured laws or automatic matching.
Choose the cycle and trigger
Mode selects Continuous or One-Shot. Continuous repeats the track and Doppler process. One-Shot waits for a trigger, then runs the cycle once. Trigger selects Energy or Manual: Energy starts when audio is detected; Manual starts when clicked, even if a preceding track cycle has not finished.
The guide describes Energy as threshold-triggered, but does not give a numeric threshold or a host-independent timing guarantee. Its setup examples are not a test of how the control behaves in a particular DAW or file-based processor.
The five main motion inputs
The guide highlights five controls when establishing the effect: Start Point, End Point, Curve of Track, Center Time and Pitch. Start and End set where the source begins and finishes; the center handle bends the path; Center Time places the pitch peak; Pitch scales the perceived pitch shift. This is why a single pan move is not a substitute for drawing the path.
The manual’s examples suggest setting Track Time to the desired effect length, orienting the travel arrows, and positioning the handles relative to the listener. It also says a shorter Center Time makes the approach reach its pitch peak sooner. These are manual-based concepts, not a preset recipe or a promise that a visual path matches real movement.
Gain, Pan and Pitch
Each of these controls has its own Bypass button. The manual gives a broad 0–200% range for its secondary Reality controls: it describes zero as no added effect, 100% as a reasonable realistic setting, and values above 100% as exaggeration. That is Waves’ scale description, not a measured real-world mapping.
Gain changes level with distance. At 0%, there is no distance-related gain change; increasing it makes distant sounds lower, with values above 100% exaggerating that drop. It is not an output fader.
Pan changes stereo placement along the track. The guide says 0% produces mono output, 100% is its realistic setting, and up to 200% exaggerates the panning. If the mix engineer will place the sound later, the manual describes reducing Pan to zero as an option; it does not guarantee a particular host’s routing behavior.
Pitch scales the Doppler pitch effect. Zero means no Doppler pitch effect in the manual’s description; 100% is its realistic reference and values above that strengthen the shift. Start, End, path curvature and Center Time also affect the result, so Pitch is not a standalone “speed” control.
Air Damp and Reverb
Air Damp reduces high frequencies with distance in both approach and departure directions. The manual describes 0% as no damping, 100% as its realistic reference with damping beginning around 10 kHz, and higher values as stronger damping. This is Waves’ description, not a measured frequency curve. Air Damp has its own Bypass button.
Reverb controls the amount of the generated tail mixed into the output. It is a gain/amount control, not a wet/dry balance; the manual describes more reverb as the source gets farther from the listener. Its separate Reverb Time field is shown in seconds, and Reverb Brightness is shown from 0.0 to 1.0, with 1.0 the brightest. The broad 0–200% sentence elsewhere groups Reverb amount, time and brightness together, so this guide does not assign that percentage range to the separately displayed Time or Brightness fields. The manual does not specify Reverb Time bounds; Brightness is bounded at 0.0–1.0. It states no default for either field. Reverb Amount also has its own Bypass button; the manual does not describe separate bypasses for Reverb Time or Brightness.
The manual says Brightness is often set below 1.0, offering about 0.5 as an example. That is a suggested starting point from Waves, not a universal default. Reverb amount, Reverb Time and Brightness should not be conflated with a single wet/dry control; no dedicated wet/dry control is documented.
Output and shared utilities
The interface shows an output fader, two output meters and numeric level readouts. The manual does not specify the fader’s numeric range or default, document meter calibration, or establish behavior in a current build. Treat them as plugin displays, not as evidence that a signal meets a broadcast, loudness or peak target.
The shared WaveSystem toolbar provides preset save/load, Compare, Undo, Redo, Resize and access to the WaveSystem Guide. The manual also names a “Doppler Reset (default)” factory preset/initial setting. That is a preset name, not a separate reset button. Factory presets are described as suggestions because the effect depends on the sound and picture context.
A conservative way to approach the controls
This sequence is a practical recommendation based on the documented relationships, not a tested recipe:
- Draw a plausible Start-to-End route and choose the direction. Use the Center Handle only to bend the path.
- Set Track Time for the intended pass, then adjust Center Time if the pitch peak should happen earlier or later. Keep those timing controls distinct from the spatial handle.
- Select One-Shot or Continuous and the appropriate Energy or Manual trigger; do not assume a numeric Energy threshold from the manual.
- Balance Pitch with path geometry, then decide how much distance-related Gain and Pan you want. Use Air Damp and Reverb to shape additional distance cues rather than treating 100% as a guaranteed physical simulation.
- Watch the output displays and compare with your own source material. No meter calibration, playback test or safe-level guarantee is established here.
Related tools
For motion that is not based on Doppler pitch change, the official Waves S1 Stereo Imager is a different stereo-placement tool. For repeated echoes rather than a moving-source pass, see Waves H-Delay. These are task distinctions, not listening comparisons. The Waves Audio Post Resources hub is the site’s live index for related Waves guides.
Sources and documentation limits
Checked October 19, 2026 (America/New_York). The current Doppler product page links the Doppler User Guide, a 14-page PDF. The page lists Waves versions V9–V17 and Stereo/Mono-to-Stereo components; these are listing labels, not proof of support on a given OS/DAW or a tested configuration. The linked manual was read in full; its path, timing and control pages were visually inspected alongside the official product UI capture.
The Waves Graphic Library requires attribution and a link from each product image to its relevant official product page. The image is vendor artwork, not a current installed instance or verified default state. No plugin, host or audio test was performed for this guide.
FAQ
What is the difference between Track Time and Center Time?
Track Time sets the total path duration in seconds. Center Time sets when the pitch effect peaks and generally defaults to half the Track Time. The spatial Center Handle is separate: it bends the path but does not set the pitch peak.
Does the Center Handle set the Doppler pitch peak?
No. The Center Handle curves the source’s path vertically in the Space Display. Center Time sets the moment of the pitch peak; the manual describes the controls separately.
What do One-Shot and Continuous mode do?
Continuous repeats the track and Doppler process. One-Shot waits for a trigger and runs once. The manual does not provide a universal numeric timing range or host-specific behavior guarantee.
How do the Energy and Manual triggers differ?
Energy starts the cycle when audio is detected, while Manual starts it when clicked. The linked guide does not specify a numeric Energy threshold, so none is assumed here.
Is the Reverb control a wet/dry mix?
No. The manual describes Reverb as the amount/gain of its generated tail, not a wet/dry balance. Reverb Time is displayed in seconds, but its numeric bounds are not specified. Brightness is shown on a 0.0–1.0 scale, with 1.0 brightest; neither field has a stated default.
What does 100% mean for Gain, Pan, Pitch and Air Damp?
The manual calls 100% a reasonable realistic reference for these effects, with 0% suppressing the corresponding distance-related effect and values above 100% exaggerating it. This is vendor guidance, not a measured physical calibration.
Are Doppler’s output meters calibrated?
The manual shows output meters and numeric readouts but does not establish their calibration or current runtime behavior. Do not treat them as proof of a broadcast, loudness or peak target.
Is “Doppler Reset (default)” a reset button?
No. The guide names “Doppler Reset (default)” as a factory preset/initial setting, not a separate reset control. The toolbar provides preset and comparison utilities.
About the Author
Joseph Nilo has been working professionally in all aspects of audio and video production for over twenty years. His day-to-day work finds him working as a video editor, 2D and 3D motion graphics designer, voiceover artist and audio engineer, and colorist for corporate projects and feature films.