
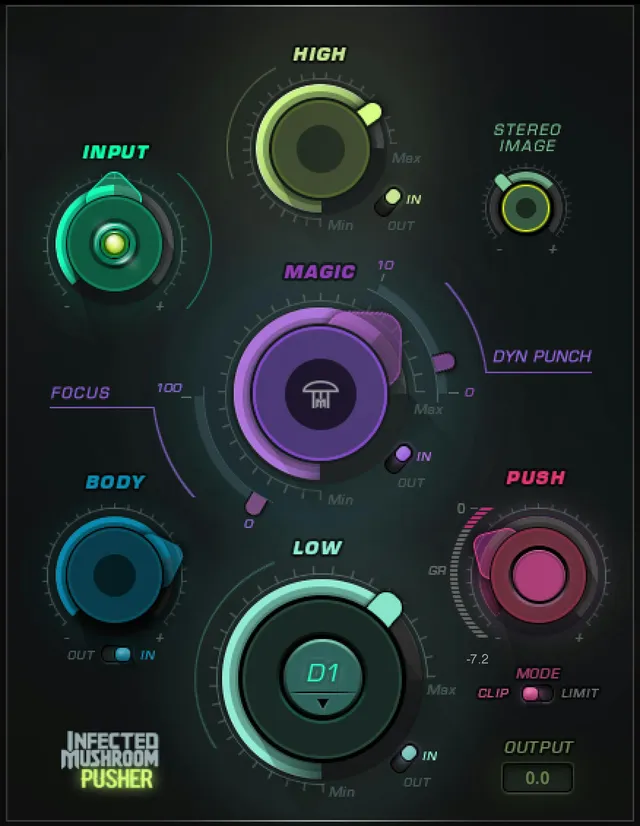
Waves Infected Mushroom Pusher is a multiband sonic-enhancement and final-level processor built around several simplified tone/dynamics sections plus a selectable clipper or limiter. Its main controls are Low, Body, Magic, Focus, Dyn Punch, High, Stereo Image and Push, with input/output gain and section bypasses around them. [1][2]
Waves describes seven essential processing functions in the current product page. The user guide breaks the interface into the actual user controls and shows that some of those functions are grouped: for example, Magic In/Out controls Magic, Focus, Dynamic Punch and Stereo Image together. [1][2]
My Short Version
Set Input first and use the Sensitivity LED as the manual recommends: green is good, yellow is the intended optimal region, red is very hot. Then add only the sections you need rather than turning every enhancement control up at once. [1]
Use Low for low-frequency enhancement, Body for low-mid weight, Magic/Focus/Dyn Punch for broader excitation and punch, High for high-frequency enhancement, and Stereo Image for high-frequency widening. Finish with Push, then choose Clip or Limit and use Output for attenuation. [1]
The manual says the plugin output does not exceed -0.1 dBFS, but that is a documented output behavior—not evidence that every setting is appropriate for mastering, nor a true-peak compliance guarantee beyond what Waves explicitly documents. [1]
Components
Pusher has two components: [1]
- IMPusher Mono — mono in to mono out.
- IMPusher Stereo — stereo in to stereo out. [1]
The stereo-only widening behavior belongs to the stereo processing context; this article does not invent a separate widening output for the mono component.
Input
Input adjusts the plugin input level. [1]
- Range: -24 dB to +24 dB
- Resolution: 0.1 dB
- Default: 0 dB
- Reset: 0 dB [1]
The manual explicitly says Input does not change when you load a preset. That makes it useful as a stable gain-staging control while auditioning presets. [1]
Sensitivity LED
The Sensitivity LED indicates the input operating region: [1]
- Off: too low.
- Green: good.
- Yellow: optimal.
- Red: very hot. [1]
Waves recommends using the loudest section when setting input for mastering and adjusting toward the desired color. This is vendor setup guidance, not a measurement from this article.
Low
Low sets the amount of the low-frequency process. Waves describes it as low-frequency enhancement with added harmonics. [1]
- Range: 0 to 20
- Resolution: 0.1
- Default: 0
- Reset: 0 [1]
Higher settings increase the Low processing amount; the exact spectral curve and harmonic content are not published numerically in the current guide.
Low Note/Freq
Low Note/Freq chooses where the Low process begins. The documented stepped choices are: [1]
- D1 = 37 Hz
- D#1 = 39 Hz
- E = 41 Hz
- F = 44 Hz
- F# = 46 Hz
- G = 49 Hz
- G# = 52 Hz
- A = 55 Hz
- A# = 58 Hz
- B = 62 Hz
- C = 65 Hz
- C# = 69 (unit omitted in the guide)
- D2 = 73 Hz
- D#2 = 78 Hz
- Default/reset: D1 = 37 Hz [1]
The guide prints C#=69 without a unit; no unit is supplied here. [1]
Low In/Out
Low In/Out toggles the Low process on or off. [1]
Use it for a level-aware A/B of the Low section rather than trying to imitate bypass by turning the amount knob down and changing other settings.
Body
Body controls the amount of low-midrange dynamics and frequency processing. [1]
- Range: 0 to 20
- Resolution: 0.1
- Default/reset: 0 [1]
Waves' quick-start description frames Body as adding weight in the middle frequencies. The manual does not publish an exact crossover or EQ curve for this section.
Body In/Out
Body In/Out toggles the Body process on or off. [1]
This is independent of Low and High section switching.
Magic
Magic sets the amount of broad dynamics boost/excitation. [1]
- Range: 0 to 100
- Resolution: 0.1
- Default/reset: 0 [1]
The manual describes Magic as acting across frequencies rather than defining a published band or crossover.
Magic In/Out
Magic In/Out is a grouped bypass. It toggles Magic, Focus, Dynamic Punch and Stereo Image together. [1]
- Default: On
- Reset: On [1]
That grouping is important: turning Magic In/Out off does more than silence the Magic knob itself.
Focus
Focus adds high-midrange dynamics and frequency processing. [1]
- Range: 0 to 100
- Resolution: 0.1
- Default/reset: 0 [1]
The current guide does not publish a center frequency, bandwidth, attack or release for Focus, so none is guessed here.
Dyn Punch
Dyn Punch controls the amount of punch and crispness. [1]
- Range: 0 to 10
- Resolution: 0.1
- Default/reset: 0 [1]
It belongs to the group controlled by Magic In/Out.
High
High controls high-frequency enhancement. [1]
- Range: 0 to 10
- Resolution: 0.1
- Default/reset: 0 [1]
The manual uses the word “sparkle” in its quick start but does not publish a specific cutoff, shelf frequency or harmonic spectrum.
High In/Out
High In/Out toggles the High process on or off. [1]
That bypass is separate from the grouped Magic bypass.
Stereo Image
Stereo Image controls widening at higher frequencies. [1]
- Range: 0 to 20
- Resolution: 0.1
- Default/reset: 0 [1]
The manual does not publish the frequency split, correlation target or widening algorithm. Stereo Image is also inside the group disabled by Magic In/Out. [1]
A sensible workflow is to check the stereo result in mono and on headphones/speakers appropriate to the project, but that is an editorial recommendation, not a listening test performed for this guide.
Push
Push sets the amount of Push for achieving maximum loudness, as the guide describes it. [1]
- Range: 0 to 24 dB
- Resolution: 0.1 dB
- Default/reset: 0 dB [1]
Push works with the Clipper/Limiter Mode selector. The guide defines Push as an amount control for achieving maximum loudness but does not specify its detailed internal signal routing. [1]
Clipper / Limiter Mode
The mode toggle chooses between: [1]
- Clipper — shown pink in the documented interface.
- Limiter — shown orange.
- Default/reset: Clipper. [1]
The current guide distinguishes the modes by processing type but does not publish separate attack, release, lookahead, oversampling or clipping-curve parameters. Those should not be invented from the interface.
Gain Reduction / Clipping meter
The meter reports different quantities by mode: [1]
- In Limit mode, it indicates gain reduction.
- In Clip mode, it indicates clipping amount. [1]
The current PDF text and rendered page both contain malformed typography in the printed numeric range (0 to I 30 dB / visually ambiguous character before 30). Because this is a read-only meter-scale notation rather than an adjustable processing control, the article documents the meter function but does not assert an exact lower endpoint from the malformed source. The guide does state 1 dB increments. [1]
The exact meter endpoint remains unspecified here rather than being normalized to a guessed value.
Output
Output attenuates the plugin output. [1]
- Range: 0 to -24 dB
- Resolution: 0.1 dB
- Default/reset: 0 dB [1]
Waves states that the plugin output never exceeds -0.1 dBFS regardless of drive. [1]
That statement is reproduced as vendor documentation. It is not a measured true-peak or codec-delivery guarantee from this article.
WaveSystem toolbar
The shared toolbar provides preset save/load, setting comparison, undo/redo, and interface resizing. [1]
Input's special preset-persistence behavior is covered separately above.
A practical workflow
Set Input first with the Sensitivity LED. Then work from broadest need to smallest enhancement: Low and Body for weight, Magic/Focus/Dyn Punch for broader enhancement, High for top-end, and Stereo Image only when stereo widening is actually useful. [1]
Turn section bypasses off and on as you go so each addition earns its place. Because Magic In/Out also controls Focus, Dyn Punch and Stereo Image, remember that it is a grouped comparison rather than a Magic-only bypass.
Set Push last. Compare Clip and Limit at comparable perceived level instead of assuming the louder setting is automatically better. That comparison advice is editorial; no listening test was run here.
Best for / skip if
Pusher is best suited when you want a single interface for several broad enhancement moves plus a final clip/limit stage on a track, group or mix. [1][2]
Skip it when you need surgical control over crossover frequencies, dynamics timing or individual processor algorithms that Pusher intentionally abstracts. Dedicated EQ, multiband dynamics, imager and limiter tools expose more explicit control when that is the task.
Limitations and evidence boundary
This is a documentary controls reference. No loudness normalization, master-bus shootout, clipping analysis, true-peak measurement, stereo-correlation test, CPU benchmark, host test or listening comparison was performed.
The current guide does not publish detailed band/crossover definitions for Body, Magic, Focus, High or Stereo Image. It also contains malformed typography for the exact numeric endpoint of the read-only GR/Clipping meter scale. Those gaps are disclosed rather than filled from assumptions.
Related guides
Browse the Waves plugin catalog for related processors.
Bottom line
Infected Mushroom Pusher packages broad low/body/high enhancement, a grouped Magic/Focus/Punch/widening section, and Push with selectable clipping or limiting into one processor. [1][2]
Its controls are intentionally macro-oriented. The tradeoff is speed and a compact interface versus the more explicit timing, crossover and algorithm controls of separate processors.
Sources
Checked October 18, 2026. No listening, loudness, native-host or measurement test was performed.
- Waves Infected Mushroom Pusher User Guide, current product-linked guide. See the interface and control descriptions, including the final meter/output page.
- Waves Infected Mushroom Pusher product page, current product identity and seven-processor feature summary.
- Waves Graphic Library, current reusable-product-image permission with required relevant-product backlink.
FAQ
What does Infected Mushroom Pusher do?
Waves describes Pusher as a multiband sonic enhancer and limiter/clipper. The guide lists IMPusher Mono (mono in to mono out) and IMPusher Stereo (stereo in to stereo out). [1][2]
What color should the Sensitivity LED be when setting Input?
The guide calls yellow optimal and recommends setting Input until the LED is steady yellow. It also identifies green as good, red as very hot and off as too low; for mastering it recommends using the loudest/highest-peaks section. [1]
What does Magic In/Out bypass?
It toggles Magic, Focus, Dynamic Punch and Stereo Image together, not Magic alone. The guide lists its default and reset state as On. [1]
Does Stereo Image work on both Pusher components?
The guide describes Stereo Image as widening the stereo field at higher frequencies, while the components are mono-in/mono-out and stereo-in/stereo-out. The documentation does not specify a separate widening behavior for the mono component. [1]
How do Clip and Limit modes differ?
The mode toggle selects Clipper (pink) or Limiter (orange), with Clipper as default and reset. The meter reports clipping amount in Clip mode and gain reduction in Limit mode; the guide does not publish separate attack, release, lookahead or curve controls. [1]
What output ceiling does Waves document?
The guide states that plugin output never exceeds -0.1 dBFS regardless of drive. This is a vendor specification, not a true-peak, codec-delivery or independent measurement guarantee. [1]
Is the Gain Reduction/Clipping meter's exact scale range clear?
The guide says the meter moves in 1 dB increments, but its printed endpoint appears as `0 to I 30 dB`. That typography is ambiguous, so the exact endpoint should not be normalized to a guessed value. [1]
Does the Input setting change when loading a preset?
No. The guide explicitly says Input level does not change when a preset is loaded. It documents a -24 to +24 dB range in 0.1 dB increments, with default and reset at 0 dB. [1]

About the Author
Joseph Nilo has been working professionally in all aspects of audio and video production for over twenty years. His day-to-day work finds him working as a video editor, 2D and 3D motion graphics designer, voiceover artist and audio engineer, and colorist for corporate projects and feature films.