
Waves Renaissance Equalizer, also called REQ, is a paragraphic EQ: you can shape its curve directly on a graph or enter values with parametric controls. It comes in two-, four- and six-band mono and stereo components, with bell filters, resonant shelves and cut filters available according to the band you choose.
Two details make its curves worth understanding before you start. A bell boost is wider than a cut at the same Q, and a shelf's Q affects its resonant shape as well as its slope. The real-time analyzer and output Trim help you see the result and manage level, but neither makes the tonal decisions for you.
This guide is based on the official Waves manual and interface imagery checked October 18, 2026. I have not auditioned or measured the plugin, and the currently installed build has not been checked.
My Short Version
Choose the component with the number of bands you need, then make one useful change at a time. Use a bell for a region of the spectrum, a shelf for the low or high end, and an outside band's cut filter when you want to roll off frequencies beyond a boundary. You do not need to use every band just because it is available.
Watch the curve when changing Q. In REQ, a narrower cut and a wider boost can share the same Q number; changing a shelf's Q can introduce a bump or dip around the transition. If the goal is a simple tonal adjustment, begin with a modest amount and judge the whole phrase in the mix.
Check output level separately from tone. The Trim button can raise or lower the output faders by its displayed amount; it is not just a meter reset. On stereo material, also decide whether the channels should stay linked. For fully independent left/right automation, the manual recommends two separate mono instances rather than an unlinked stereo instance.
What REQ is useful for
The official Renaissance Equalizer page presents a six-band EQ with several curve options and a frequency analyzer. Its User Guide explains the two ways of working: adjust the visible curve, or use Gain, Freq and Q controls for precise values.
Best for: static tonal adjustments where you want direct control over the curve. That might mean reducing a persistent low-mid buildup, adding a broad high shelf, or removing unwanted low-frequency content with a high-pass filter.
Skip it when: the correction needs to react only when a particular frequency becomes too loud. REQ's documented controls do not include a per-band threshold, attack or release. A dynamic EQ addresses a different task; a useful starting point is the Waves F6 guide.
Components and band choices
The manual lists REQ mono and REQ stereo, each in 2-band, 4-band and 6-band versions. It says the mono and stereo components are identical apart from the number of channels. Fewer bands reduce the number of available EQ sections; they do not create a different family of filter shapes.
The outside bands retain the same role across component sizes. The two bands in a two-band component have the filter choices of bands 1 and 6 in the six-band component, including when presets move between component sizes. Do not assume that a band's number alone tells you which choices it has in a smaller component; identify its outside or inside role.
The following map uses the six-band component's numbering:
| Band | Available filter choices | Practical distinction |
|---|---|---|
| Band 1 | High-pass/low-cut, low resonant shelf, bell | The low outside band can roll off the bottom end or shape it with a shelf or bell. |
| Band 2 | Low resonant shelf, bell | An inside band; no cut/pass option is documented. |
| Band 3 | Low resonant shelf, bell | Another inside band with low-shelf or bell operation. |
| Band 4 | High resonant shelf, bell | An inside band with high-shelf or bell operation. |
| Band 5 | High resonant shelf, bell | Another inside band; no cut/pass option is documented. |
| Band 6 | Low-pass/high-cut, high resonant shelf, bell | The high outside band can roll off the top end or shape it with a shelf or bell. |
All bands share the documented frequency range of 16–21,357 Hz. A low-shelf role does not mean that its frequency control is restricted to bass frequencies.
Selecting and editing a band
Click a numbered tab below the parametric controls, or click a numbered marker on the graph, to select a band. The selected graph marker has a yellow box, and the color-coded Band On/Off control identifies the selected band. Its values appear above the parametric knobs.
Band On/Off
Click the band's numbered On/Off button to switch that band in or out. On the graph, double-clicking a band marker does the same job. A single click selects the band; a double-click changes its active state, so take care when working quickly.
This is useful for checking whether one EQ move helps while the other bands continue working. It is different from comparing two complete plugin settings with the toolbar.
Filter Type
Click the filter-shape control to cycle through the available types, or choose a type from its drop-down menu. The manual also documents Cmd-click on a band marker on Mac to cycle filter types. It does not give a Windows equivalent for that shortcut.
The choices depend on the band map above. Changing from a bell to a shelf changes what Freq and Q mean, so check the curve and parameter values after switching type.
Gain
Gain ranges from −18.0 to +18.0 dB, in 0.1 dB increments. It sets the amount of boost or cut for a bell or shelf; pass-filter behavior is described by frequency and Q rather than a shelf-like gain amount.
Drag a marker up or down, adjust its Gain control, or double-click the parametric knob to type a value and press Enter. A large range is available, but the useful amount depends on the source and the purpose of the change.
Freq
For a bell, Freq sets the center frequency. For a cut or shelf, it sets the corner frequency. The documented range is 16–21,357 Hz, with one-sixteenth-tone steps: 96 steps per octave, displayed rounded to the nearest integer.
Move a graph marker left or right, use the Freq control, or enter a value numerically. The left and right arrow keys step a selected frequency value in those one-sixteenth-tone increments. This is a stepped musical scale rather than a promise that every integer hertz value is a distinct setting.
Q
Q has a different job for each filter type. For a bell, it sets bandwidth: higher Q makes the band narrower. For a shelf, it changes the steepness and the resonant dips or peaks. For a cut filter, it changes the slope and the bump around the transition.
The manual's main Q description gives 0.26–6.5 for bells and 0.71–1.41 for shelves and pass filters. Hold Alt while dragging a graph marker left or right to change Q, or adjust the Q control directly.
There is a documentation inconsistency worth preserving: the filter summaries on manual p. 8 append “dB/octave” to the 0.71–1.41 Q range. Page 7 lists Q separately from slope, and describes cut slopes of about 10–18 dB/octave. Treat 0.71–1.41 as the documented Q control range from p. 7, not as a 0.71–1.41 dB/octave rolloff specification. The guide does not establish an exact slope for every Q setting.
Constrained movement and precise entry
Hold Ctrl while dragging vertically or horizontally to constrain a graph marker to one axis. That lets you change gain without accidentally shifting the frequency, or move the frequency without changing the gain.
For a precise Q, Freq or Gain value, double-click its parametric knob, enter the value and press Enter. The manual also allows a selected knob or band marker to be adjusted with keyboard arrows.
Parametric View
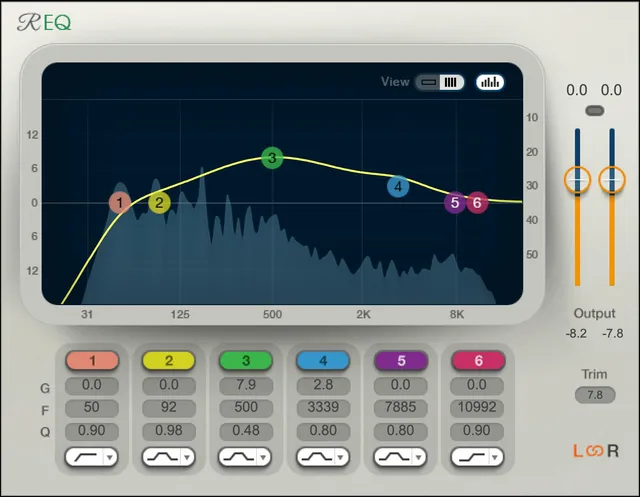
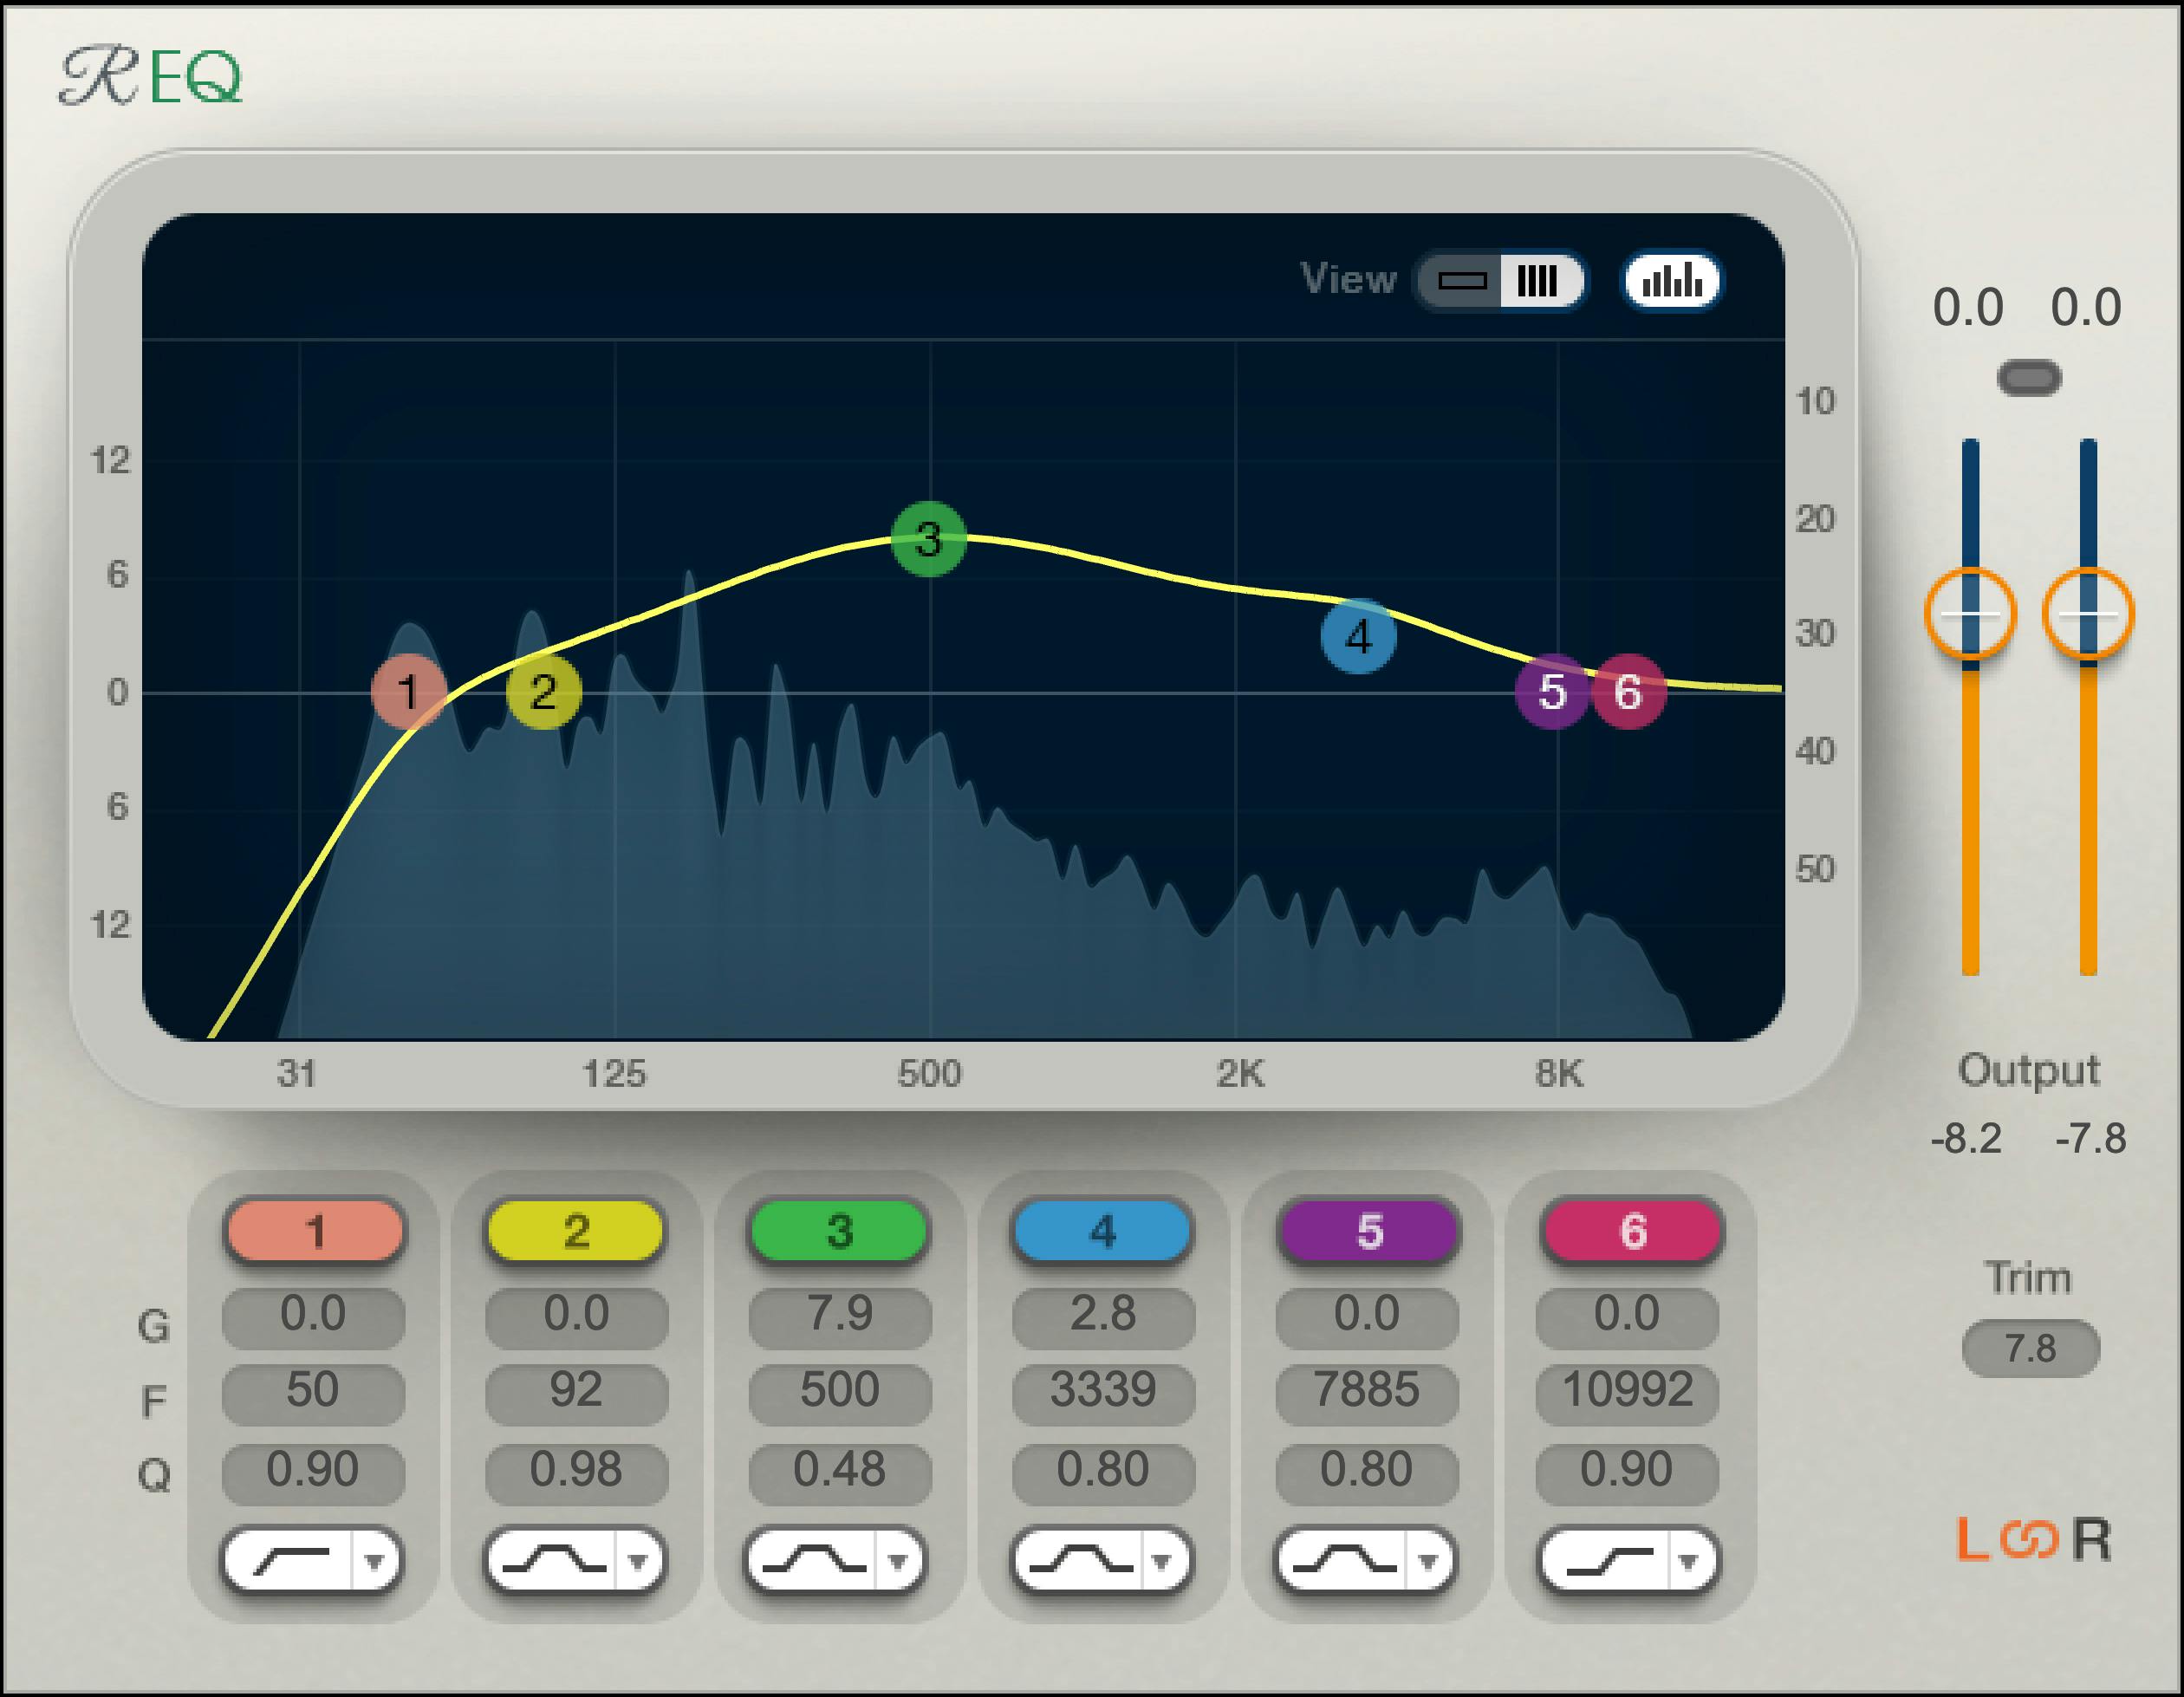
The View selector at the top of the graph changes the parametric presentation. The manual's diagrams show a selected-band panel with knobs, while the Graphic Library image shows columns of values for all six bands. They are presentations of the EQ controls, not additional processing modes.
The graph curve shows the EQ shape, and the colored markers provide direct band editing. Do not confuse that curve with the analyzer's changing signal display behind it.
Understanding the filter curves
High-pass and low-pass
A high-pass filter removes frequencies below its cutoff; REQ calls this the low-cut option on the low outside band. A low-pass filter removes frequencies above its cutoff; this is the high-cut option on the high outside band.
The manual describes the six-band component's outside filters as third order and states 18 dB/octave at Q = 1.0. Its Q section also describes an approximate 10–18 dB/octave slope change as Q changes, along with a change in the bump. No separate selector for fixed slope values is documented.
Start the cutoff below or above the useful part of the source, then move it toward the unwanted material while listening in context. Stop before the removal takes away something the part needs; that is an editorial approach, not a prescribed frequency setting.
Resonant shelves
A shelf raises or lowers the spectrum below or above a specified frequency, then levels toward the chosen gain. The manual places the shelf's frequency point midway through its slope: in its example, a +6 dB shelf at 1,000 Hz is about +3 dB at 1,000 Hz.
REQ's resonant shelves can create a bump or dip around the transition. Changing Q adjusts that transition and its resonance. Watch the curve rather than treating Q as a generic “more precise” control; the shelf can change shape as well as steepness.
The guide compares this cut-and-boost behavior with certain analog filters, notably Pultec. That is the vendor's explanation of the curve, not evidence that REQ recreates a particular hardware unit or sounds identical to it.
Bell filters
A bell boosts or cuts around its center frequency, with Q controlling the width. At the same Q, an REQ boost is wider than an REQ cut. The manual describes this as a design choice for broader tonal boosts and more focused removal.
If you find a problem with a temporary boost and then change it to a cut, the result will not simply be a vertically mirrored curve. Reduce monitoring level before an exaggerated search boost, then return to a restrained cut and compare the result in context.
Output faders, meters and Trim
Output faders and peak meters
The output section has mono or stereo metering according to the component. Output fader range is −∞ to +12 dB, with the fader value shown above each meter. The logarithmic output meters run from −60 to 0 dBFS, with peak-hold values beneath them.
Click a peak-hold value or its meter to reset the hold. The clipping light above the faders has its own click-to-reset action. Clearing an indicator does not remove the level condition that caused it; adjust the output if it is too high.
The manual describes 48-bit internal processing and sufficient headroom to avoid clipping within each band. That does not mean a hot plugin output is safe for the next processor, export or playback path. Check the complete signal chain, particularly after boosts.
Trim: a gain adjustment or a reset
Trim displays the available headroom or the amount of output overload. A positive value means the output could be increased by that amount before reaching the indicated limit; a negative value means it should be reduced by the displayed amount.
Clicking Trim once moves the output faders by its displayed value, then resets Trim to 12.0, the maximum positive gain allowed. If it shows a positive number, clicking it raises gain. Do not click it merely to clear the display when your aim is to keep a level-matched comparison.
To reset Trim and the meters without moving the faders, click in the meters or between them. The separate clipping light resets when clicked. These reset actions and the gain-changing Trim action serve different purposes.
Analyzer and cursor readout
The RTA button at the top right of the graph switches the real-time analyzer on or off. It shows signal activity after the EQ, so the display includes the effect of your EQ choices. The manual says it is calibrated to a pink curve and suggests switching it off when it is not needed to save host processing.
Use the analyzer to help locate an area to investigate, then decide by listening. A visible peak is not automatically a fault, and a post-EQ display is not an independent view of the untreated input.
Cursor Coordinates
Hover over the graph to show the frequency at the cursor position. It can help relate an analyzer feature to a frequency before you move a band. Moving the cursor alone is a readout action; dragging a band marker changes the EQ.
Stereo Link and left/right editing
The L, Link and R controls choose which channel you edit and whether the EQ changes track together. Link applies to Gain, Frequency, Q, Filter Type and In/Out. With Link on, editing a parameter affects both channels; L or R identifies the channel whose controls you are manipulating.
Turn Link off and select L or R to adjust only that channel. You can then relink the channels: the manual says their existing offsets are maintained as one channel tracks the other's movements.
There is an important exception for gain entry. Typing a new gain value applies that value to both linked channels and removes their gain offset. Dragging the band marker or gain value preserves the offset. If the channels intentionally differ, choose the editing method carefully.
The component list names mono and stereo versions. A later manual section also discusses “dual-mono” use when explaining separate channel control. That wording does not establish a third separately named component in the earlier list; check the choices provided by your host.
Link and automation
The manual says the Link button is not automated and its state is not saved as part of a session. It also warns that true dual-mono automation is not possible within an unlinked stereo REQ: most DAWs' automation systems can control only one channel, leaving the other channel's attempted changes unwritten.
For complex EQ requiring independently automated resets on each channel, including left/right mastering work, Waves recommends two separate mono REQ processors, automated independently. Do not assume that an unlinked stereo instance will recall and automate every independent left/right move as intended. Verify the actual host automation and saved session before relying on it.
Skins, presets and the WaveSystem toolbar
Skins
The toolbar's Skins menu offers Light, Dark and Legacy views. The manual says all three have the same controls and changing skins does not change parameter values. It also says the current instance's skin becomes the default view for new instances.
Presets and comparison
The manual describes factory and artist presets as starting points. Use one to explore a direction, then adjust it for the source; a named preset is not a guarantee of a suitable result.
The WaveSystem bar provides saving and loading presets, comparing settings, undo and redo, and resizing. Its comparison facility is useful for checking alternate complete settings; it is separate from a band's On/Off control and the stereo Link selector. The upper-right icon opens the WaveSystem Guide for the toolbar's detailed operation.
The supplied Graphic Library image is cropped to the plugin panel and does not show the full toolbar. Factory processing defaults are not specified in the reviewed manual, so the values in its illustrations should not be treated as an initialization preset.
A practical starting workflow
- Choose the component and channel plan. Use only the bands needed. For stereo material, decide whether the EQ should remain linked; for independently automated channels, follow the manual's separate-mono-instance recommendation.
- Identify one tonal task. Select a bell, shelf or outside-band pass filter suited to the change. Begin with a modest move rather than filling every available band.
- Set frequency, then refine shape. Use the Freq value or marker position; adjust Q while watching how that filter type changes. Keep the bell boost/cut asymmetry in mind.
- Compare the band in and out. Use its On/Off control, then assess the whole phrase in the mix. The post-EQ analyzer can help explain a change, but it does not establish that the change is better.
- Manage output deliberately. Check peaks and clipping after boosts, and use the output faders to keep a useful comparison level. Use Trim only when you intend its displayed gain adjustment; use the meter area for a reset.
- Check recall and automation. Save the setup and inspect the actual host behavior before committing an edit that depends on separate channel settings. Listen through the resulting passage and check the export.
Keep the changes that improve the passage in context; leave the other bands alone.
Related Waves guides
The Waves F6 guide is relevant when a frequency problem needs level-dependent processing. The Waves RComp guide covers a different task: controlling signal dynamics rather than choosing a static EQ curve.
For more workflow and product navigation, use the Waves Audio Post Resources hub. For the separate ownership and update-plan decision, see Waves Subscription vs Perpetual.
Sources and documentation limits
Primary sources checked October 18, 2026:
- Waves Renaissance Equalizer User Guide, all 14 PDF pages. Printed pp. 2–4: interface inventory, components, band types and skins; pp. 5–7: editing, Gain, Freq and Q; pp. 8–9: filter shapes; p. 10: output and Trim; p. 11: analyzer and cursor; pp. 12–13: Link, automation and toolbar.
- Official Renaissance Equalizer product page, product identity and link to the reviewed manual.
- Waves Graphic Library, authentic interface image and product-page-backlink reuse condition.
The manual's p. 8 Q-unit inconsistency and its later dual-mono wording are addressed above. Processing defaults, exact slope values at every Q setting, current installed-build behavior and host-specific automation results remain unverified. No measured response, sound-quality verdict, current price or compatibility promise is claimed.
FAQ
Does Renaissance Equalizer always have six bands?
No. The manual lists two-, four- and six-band versions in mono and stereo. The outside bands preserve the filter choices of bands 1 and 6 in the six-band version, including when moving presets between component sizes.
Is Renaissance Equalizer a dynamic EQ?
Its documented controls provide static equalization. The reviewed manual does not include per-band threshold, attack or release controls for level-dependent EQ. Consider a dynamic EQ when the correction needs to respond only as a frequency becomes too loud.
Why does a bell cut look narrower than a boost at the same Q?
REQ deliberately uses different bell shapes for boosting and cutting. The manual says a positive-gain bell is wider than a negative-gain bell at the same Q, so changing a boost into a cut does not simply mirror the curve.
Does the Q value directly specify the filter slope?
No. Q controls bandwidth for bells and affects slope and resonance for shelves and pass filters. Page 7 gives Q ranges separately from slope; page 8 inconsistently appends dB/octave to a Q range. The manual specifies 18 dB/octave for the outside pass filters at Q = 1.0, but not an exact slope for every Q setting.
What happens when I click Trim?
It moves the output faders by the displayed amount, which can raise or lower gain, then resets the Trim display to 12.0. To reset Trim and meters without changing fader values, click in the meters or between them.
Does the analyzer show the signal before or after EQ?
After EQ. The manual describes a post-EQ real-time analyzer calibrated to a pink curve. Its top-right button switches the display on or off; the display includes the effect of your EQ settings.
Will linked left and right channels keep their gain difference?
The manual says dragging a band marker or gain value preserves the existing gain offset. Typing a new gain value applies it to both linked channels and removes that offset. Link also applies to Frequency, Q, Filter Type and In/Out.
Can I automate two channels independently in one unlinked stereo instance?
The manual warns that true dual-mono automation is not possible within an unlinked stereo REQ and that Link is neither automated nor saved as part of a session. For fully independent channel automation, it recommends two separate mono REQ processors automated independently. Verify behavior in your actual host.

About the Author
Joseph Nilo has been working professionally in all aspects of audio and video production for over twenty years. His day-to-day work finds him working as a video editor, 2D and 3D motion graphics designer, voiceover artist and audio engineer, and colorist for corporate projects and feature films.