

Waves Abbey Road Reverb Plates models four plate-reverb systems with selectable plate character, decay damping, filtering and drive. The Damper controls the tail, while PreDelay separates the start of the effect from the direct sound. Drive and Analog are separate choices about coloration and modeled imperfections. [1][2]
A plate is not a sampled room. Its metal-sheet mechanism produces a different kind of reverberant effect, which can be useful precisely because it does not imitate an ordinary space.
My Short Version
Choose the plate and tail first. Filter what feeds it, then decide how much separation and wet signal the track needs.
Damper is a control position, not a number of seconds. Do not treat a setting copied from another plate as an identical decay.
Leave Drive, Analog and stereo Crosstalk as deliberate decisions rather than mandatory ingredients. This guide explains the documented interface; it is not a new plate shootout.
What the four models represent
The product models four Abbey Road plate units labeled A, B, C and D. Waves describes differences in their electronics and frequency behavior as well as the plate mechanisms. [1, pp.3–4][2]
That gives you four starting characters, not four quality levels. A brighter or longer-sounding choice can be useful on one arrangement and distracting on another.
For natural spoken-word production, decide whether a plate effect is appropriate at all. Matching a location or preserving a close, dry voice is a different goal from adding a lush vocal tail.
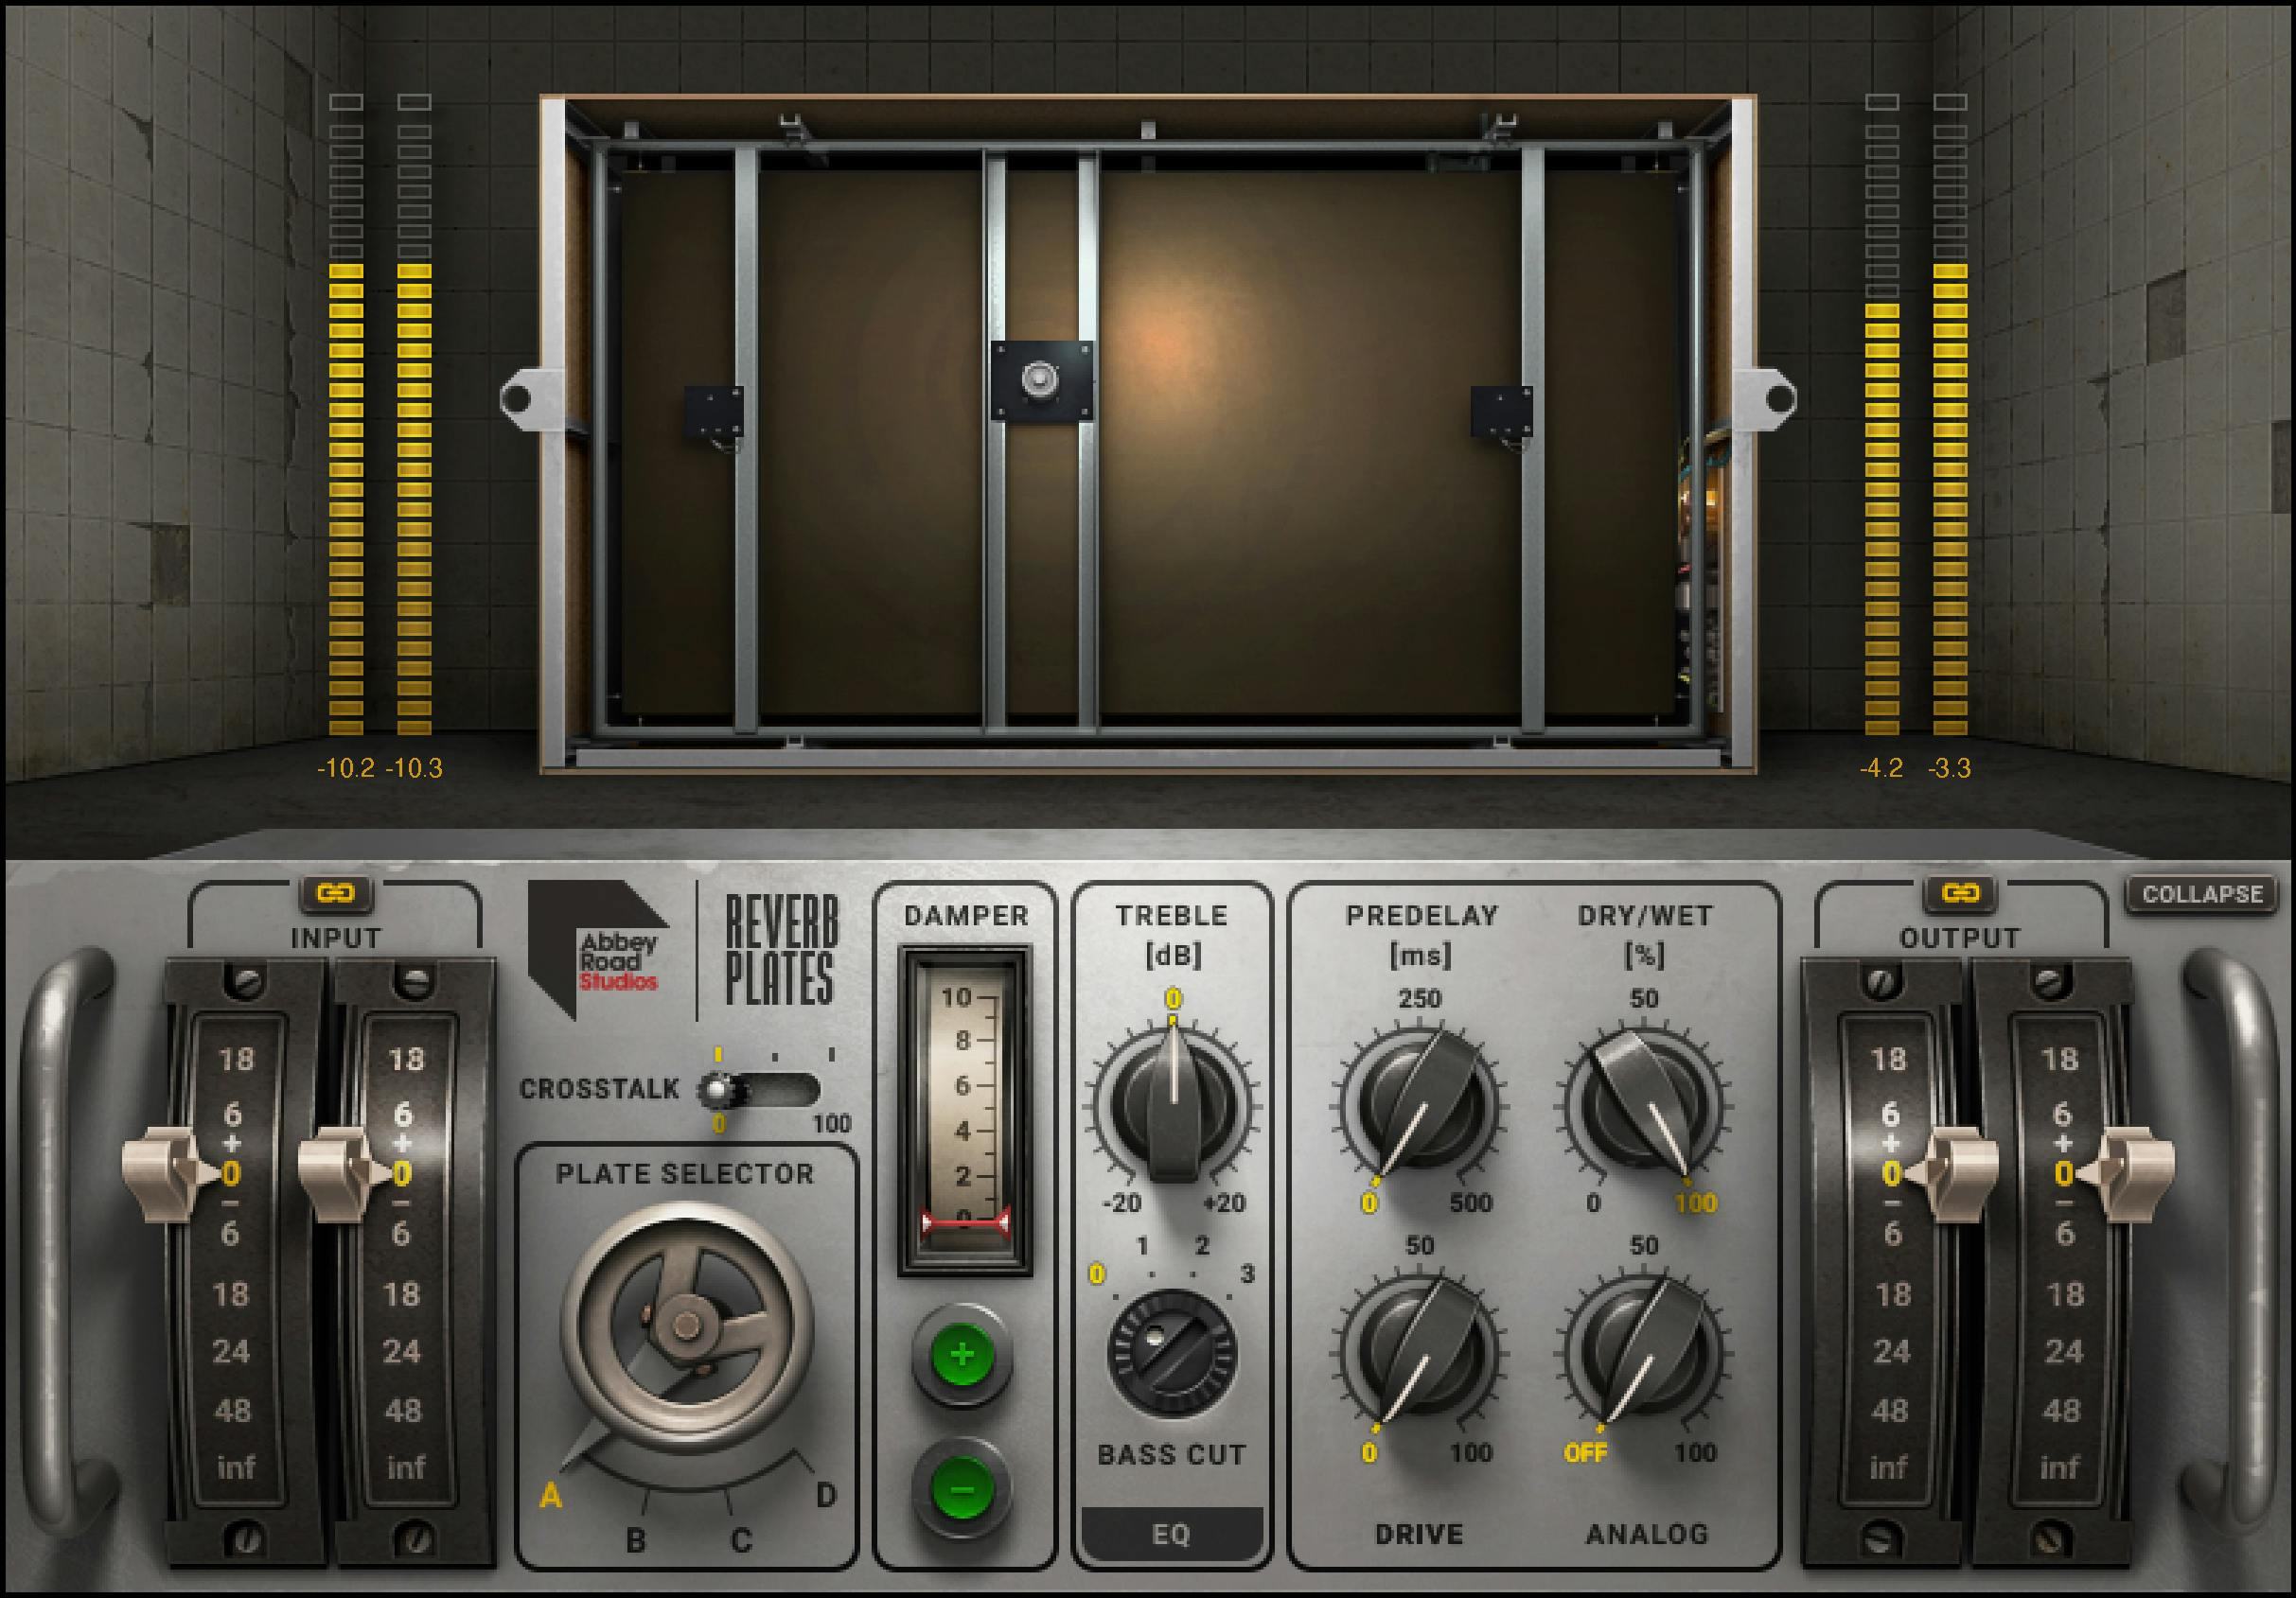
Every main control
Plate Selector
The selector chooses A, B, C or D. The documented default is A. [1, p.9]
Compare plates at similar overall levels and revisit Damper after changing the model. Otherwise, differences in tail length or level can dominate the decision before you evaluate the character.
The large plate picture identifies the selected model. It is not an editable physical layout with movable pickup points.
Damper and its plus/minus buttons
Damper selects one of 11 positions, 0–10, with a documented default of 2. Use the plus/minus buttons, which respond to extended clicks, or drag inside the damper meter. The guide does not establish a continuously variable decay setting between those positions. [1, p.10]
The manual describes different decay ranges for the modeled plates, rather than one exact seconds conversion for every slider value.
Choose the tail against the phrase and the space after it. A long tail that sounds appealing on one isolated word may cloud the next line in the mix.
Bass Cut
Bass Cut selects one of four high-pass modes in the plate input amplifier: 0, 1, 2 or 3, default 0 (no bass cut). The guide describes frequencies within 10–1000 Hz but does not assign a specific cutoff to each numbered position. Do not substitute a four-frequency map from another source or model. [1, p.10]
It changes what excites the plate, not just the returned sound afterward. That is useful when the source's low end makes the effect occupy too much of the arrangement.
Do not choose the highest cut automatically for every vocal. Check whether removing that part of the reverb also removes wanted body.
Treble
Treble is a 4000 Hz high-shelf filter, adjustable from -20 to +20 dB, with a documented default of 0 dB. It changes the reverb brightness; Bass Cut separately acts at the plate input. [1, pp.5,10–11]
Use the fixed shelf for brightness rather than searching for an adjustable frequency control. The documented 4000 Hz frequency does not imply a separate Frequency knob.
A darker return can leave more room for articulation. A brighter one may be the effect you want. Judge the entire mix rather than equating brightness with detail in every context.
Drive
Drive sets the level of modeled total harmonic distortion, from 0–100, default 0. [1, p.10]
This is a character control, not a reverb-time adjustment. Establish the basic space before deciding whether extra coloration helps.
The same number is not a measured percentage of harmonic distortion for every source. Do not translate the control scale into a laboratory result.
Analog
Analog adjusts modeled hum and noise, from Off to 100, with Off as the documented default. Waves says 100 supplies the modeled amount from the original plates; it is not a measured noise percentage for every signal. [1, p.11]
It is separate from Drive, which models distortion behavior. Turning off added hum/noise is not described as bypassing the complete plate model.
Listen to pauses and fade-outs when making this choice. Imperfections that are masked during a full arrangement can become conspicuous once the source stops.
PreDelay
PreDelay delays the reverb path by 0–500 ms, default 0. [1, p.11]
Use it to separate the dry onset from the plate response. At longer values, that separation can become an obvious rhythmic or echo-like event.
It does not change the length of the direct source. Recheck the timing in context rather than choosing a value solely because it appears in a preset name.
Wet/Dry
Wet/Dry blends direct and reverberant signal over 0–100%, default 100. [1, p.11] The product artwork labels the balance knob Dry/Wet.
A fully wet return is the usual configuration when the dry source already exists on a separate track. On an insert, use the control to establish the intended blend within the plugin.
Judge whether the voice remains intelligible in the mix, not just whether the tail sounds attractive in solo.
Crosstalk
Crosstalk controls summing between the left and right inputs and is documented only in the Stereo-to-Stereo component. Its range is 0–100%, with a default of 0%. Do not describe it as feedback between the two reverberant outputs or extend it to Mono-to-Stereo. [1, p.11]
This is not a stereo pan control for the original vocal. Compare it as part of the return's width and relationship, checking a mono fold-down when that matters for the delivery.
Its component restriction matters when following a tutorial: a Stereo-to-Stereo control is not automatically available in the other components.
Input, output and stereo links
Input
Input adjusts the level before the plate model, from negative infinity to +18 dB, default 0. [1, p.9]
Leave headroom and understand its relationship to the modeled processing before raising it. Turning down Output afterward does not undo every change made inside the effect.
Input Link
In the Stereo component, Input Link couples left and right input-fader movements while retaining an existing offset. It defaults on. [1, p.9]
A linked move does not correct a channel imbalance that was already present. Check the actual left/right values before assuming they match.
Output
Output changes the final level, over negative infinity to +18 dB, default 0. [1, p.12]
Use it for the return level and a fair comparison, not as another way to lengthen the decay.
Output Link
Output Link is documented for the Stereo component only. It moves the left and right output faders together while preserving any offset, and defaults On. The guide does not extend this control to Mono-to-Stereo. [1, p.12]
The mono component has no pair of output faders to link.
Metering and window controls
The interface includes input and output metering, but this guide does not specify a click-to-clear gesture for numerical peak values. No such reset action is claimed here. [1, p.8]
These are not integrated-loudness or true-peak compliance readings. Use the loudness guide for the separate finished-programme check.
The guide documents the shared WaveSystem toolbar for presets, comparison, undo/redo, resizing and help. It does not specify an additional Collapse gesture. [1, p.12]
The manual's diagram labels the meter and link locations clearly. Use the genuine interface image rather than a generated imitation when following the control tour.
Presets and components
The available components are Mono, Mono-to-Stereo and Stereo. The guide describes one plate engine for Mono, one input feeding two engines for Mono-to-Stereo, and two inputs feeding two engines with summed inputs for Stereo. Input/Output Link and Crosstalk retain the explicit Stereo-only restrictions above. [1, pp.6,9,11–12]
WaveSystem provides About, Undo/Redo, preset load/save, Previous/Next, Setup A/B, Copy A/B, sizing and help. The current preset browser adds search, Factory/User/Favorite views, favorites, Copy/Paste, Reset to Default and Detach. [3][4]
A/B compares two setups within the processor. Check Analog and Drive as well as the obvious plate choice before attributing every difference to A versus D.
A practical starting sequence
Set the intended send/insert relationship first. Choose a plate and a tail that fits the phrase without adding feedback-like clutter.
Use Bass Cut and Treble for their different locations in the signal path. Add PreDelay only when separation or rhythm benefits from it.
Then evaluate Drive, Analog and Crosstalk. Make one change at a time, listen to the next phrase and the end of the tail, and keep the simpler version available.
These are proposed evaluation steps, not a tested setting for Joseph's voice or a claim that one plate wins.
Related plugins
Abbey Road Chambers combines room responses with the STEED tape-feedback system. It is a different spatial approach from a plate.
H-Reverb provides a more extensively editable envelope, filtering and dynamics architecture.
Renaissance Reverb is another reference for choosing among reverb types and basic shaping controls.
The Waves resource hub connects these choices to the existing vocal and licensing articles.
Bottom line
Choose the plate, the tail and the balance before adding character. That keeps the difference between reverb design and modeled imperfections clear.
The right amount is the amount that supports the source and the space around it—not the longest tail available.
Sources
Original source history: September 19, 2026. Targeted manual correction checked November 8, 2026 UTC; this is not a new listening, compatibility or installed-version test.
- Abbey Road Reverb Plates User Guide, component overview p.6 and control diagram/reference pp.8–12.
- Waves Abbey Road Reverb Plates.
- WaveSystem User Guide.
- Waves preset instructions.
- Waves Graphic Library.
Frequently Asked Questions
Does Damper 3 mean a three-second reverb?
No. Damper selects a position, not a time in seconds. Each plate has its own decay behavior, so the same position can give different tails on different plates. The guide lists 11 positions from 0 to 10 and a default of 2.
Which Bass Cut position gives a particular frequency?
The guide lists positions 0, 1, 2 and 3, with 0 as the no-cut default. It describes high-pass behavior within 10–1000 Hz but does not publish a frequency for each position. This article therefore does not assign exact cutoffs to those numbers.
What is the difference between Drive and Analog?
Drive adds modeled distortion behavior. Analog adjusts modeled hum and noise and defaults to Off. They are separate controls, so increasing one is not a substitute for choosing the other.
Is Crosstalk available in Mono-to-Stereo?
The guide documents Crosstalk only for the Stereo-to-Stereo component. It controls summing between the left and right inputs, with a 0–100% range and a 0% default. This does not establish the same control in Mono-to-Stereo.
Can I change the Treble filter frequency?
The documented Treble filter is a fixed 4000 Hz high shelf. Its gain runs from -20 to +20 dB, default 0 dB. The guide does not describe a separate frequency adjustment.
Will linking the input or output faders remove an existing offset?
No. The guide says the linked Stereo-component faders retain an existing left/right offset as they move. Linking their movement does not make unequal starting values identical.

About the Author
Joseph Nilo has been working professionally in all aspects of audio and video production for over twenty years. His day-to-day work finds him working as a video editor, 2D and 3D motion graphics designer, voiceover artist and audio engineer, and colorist for corporate projects and feature films.