
Waves CLA MixDown is a simplified mix-bus processor built around four main processing modules: Bass EQ, Treble EQ, Glue compression and Drive saturation. It adds dedicated input/output staging, sensitivity and peak meters, and three VU-meter modes. Waves V17 adds a Link In/Out button that moves the input and output faders in opposite directions. [1][2][4]
The current product page resolves one especially useful detail: Glue has two compressor flavors—1 is modern and punchy; 2 is vintage/controlled with a longer time constant. [2]
My Short Version
If you want to mix through CLA MixDown, put it on the mix bus early so you can make mix decisions through its processing. That is consistent with Chris Lord-Alge's own product-page guidance. If you place it on another bus, the manual says the insert should be pre-fader. [1][2]
As a Waves quick-start target, set Input so the Sensitivity LED is yellow; at the program's loudest points, the guide suggests a VU reading near 0 dB, with exceptionally loud peaks reaching +2 or +3 dB. Use the peak meter to watch for digital clips. Use Bass and Treble for broad tonal moves, choose Glue type 1 or 2, raise Glue only as far as the mix benefits, and use Drive when you intentionally want more modeled mix-bus harmonic coloration. [1][2]
In V17, Link In/Out lets you change how hard the chain is driven while moving the output fader in the opposite direction. Use the meters and your ears to check the resulting level. [1][4]
I did not audition MixDown in this writing pass. These workflow suggestions are based on Waves' documented controls and routing, not on a claimed listening test.

Components
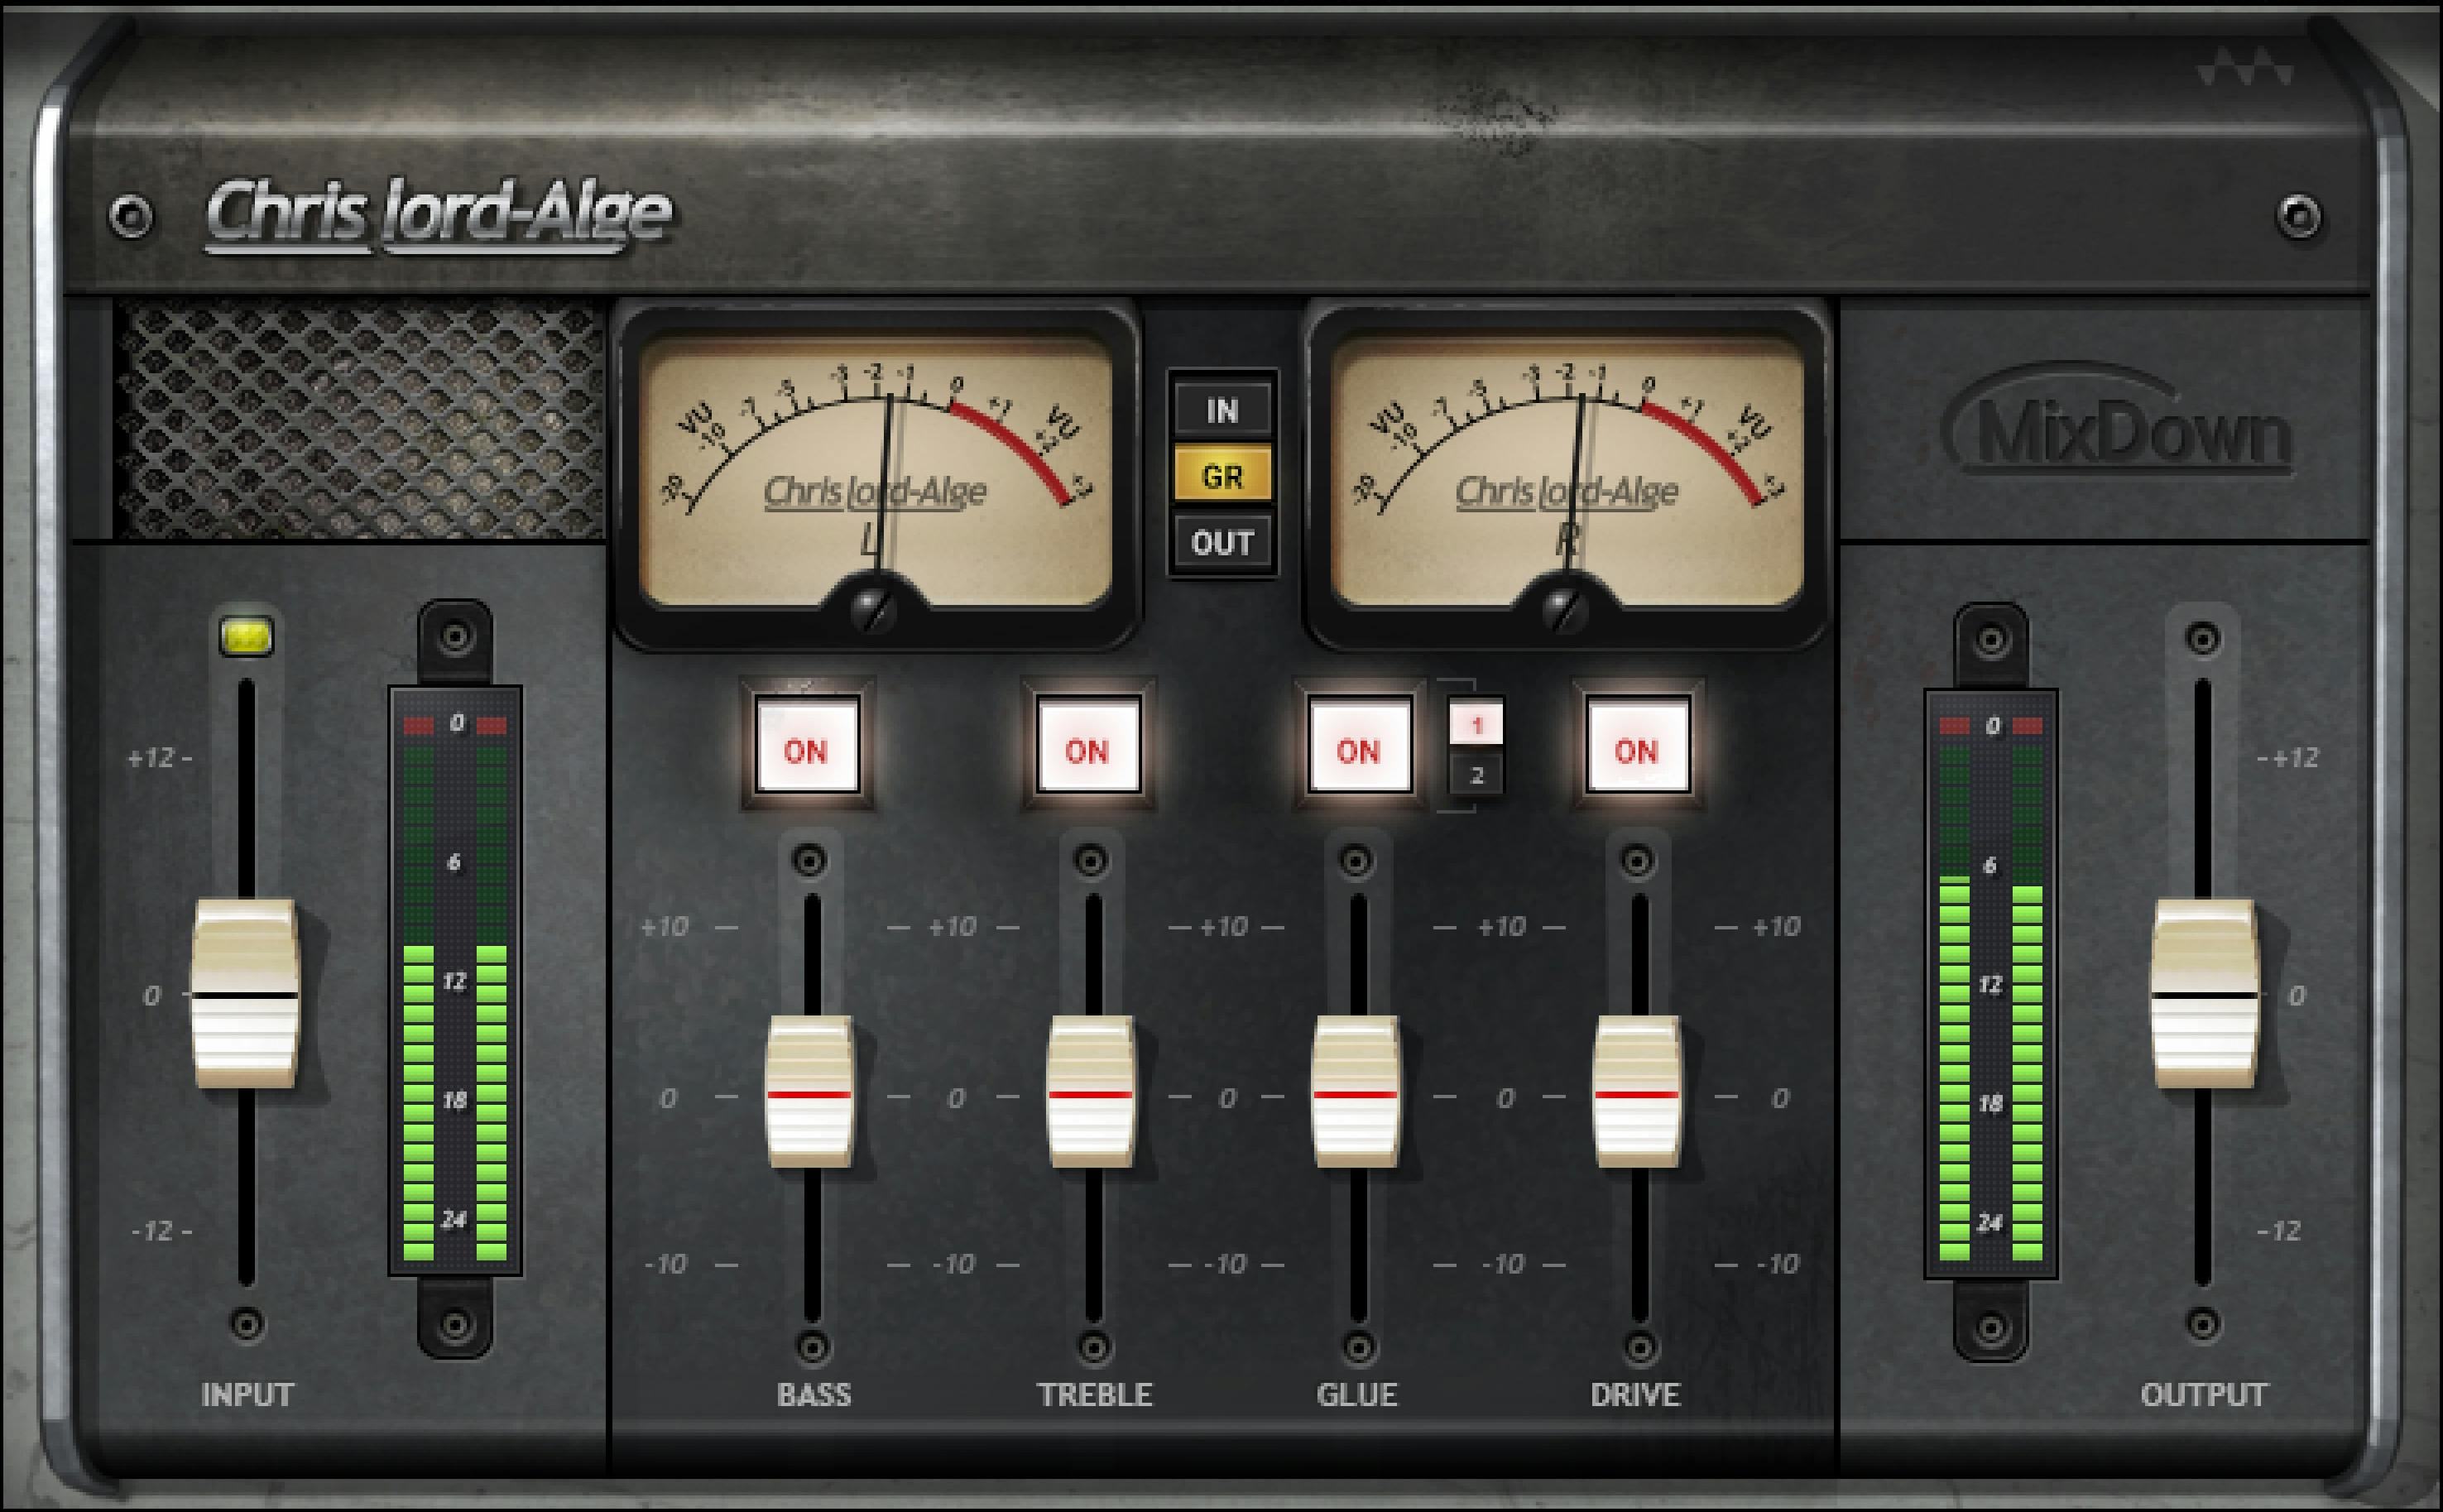
CLA MixDown has two components: [1]
- Mono — insertable on mono channels only.
- Stereo — insertable on stereo channels only. [1]
Waves says the two components are identical except for their number of channels. The stereo VU meters are labeled L/R; the mono component displays two meters labeled M. [1]
Where CLA MixDown goes in the chain
The manual's quick start describes using CLA MixDown between the bus master and mix master, with a pre-fader insert. It also says other buses should use pre-fader insertion and specifically warns that a Pro Tools master-fader insert is post-fader, which can make compression inconsistent as levels change. [1]
The current product page quotes Chris Lord-Alge recommending that, when you want to mix through the processing, you insert it before you start mixing; it can also be added later for a final processing pass. [2]
Choose the insert point for the workflow you want. Input level affects how much compression and drive the processor applies. [1]
Input fader
The Input fader sets the level entering the processor chain. [1]
- Published range: -12 to +12 [1]
The current manual prints those limits without explicitly appending a unit to the Input range line, so this article preserves the guide's wording rather than adding a unit by inference.
Waves' quick start says that increasing Input produces more compression and drive. [1]
Sensitivity LED
The Sensitivity LED indicates whether the incoming level is in the intended working zone: [1]
- Green — input too low
- Yellow — optimal input level
- Red — input too high [1]
This is separate from the peak over-level indicator. A signal can trigger the input over-level warning even when the Sensitivity LED itself is not red. [1]
Input meter
The Input meter is a peak meter. [1]
- Range: -24 dBFS to 0 dBFS [1]
It is distinct from the central VU meters and from the Sensitivity LED.
Input over-level indicator and reset
The red Input over-level indicator lights when input exceeds 0 dBFS. [1]
Click the indicator to clear the over. [1]
That click-to-clear behavior is a documented reset function and should remain accessible in the article's HTML explanation rather than being left to an interface screenshot.
Link Input / Output in V17
Waves added Link In/Out in V17. Look for the chain icon beside Input. With the link enabled, raising either fader moves the other down. This can help when changing the level into the processors, although the output still depends on how the processors respond. The older stereo illustration above omits this button. [1][2][4]
This is useful when you want to change drive into the processing while reducing the resulting output change. It is not a promise of exact loudness matching; the nonlinear processing itself can change level and dynamics.
Processor On/Off switches
Each of the four central processors—Bass, Treble, Glue and Drive—has its own On/Off switch. [1]
These allow individual processing stages to be removed without moving their amount faders.
Bass
Bass controls the level of a low-shelf filter and is described by Waves as adding warmth. [1]
- Range: -10 to +10
- Switch: Off / On [1]
The current manual does not publish the exact shelf frequency, slope or a factory/default Bass value. Those are not inferred from the interface or marketing copy.
Treble
Treble controls a high-frequency bell EQ intended for broad sparkle/clarity adjustment. [1]
- Range: -10 to +10
- Switch: Off / On [1]
The guide does not publish the bell's center frequency, bandwidth/Q or a factory/default Treble value.
Glue amount
Glue controls the amount of bus compression. [1]
- Range: -10 to +10
- Switch: Off / On [1]
The guide says higher values tend to make the mix tighter but less transparent, while lower values can leave more space. [1]
Because the scale is an application-specific macro rather than a published threshold/ratio control, do not translate the -10…+10 positions into compressor ratios or dB thresholds.
Glue compressor types 1 and 2
The small 1 / 2 selector above the Glue control chooses between two compressor models. [1][2]
The current product page explicitly maps them: [2]
- 1 — modern and punchy
- 2 — vintage/controlled with a longer time constant, intended for a more holding-together behavior [2]
The user guide describes the same two types but does not publish attack, release, ratio, threshold, detector topology or gain-reduction law for either one. [1]
This article therefore keeps the vendor's qualitative distinction without inventing conventional compressor settings behind the macro.
Drive
Drive sets the amount of harmonic distortion added to the signal. [1]
- Range: -10 to +10
- Switch: Off / On [1]
The manual says the behavior is similar to sending a very high-level signal into an SSL mix bus, and the product page describes it as an emulated SSL-console mix-bus overdrive. [1][2]
Waves' current page recommends lower Drive positions for less color and higher values when you want more distortion/grit. This article does not claim a measured harmonic curve or correspondence to a particular hardware console. [2]
Main VU meters
CLA MixDown has two central VU meters. [1]
- Stereo component labels: L / R
- Mono component labels: M / M [1]
The meter mode selector has three states: [1]
- IN — plugin input level
- OUT — plugin output level
- GR — gain reduction [1]
For IN and OUT, the published VU range is -20 dB to +3 dB. The guide does not publish a separate numerical GR scale specification beyond the displayed meter markings. [1]
VU calibration screw
The small calibration screw aligns the VU meter to the digital reference level. [1]
The guide explains the calibration screw’s purpose but leaves its factory calibration value and adjustment range unspecified.
Output fader
The Output fader adjusts final plugin output. [1]
- Range: -12 dB to +12 dB [1]
The current guide does not publish a factory/default Output fader value.
Output meter
The Output meter is a peak meter. [1]
- Range: -24 dBFS to 0 dBFS [1]
This is separate from the central VU meters.
Output over-level indicator and reset
The Output over-level indicator lights red when the signal exceeds 0 dBFS. [1]
Click the indicator to clear the over. [1]
WaveSystem toolbar
The shared WaveSystem toolbar supports preset save/load, setting comparison, undo/redo and interface resizing. [1]
Those are workflow controls, not additional MixDown processing stages.
A practical workflow
Put CLA MixDown where you actually intend to make bus decisions: the main/mix bus, a master aux, or another appropriate pre-fader bus as described by Waves. [1][2]
Set Input so the Sensitivity LED reaches yellow on representative loud sections while the peak meter remains under control. Then decide whether the mix needs tonal shaping first: use Bass and Treble conservatively because Waves does not expose their underlying frequencies/slopes. [1]
For compression, compare type 1 and 2 at the same Glue position rather than assuming one is universally stronger. Use the VU meter's GR mode to see compression activity. [1][2]
Finally, add Drive only when you want more modeled bus coloration, and use Output—or the Input/Output link—to manage resulting level changes. These are editorial workflow suggestions based on the documented controls, not a listening result.
Best for / skip if
CLA MixDown is best when you want a small set of broad mix-bus decisions—bass, treble, compression flavor/amount and console-style drive—without opening a full mastering chain. [1][2]
Skip it when you need exact compressor attack/release/ratio/threshold values, exact EQ frequencies/Q, or transparent mastering metering. Those deeper parameters are intentionally not exposed or specified by the current CLA MixDown documentation.
Limitations and evidence boundary
This is documentation-led. I did not mix through CLA MixDown, compare it with an SSL bus compressor, measure harmonic distortion, verify VU calibration against test tones, benchmark CPU/latency, or test host compatibility.
The guide leaves the EQ frequencies and slopes, Glue timing and ratio, and factory fader positions unspecified. The illustration shows one older stereo panel and does not establish factory settings. The current Waves product page and Waves user guide show the Link In/Out button.
Related guides
For official product information and the current downloadable guide, visit the Waves CLA MixDown product page and CLA MixDown User Guide.
For a closer look at a dedicated mix-bus compressor, read the Waves SSL G-Master Buss Compressor guide. Its Threshold, Ratio, Attack and Release explanations can help you decide how much direct control your mix-bus workflow needs.
Bottom line
CLA MixDown is a compact mix-bus macro processor: drive the chain with Input, shape broad low/high tone with Bass and Treble, choose one of two Glue compression flavors, add Drive coloration, then monitor IN/OUT/GR and set final Output. [1][2]
It is intentionally fast rather than surgical. The current documentation tells you what each macro does but does not expose the detailed EQ and compressor parameters behind it.
Sources
- Waves CLA MixDown User Guide. See printed pages 6–7 for the component layouts and page 9 for Link Input/Output.
- Waves CLA MixDown product page. Product overview, Glue types and current interface.
- Waves Graphic Library. The listed older stereo image is linked to the relevant Waves product page.
- Waves release notes. The June 23, 2026 V17 entry records the addition of Link In/Out.
FAQ
What does CLA MixDown do?
It combines four broad mix-bus modules—Bass EQ, Treble EQ, Glue compression and Drive—plus input/output staging and metering. Waves describes it as a streamlined mix-bus processor, not a replacement for mastering.
What is the difference between Glue types 1 and 2?
Waves describes type 1 as modern and punchy. Type 2 is vintage and controlled with a longer time constant, intended to help hold the mix together. The exact attack, release, ratio and threshold are not published.
Where does Waves recommend inserting CLA MixDown?
The guide's quick start places it between the bus master and mix master, with a pre-fader insert; it says other buses should also use pre-fader insertion and warns that a Pro Tools master-fader insert is post-fader. Chris Lord-Alge's current product-page guidance recommends mixing through it from the start, while noting it can also be added later.
What is the Input fader range?
The guide prints a range of -12 to +12 but does not append a unit to that Input range line. It also says that increasing Input produces more compression and Drive.
How should I set the input level?
Waves' quick start says to aim for a yellow Sensitivity LED and a VU reading near 0 dB at the program's loudest points; exceptionally loud peaks may reach +2 or +3 dB. Use the peak meter to avoid digital clips. These are vendor setup recommendations, not independent calibration results.
What does the Input/Output Link button do?
Waves added Link In/Out in V17. With it enabled, raising either fader moves the other down. Check the resulting output level as you adjust how hard you drive the processors.
What do Bass and Treble control?
Bass controls a low-shelf filter and Treble controls a high-frequency bell EQ. Each range is -10 to +10 with an Off/On switch. The guide does not specify the filter frequencies, slope, Q or factory defaults.
What do the meters show, and how do I clear an over-level light?
The VU selector offers IN (input), OUT (plugin output) and GR (gain reduction); the published -20 dB to +3 dB range applies to IN/OUT, not a separately specified GR scale. Input and output peak meters each span -24 dBFS to 0 dBFS. Click either over-level indicator to clear overs.

About the Author
Joseph Nilo has been working professionally in all aspects of audio and video production for over twenty years. His day-to-day work finds him working as a video editor, 2D and 3D motion graphics designer, voiceover artist and audio engineer, and colorist for corporate projects and feature films.