Waves Curves Resolve is a sidechain-driven frequency-unmasking processor: put it on the track that should make room, feed the competing priority source into its sidechain, and Resolve reduces the frequencies where the two signals conflict. You can let that process react continuously, learn/freeze a steadier sidechain profile, or switch to a Ducker mode that moves between frequency-aware Unmask behavior and full-spectrum Wide ducking. [1][2]
The interface is deeper than the large Main knob suggests. Resolve has sidechain weighting and filters, Learn/Freeze/Scan workflows, a four-band reduction graph, per-band strength, movable crossovers, a Dynamic/Steady blend, content-aware starting-point presets, input/output trims, Delta monitoring, dynamics timing/precision controls, stereo processing modes, auto makeup gain and an output true-peak limiter. A separate Curves Resolve Live component trades the Studio version’s look-ahead latency for zero-latency operation and changes part of the stereo-control set. [1][2]
My Short Version
Insert Resolve on the track that should yield space, route the source that should stay clear into Resolve’s sidechain, and start by raising the Main knob from 0%. Then choose the most appropriate Sidechain Content starting point and shape what Resolve listens to with the Tilt and HPF/LPF controls. [1]
If the real-time response moves too much, use Learn to average the sidechain or Freeze to capture a moment, then blend from Dynamic toward Steady. Use the four band controls to limit how much reduction occurs in each frequency region. [1]
For voice-over-over-music or other full-range ducking jobs, enable Ducker and use the slider between Unmask and Wide. Unmask stays frequency-aware; Wide treats the sidechain as equal across the spectrum and ducks the input broadly. [1][2]
Everything below is based on Waves documentation and interface inspection, not a listening or CPU test performed for this article.
Signal setup: processed track and sidechain
Resolve belongs on the track you want to reduce. The source that should win the conflict is routed to the plugin’s sidechain input. Waves’ manual example inserts Resolve on music and sends the lead vocal to its sidechain, but the same architecture can be used for kick/bass, dialogue/music, guitars/vocals and other competing elements. [1]
Waves says more than one source, including groups or auxes, can be routed into the sidechain. Resolve requires an active sidechain for its normal conflict-driven workflow and displays a temporary routing reminder when instantiated without one. [1]
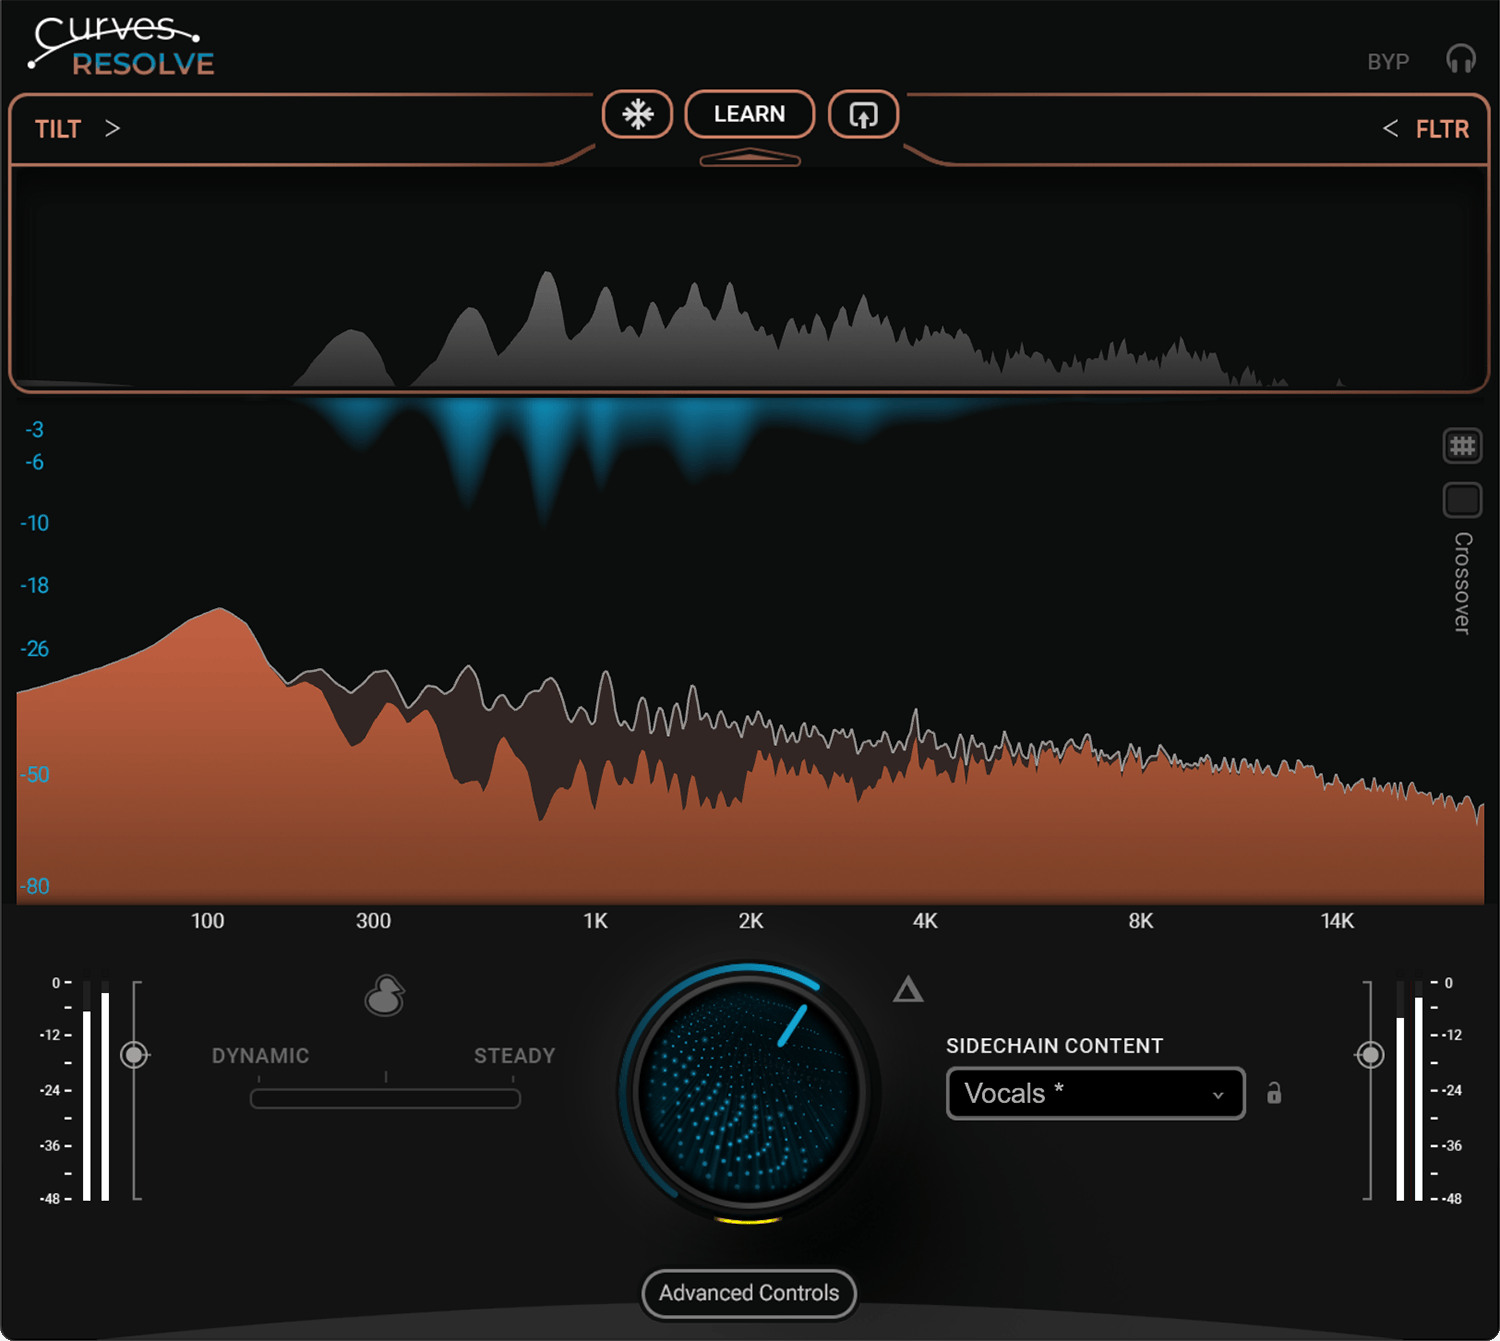
Main knob
The large Main knob controls the global intensity of Resolve’s attenuation. [1]
- Range: 0–100%
- 0% = no Resolve processing
- 100% = maximum global reduction applied to detected masked frequencies [1]
This is a global amount control. It works alongside the individual 0–200% band controls rather than replacing them.
The manual says Main behaves differently in Ducker mode, where the algorithm can move toward broad full-spectrum reduction rather than only frequency-specific unmasking. It does not publish a dB-of-reduction mapping for Main, so 50% should not be read as a fixed 50% attenuation or a specific dB value.
Sidechain display
The upper SC Display shows the sidechain signal Resolve is actually listening to after the sidechain Tilt and HPF/LPF filtering. [1]
This distinction matters: the display represents the detection/analysis feed, not an EQ being printed onto the sidechain source itself.
Sidechain Tilt types
The Tilt section changes how Resolve weights the sidechain spectrum without changing that source in your mix. The toggle cycles through three documented curves: [1]
- Natural — a seesaw-style tilt between lows and highs.
- Hi-Tilt — emphasizes treble in the analysis weighting.
- Lo-Tilt — emphasizes bass in the analysis weighting.
The arrow beside Tilt expands or collapses the detailed Tilt controls. [1]
Tilt Gain
Tilt Gain sets the amount of tilt around the selected anchor frequency. [1]
The current guide explains its behavior but does not publish a numerical range or factory default. This article therefore does not reverse-engineer the displayed value scale into an unsupported formal specification.
Tilt Anchor Frequency
Tilt Anchor Frequency sets the pivot point. Frequencies below and above the anchor tilt in opposite directions. [1]
- Range: 300–3000 Hz [1]
The current guide does not publish a fixed factory default, so none is claimed.
Sidechain HPF and LPF
The sidechain HPF and LPF restrict the frequency range Resolve uses for analysis. They alter what the detector listens to; they do not directly high-pass or low-pass the processed track. [1]
For both filters, the manual documents:
- Frequency range: 20 Hz–20 kHz
- Slope choices: 24, 48 or 72 dB/octave [1]
The arrow beside Filter expands or collapses these controls. The manual does not publish factory cutoff defaults.
Freeze
Freeze captures a short snapshot of the incoming sidechain at the moment you click it. The button blinks while the snapshot action is active. [1]
Click Freeze again to return to the previous learned profile if one exists. If there was no earlier Learn state, unfreezing disables the Dynamic/Steady slider because that slider needs a stored steady profile to blend toward. [1]
Waves positions Freeze for moments where a short, sharply defined sidechain spectrum is more useful than a longer average. The manual warns that a frozen profile can produce harsher reduction toward the Steady end of the blend. That is vendor guidance, not a result measured here. [1]
Learn, Abort and Stop
Learn averages the sidechain over time to create a steady profile. [1]
When learning starts, Abort flashes during the first seconds while Resolve gathers enough audio. Once it has enough material to form a valid steady curve, the control changes to Stop, which ends the learning process. [1]
The manual does not publish a fixed Learn duration because the workflow is user-stopped after the initial valid-data period.
Scan File
Scan File creates the same kind of steady sidechain profile without playing the sidechain through the plugin in real time. Browse to a file or drag a supported file onto the sidechain panel. [1]
Documented formats: WAV, AIF, AIFF, OGG, FLAC and MP3. [1]
Scan File is analysis input; it does not replace the audio on the processed track.
Sidechain Audition
SC Audition solos the audio coming from the sidechain. [1]
Use it to hear what the detector is listening to while adjusting Tilt and filters. This is different from Delta, which auditions what Resolve removes from the processed signal.
Bypass
Bypass disables Resolve’s processing while retaining state and latency. [1]
That last point matters for comparisons: Waves explicitly documents state/latency retention rather than a zero-latency bypass path. No host timing test was performed here.
Main graph: frequency and reduction scales
The main graph visualizes input, output and reduction across the spectrum. [1]
- Horizontal axis: 20 Hz–20 kHz
- Vertical reduction axis: -80 to 0 dB [1]
The real-time reduction trace shows where Resolve is attenuating. Downward peaks indicate greater reduction at those frequencies. The graph is a visualization of the processing, not a control for drawing an arbitrary EQ curve.
Input and post-process spectrum displays
Resolve overlays the Input Signal and Post-Process Signal (Output) spectra in the main graph. [1]
These displays help you see where the processed result differs from the input. They are informational readouts; they do not constitute a measurement made by this article.
Four bands and three crossovers
The graph is divided into four processing bands by three movable crossover points. [1]
Each band has its own reduction-strength control and can be soloed, bypassed or delta-monitored from its associated controls. [1]
Moving a crossover changes which frequency region belongs to each band. The manual does not give separate numerical min/max/default crossover values beyond the graph’s 20 Hz–20 kHz frequency span, so none are invented here.
Band Reduction controls
Each band’s reduction control scales how strongly that band participates in Resolve processing. [1]
- Range: 0–200%
- 0% = no Resolve processing in that band
- 100% = normal processing amount
- 200% = maximum/double processing amount for that band [1]
A 200% band value is not documented as a fixed number of dB. It scales Resolve’s algorithmic processing amount.
Hide/Show Crossovers and Gridlines
Hide/Show Crossovers toggles the crossover guides in the graph. Hide/Show Gridlines toggles the graph grid. [1]
These change the interface view, not the underlying sound or stored crossover frequencies.
Dynamic / Steady slider
After Learn or Freeze creates a steady sidechain profile, the Dynamic / Steady slider blends between real-time sidechain-driven analysis and that fixed profile. [1]
- Range: 0–100%
- 0% = fully Dynamic
- 100% = fully Steady [1]
The manual says the default value is set automatically after the first Learn and is then adjustable and automatable. That means there is no single static numerical factory default to publish here. [1]
Waves recommends the Dynamic end for many situations and describes some Steady blend as a way to make the processing softer/more predictable. That is vendor workflow guidance, not a listening conclusion from this article.
Ducker mode: Unmask and Wide
Ducker changes Resolve from its normal unmasking workflow toward a conventional full-range ducking option. In Ducker mode, the Dynamic/Steady slider becomes Unmask / Wide. [1]
- Unmask — frequency-aware reduction focused on masking regions.
- Wide — broad reduction across the processed signal’s spectrum. [1, p.12][2]
Slider-label caveat: The manual’s percentage description on page 11 and label order in the page 12 artwork are not aligned. This guide therefore does not confirm the Ducker slider’s left/right direction or percentage-to-mode mapping. No installed control was tested. [1, pp.11–12]
The slider can sit between those endpoints, blending the character of the two behaviors. Waves specifically positions this mode for narration/voiceover/vocal-over-music jobs where broad level movement may be more useful than only spectral carving. [1][2]
Sidechain Content menu
The Sidechain Content drop-down changes multiple Resolve parameters to provide a content-specific starting point for the signal feeding the sidechain. [1]
The current guide gives examples including Vocals, Drums, Bass and Kick and the product page also describes instant content snapshots for sources such as vocals, bass, guitars and synths. The current manual does not publish an exhaustive fixed list of every menu item. This article therefore does not claim those examples are the complete menu inventory. [1][2]
Selecting an item may change: [1]
- all crossover positions;
- all four band process amounts;
- Tilt type, Tilt Gain and Tilt Anchor;
- HPF and LPF frequencies;
- Attack, Release and Precision;
- Ducker On/Off and the Wide/Unmask slider. [1]
That makes Sidechain Content a macro starting-point selector rather than merely a label.
Sidechain Content Lock
Sidechain Content Lock prevents the relevant content-derived controls from changing when you switch general plugin presets. [1]
Use it when you want to audition presets without losing the content analysis/setup you have chosen for the current sidechain.
Delta
Delta auditions only the audio Resolve is attenuating from the processed signal. The button flashes blue while active. [1]
This is useful for checking whether the algorithm is taking important foreground material rather than primarily the competing/masked content. That is an editorial use recommendation based on the documented audition path.
Delta is distinct from SC Audition: Delta plays removed program material; SC Audition plays the sidechain input.
Input Trim
Input Trim adjusts the processed signal level before Resolve processing. [1]
- Range: -∞ to +24 dB [1]
The guide does not publish a factory default. Do not confuse this with sidechain level; it changes the track being processed.
Output Trim
Output Trim sets post-processing output level. [1]
- Range: -∞ to +24 dB [1]
Waves notes that positive Output Trim is one case where the output limiter can be useful. The manual does not publish a factory default.
Follow SC
Follow SC determines whether Resolve’s reduction depends on an active sidechain event. [1]
- Range: On / Off
- Default: On [1]
With Follow SC On, reduction follows the sidechain and stops when the conflict/source is absent. With it Off, reduction can persist even without incoming sidechain audio, which Waves compares to a more conventional dynamic-EQ-style behavior. [1]
Attack
Attack controls how quickly attenuation begins after sidechain activity appears. [1]
- Range: 0–1000 ms [1]
The manual offers qualitative working zones: fast around 0–10 ms, medium around 30–80 ms, and slow above 100 ms. Those are vendor suggestions, not hard mode boundaries. [1]
No factory default is published in the retrieved guide.
Release
Release controls how quickly attenuation stops after sidechain activity disappears. [1]
- Range: 0–1000 ms [1]
Longer release settings smooth the return. The current guide does not publish a factory default.
Precision
Precision controls how narrow or broad Resolve’s frequency-specific cuts are. Waves describes higher values as more surgical/narrow and lower values as smoother/broader. [1]
- Range: 0–100 [1]
The guide warns that extreme choices can create phase/resonance concerns but does not publish a factory default.
Auto Make-Up Gain
Auto Make-Up Gain measures the input RMS and applies dynamic compensation based on Resolve’s gain reduction or boosting so output RMS more closely tracks input RMS. [1]
- Range: On / Off
- Default: Off [1]
That is a loudness-compensation feature, not proof that every processed moment is perceptually level matched. No independent loudness test was performed.
Studio component stereo modes
The normal/Studio component uses a Balance drop-down with three processing modes: [1]
- Linked — processing is driven by the sum of Left and Right.
- Split — Left and Right are processed individually.
- M/S — output processing amount can be distributed between Mid and Side based on the sidechain’s Mid/Side content. [1]
The manual notes that stereo sidechain input is not supported in Pro Tools for the Split workflow. Treat that as current Waves documentation, not a host test performed here. [1]
Live component Process Channel modes
Curves Resolve Live uses a different Process Channel menu: [1]
- Linked — reacts to the sum of Left and Right sidechain channels.
- Mid — reacts to Mid sidechain content.
- Side — reacts to Side content.
- Left — reacts to the left sidechain channel.
- Right — reacts to the right sidechain channel. [1]
This is a real component difference; do not present the Studio Balance menu and Live Process Channel menu as interchangeable labels.
Stereo Balance
The Studio stereo component includes a Stereo Balance control for shifting Resolve’s reduction focus toward Left/Right or Mid/Side. [1]
- Range: -100 to +100
- Availability: Studio stereo component only; not available in Live [1]
The current guide does not publish a factory default or a formal unit label beyond the numerical range.
Output Limiter
Limiter enables true-peak limiting on Resolve’s output. [1]
- Range: On / Off
- Ceiling: -0.1 dB [1]
Waves recommends it when boosting Output Trim. The manual does not say this replaces normal downstream mastering/true-peak management; treat it as an output safety control inside Resolve.
Advanced Controls Panel View/Hide
Advanced Controls Panel View/Hide expands or collapses the advanced control area. [1]
This changes interface visibility, not the stored values of Follow SC, timing, Precision, Auto Make-Up, stereo mode or Limiter.
Curves Resolve vs Curves Resolve Live
The current product page says the package includes Curves Resolve Live, a zero-latency version. Waves’ current technical table reports: [2]
- Resolve: 1087 samples at 44.1/48 kHz; 2175 samples at 88.2/96 kHz; 4351 samples at 176.4/192 kHz.
- Resolve Live: 0 samples at its supported rates in the table; Waves’ sample-rate notes list Live up to 96 kHz. [2]
Those are vendor-reported values, not host measurements. The Live component also changes the stereo-control set as described above and omits the Studio-only Stereo Balance control. [1]
Use Live when latency is the overriding constraint; use the normal component when its look-ahead/processing architecture and Studio-specific controls are appropriate. That last sentence is editorial workflow guidance, not a claim that one sounds better.
A practical starting workflow
This is a hypothetical narration-over-music edit, not a tested session or a preset.
Imagine a scene where a narrator speaks over a guitar-led music cue. One phrase is difficult to follow, but lowering the entire cue leaves the scene feeling empty. First decide what needs attention: the music's overall level, a particular musical accent, or competition around a few words. A clip-gain move or a different edit may answer that question without another plugin.
When frequency competition is the issue, place Resolve on the music and send the narration to its sidechain. The music is the processed track; the narrator is the reference. SC Audition lets you check the sidechain feed. Start with a restrained Main amount rather than treating a busy reduction graph as the goal. [1, pp.5,8,11]
Review the whole phrase, including the lead-in and the pause afterward. Did the words become easier to follow? Does the cue still support the scene? Does a musical accent now distract because it disappears and returns? These are listening questions to use during your own edit, not results established here.
Use Delta to examine the removed material, then return to the complete mix before deciding. Per-band reduction can narrow the part of the spectrum you ask to yield; it does not replace that listening decision. [1, pp.10,13]
For broader level movement, compare the named Unmask and Wide behaviors in Ducker mode. Do not follow a left/right or percentage instruction from this guide: the source discrepancy remains unresolved. [1, pp.11–12]
Keep a recoverable unprocessed version and compare at a similar listening level. Prefer the simpler treatment when it solves the problem. No universal amount, timing value or superiority claim follows from this example.
Practical uses and limits
Resolve is designed for masking between two or more mix elements: vocal versus music, kick versus bass, dialogue versus score, or any case where a priority source should trigger space in another track. [1][2]
It is not a conventional static EQ replacement in every case. Normal Resolve processing depends on a sidechain relationship, and many of its controls shape where and when attenuation follows that signal. Follow SC Off and learned/frozen states can make behavior steadier, but those are still Resolve workflows rather than a hand-drawn EQ curve. [1]
The manual does not publish numerical defaults for every macro/detail control (including Tilt Gain, Tilt Anchor, filters, Attack, Release, Precision, trims, crossovers and Stereo Balance), nor does it enumerate every current Sidechain Content menu item. Those missing values are left unspecified rather than inferred from screenshots.
Related guides and plugins
The live Waves F6 guide is the closest existing site reference for frequency-selective dynamic processing, but F6 is a user-defined dynamic EQ rather than Resolve’s sidechain-driven unmasking system. The live Vocal Rider guide covers automatic vocal-level riding, a different task from carving competing frequencies.
The Waves Curves AQ guide explains how AQ learns a track and suggests EQ curves. Resolve listens to a competing track to find where to make space. For Curves Equator, see the Waves product overview. The Waves Audio Post Resources hub collects more Waves guides.
Bottom line
Curves Resolve is a conflict-management processor whose main decision is not simply “how much EQ?” but “what should this track make room for, where, and how dynamically?” The sidechain Tilt/filters shape what Resolve listens to, Learn/Freeze/Scan create steady profiles, the four bands constrain reduction, Dynamic/Steady changes temporal behavior, and Ducker can move between frequency-aware Unmask and broad Wide ducking. [1]
This is a documentation-based control reference, not an installed-version test. The Ducker slider’s numerical mapping remains unresolved in the sources. Where the manual omits a range, default or complete menu inventory, that information remains unspecified here. [1]
Sources
Checked September 20, 2026. No listening, host, CPU, sidechain-routing or latency measurement was performed.
- Waves Curves Resolve User Guide, especially pp. 5–16. Official interface/control pages 6, 11, 12 and 16 were directly screenshot-inspected in this writing pass.
- Waves Curves Resolve product page, current feature and technical data including Resolve Live and vendor latency/sample-rate specifications.
- Waves Graphic Library, current Curves Resolve product-image entry and attribution/backlink condition.
October 7, 2026 targeted check: the Ducker percentage/label discrepancy was reviewed; this does not represent a fresh verification of the whole manuscript or control matrix.
Frequently Asked Questions
Which track should contain Curves Resolve?
Place it on the track that needs to make room. For narration over music, process the music and send the narration to the sidechain, not the other way around.
Will sidechain filtering change the narrator’s sound?
It changes the signal Resolve uses for detection, not the narrator’s audible track. Use the sidechain filters to choose what should influence the processing.
Why is Dynamic / Steady unavailable?
The slider needs a stored profile. Learn creates an average; Freeze captures a moment. Unfreezing without an earlier learned profile disables the blend again.
Should narration always use Wide ducking?
No. Wide lowers the music broadly; Unmask targets conflicting frequencies. Choose the behavior that serves the edit, rather than assuming every voice needs the same treatment.
Are SC Audition and Delta the same thing?
No. SC Audition plays the sidechain input. Delta plays what Resolve removes from the processed track. They answer different questions: what drives the detector, and what is being taken away?
Can I skip Resolve when the mix already works?
Yes. A simpler level adjustment or an arrangement change may be enough. Compare intelligibility and musical balance in the finished scene; processing is not a requirement, and this guide reports no listening comparison.
About the Author
Joseph Nilo has been working professionally in all aspects of audio and video production for over twenty years. His day-to-day work finds him working as a video editor, 2D and 3D motion graphics designer, voiceover artist and audio engineer, and colorist for corporate projects and feature films.